





A Short Overview of the Article
This article provides an overview of the Form Component Control in Dynamics 365 and Power Apps, explaining how it addresses the limitations of "Quick View" forms. It shows how users can embed an editable related record directly within a main form, reducing the need to navigate between records.
Using a practical example of editing a "Contact" from an "Account" form, the article walks through the setup process, key benefits, limitations, security considerations, and common use cases.
Overall, it highlights how Form Components can simplify data entry, improve user experience, and replace some older custom JavaScript solutions with a no-code approach.
A Short Reference About the Author
Stanislav is a highly accomplished Dynamics 365 Consultant, bringing extensive practical experience across Dynamics 365, Power Platform, Azure, AI, and the broader Microsoft technology ecosystem.
Introduction
If you have spent any time building forms in Dynamics 365 or Power Apps, you have probably hit this problem: you need to show the data from a related table right on the form you're working on. The go-to tool has always been a "Quick View" form. You add it through a lookup column, pick up a few fields from the related record, and they show up on your form.
It works fine until someone needs to change something. Everything on a "Quick View" is read-only. So, if a user is looking at an account and notices the contact's phone number is wrong, they cannot just fix it there. They have to leave the account, open the contact, edit the field, save, and go back. It's not a big deal once. It's annoying when it happens fifty times a day.
That is the gap Microsoft filled with the Form component control. The easiest way to describe it: a form inside a form, not a preview, not a read-only snapshot, an actual embedded form of the related table where fields can be edited on the spot.
Quick View vs. Form Component
A "Quick View" form only shows data. There is no editing, and customization is fairly limited. You will not get far trying to squeeze a subgrid or anything complex into one.
A "Form" component embeds a whole main form from the related table. That means its tabs come with it, and any quick view controls sitting on that form come with it, even the timeline if there is one. And every field on it can be edited directly, no popup, no separate screen.
You can see this difference on the form itself. Fields on a "Quick View" have a little padlock next to them. On a "Form" component, there is no padlock, because the field is not locked.
A few things it does not do, though:
-
It only works with the main forms.
-
"Quick Create," "Quick View," and "Card" forms are not supported for use as embedded forms.
-
Business process flows on either form are not fully reliable inside a component yet. It is reasonable to avoid combining the two.
-
No nesting. A "Form" component cannot contain another Form component.
-
Canvas apps cannot be embedded inside it either.
Walking Through: Editing a Contact from the Account Form
Here is a scenario most people who have touched Dynamics 365 Sales or Customer Service will recognize. On the "Account" form, you want to see the primary contact and be able to fix its details without navigating away.
Step 1. Check that the contact's form is a "Main form".
The component only accepts "Main forms". So, do the following:
-
Open your solution.
-
Go to the "Contact" table.
-
Click on the "Forms" and confirm the form you want is typed as "Main" (the default "Contact" form usually is).
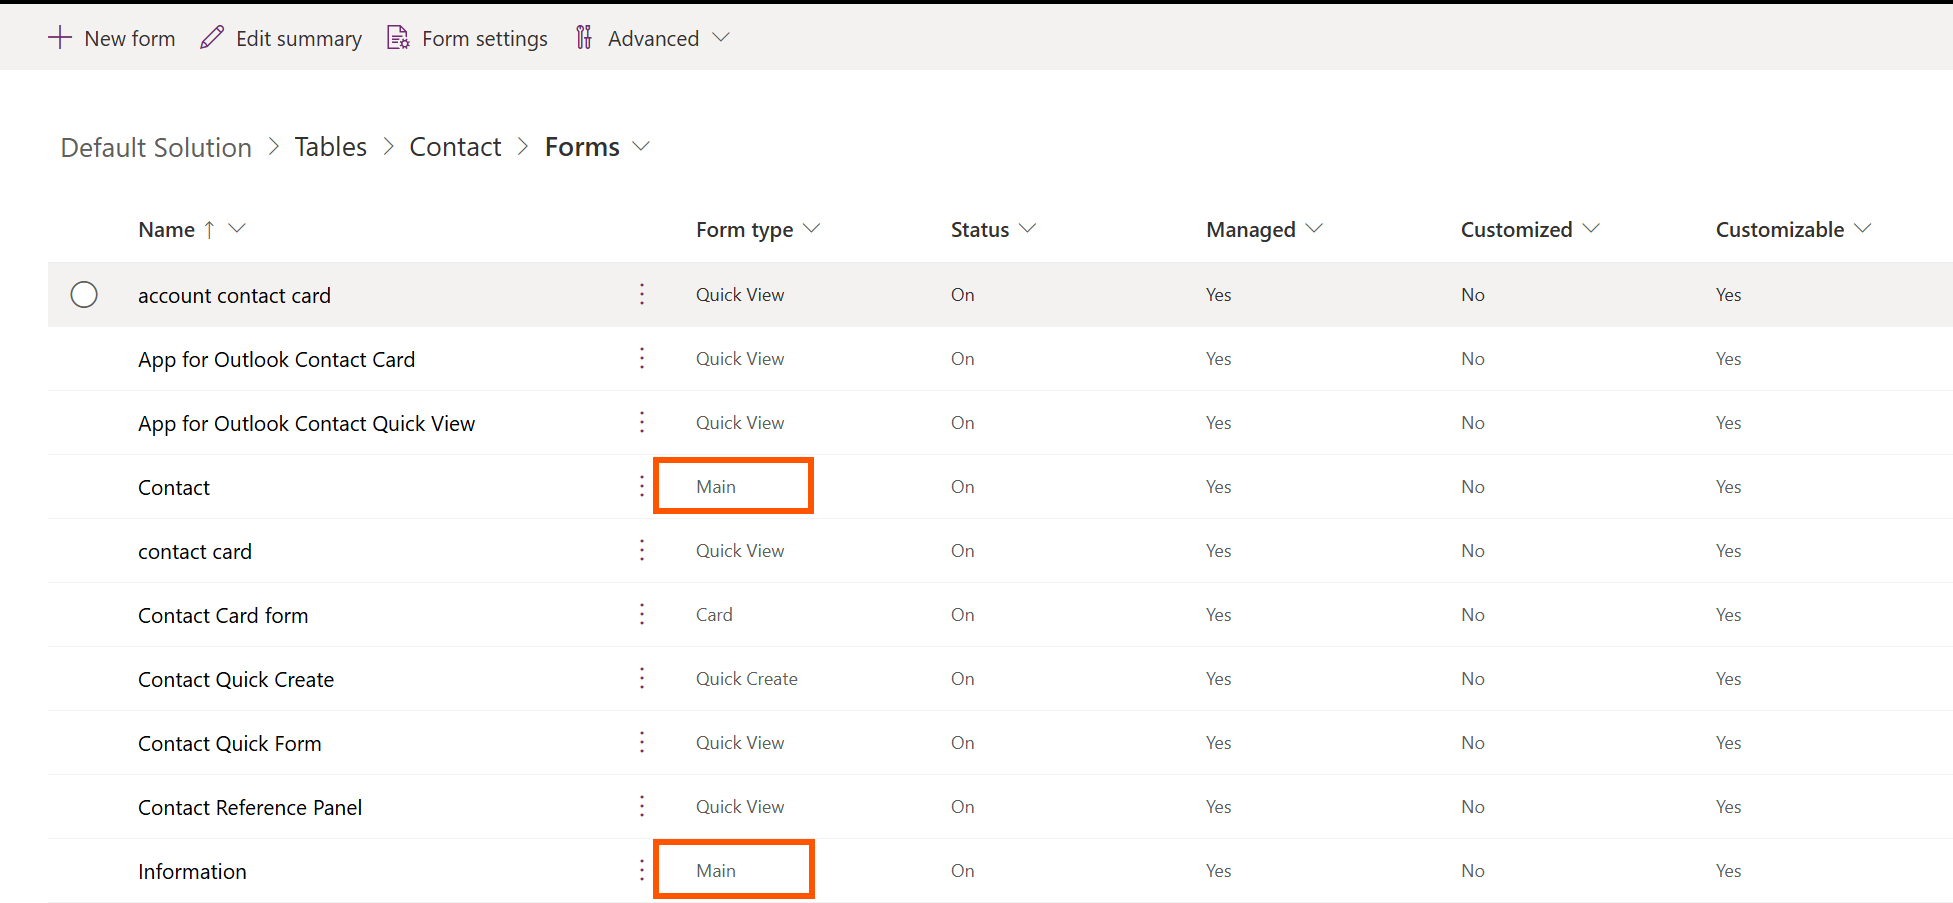
! Note. If the full contact form is too big, and you would rather show three fields instead of thirty, do not try to reuse a "Quick View" or "Quick Create" form for this. The component will not take them. Build a dedicated main form instead.
Step 2. Add the component to the "Account" form.
Go through the following:
-
Open the "Account" table.
-
Go to the "Forms", pick the "Main form", and open it in the "Designer".
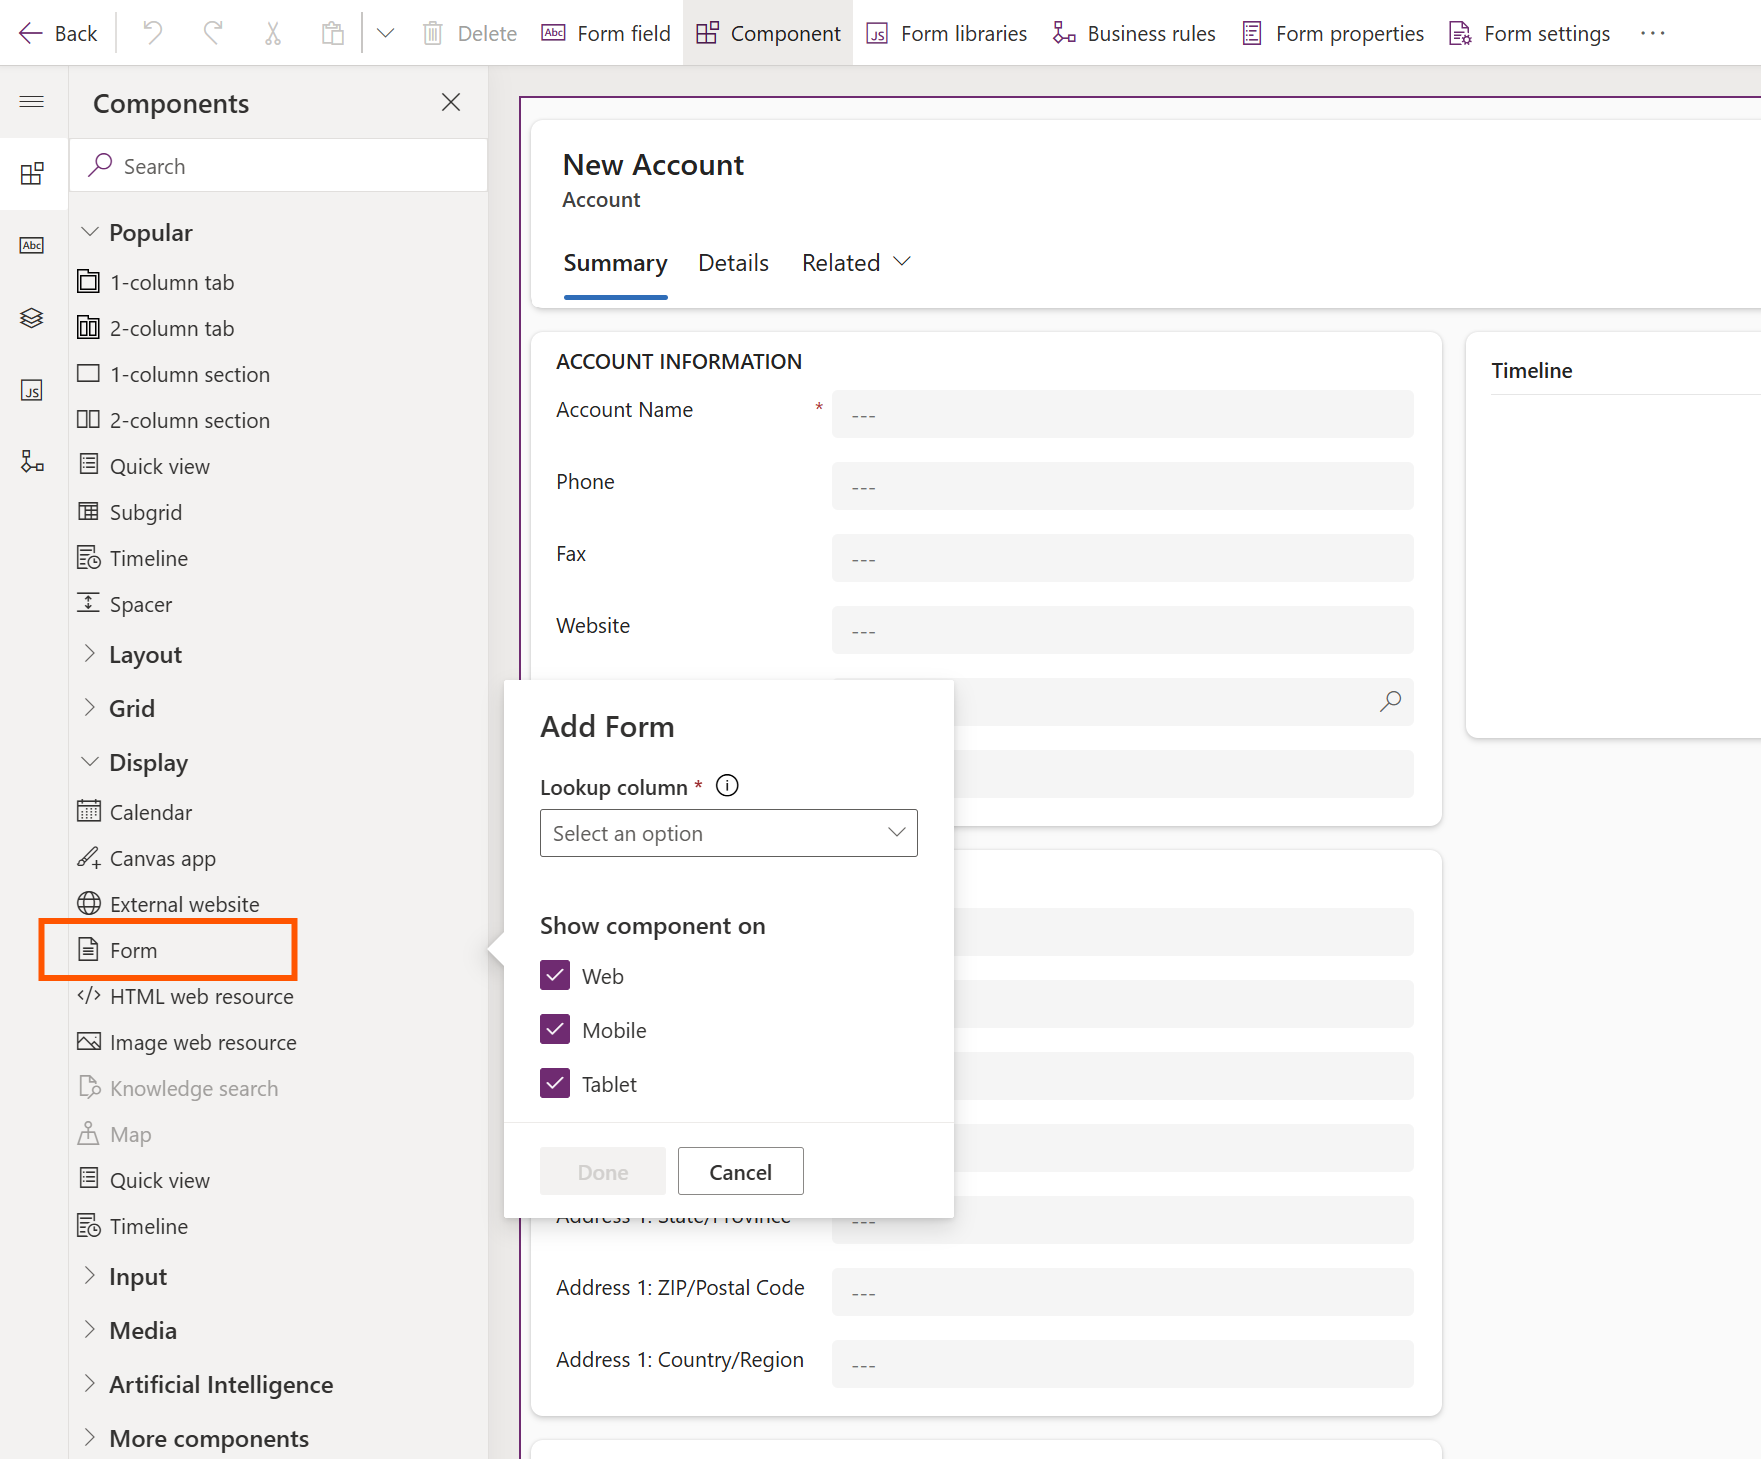
! Note. Pick the tab where the contact block should live, an existing one or a new tab you add yourself, then click on the "+ Component" and choose the "Form" component.
Step 3. Point it at the right data.
You will be asked for three things:
-
Look up the column.
-
Look up the field on the "Account" that defines the relationship (for example, the "Primary Contact") and the "Related" table.
-
Choose the table form you are embedding (the "Contact").
After that, create the exact main form to show.
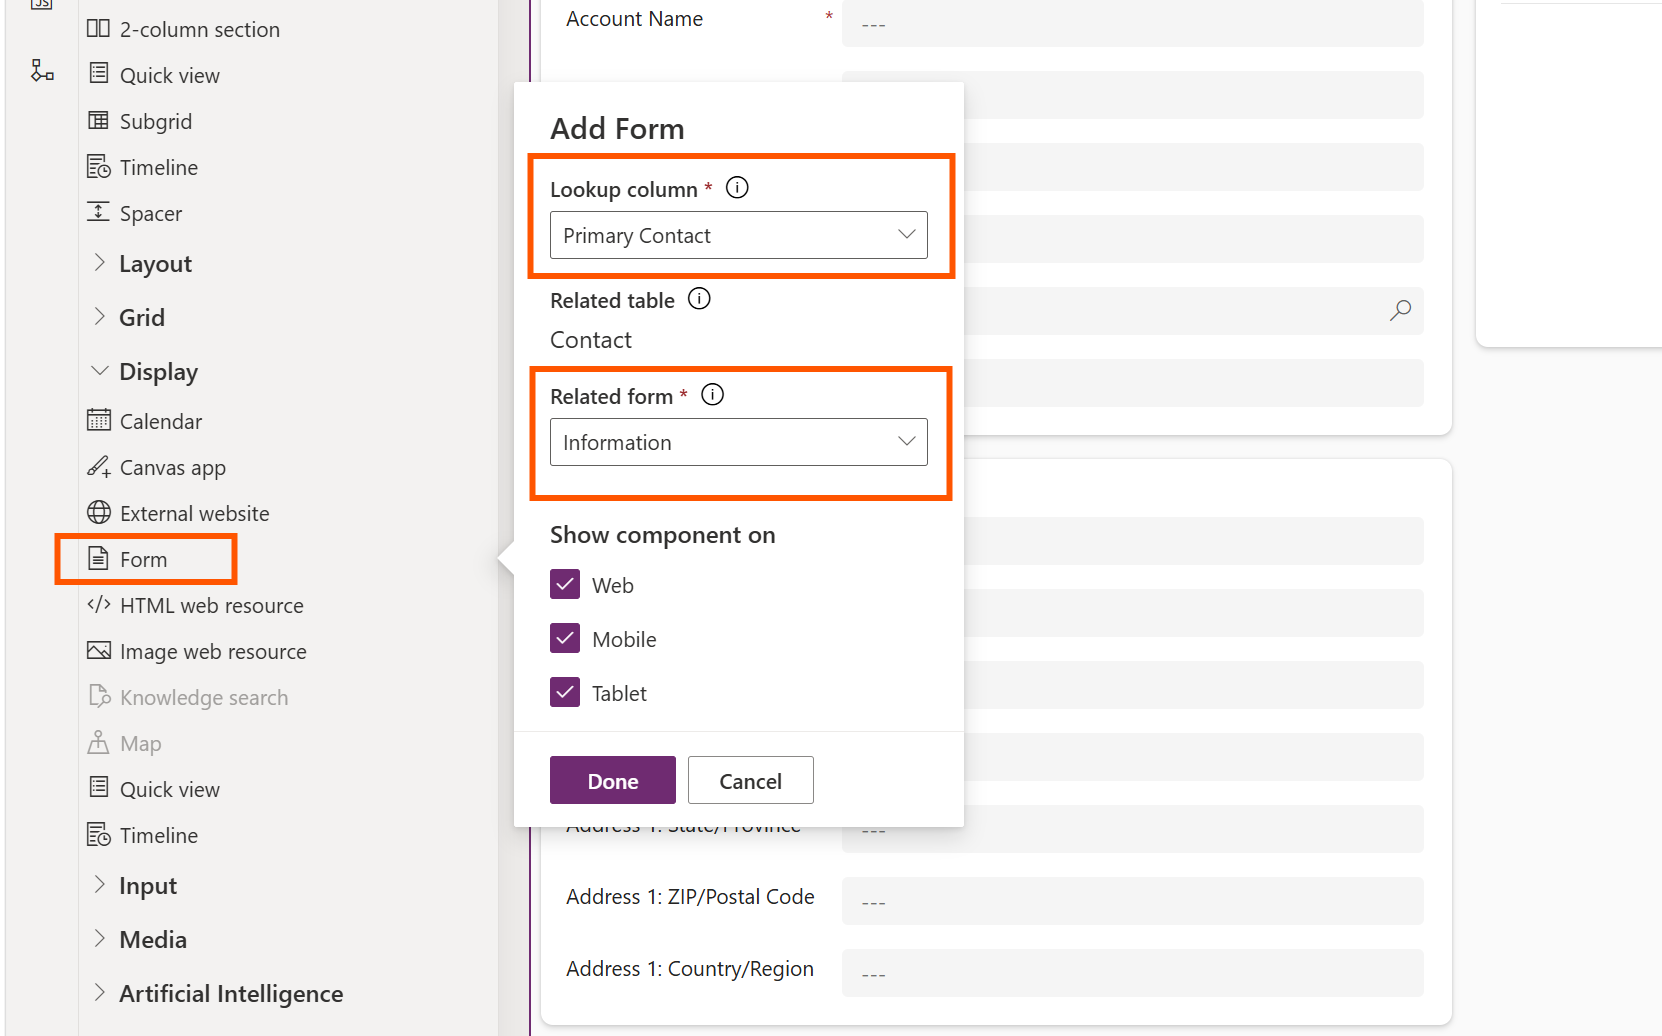
! Note. You can also set a height for the block and decide whether to show a label. It is reasonable to turn the label off, as it tends to look more natural as part of the account form instead of a separate labeled box sitting on top of it.
Step 4. Save, publish, and check it out.
Save, publish, then open any account that has a primary contact set. You will see the contact form sitting right there, the fields editable, the tabs intact, and the timeline included if the form has one.
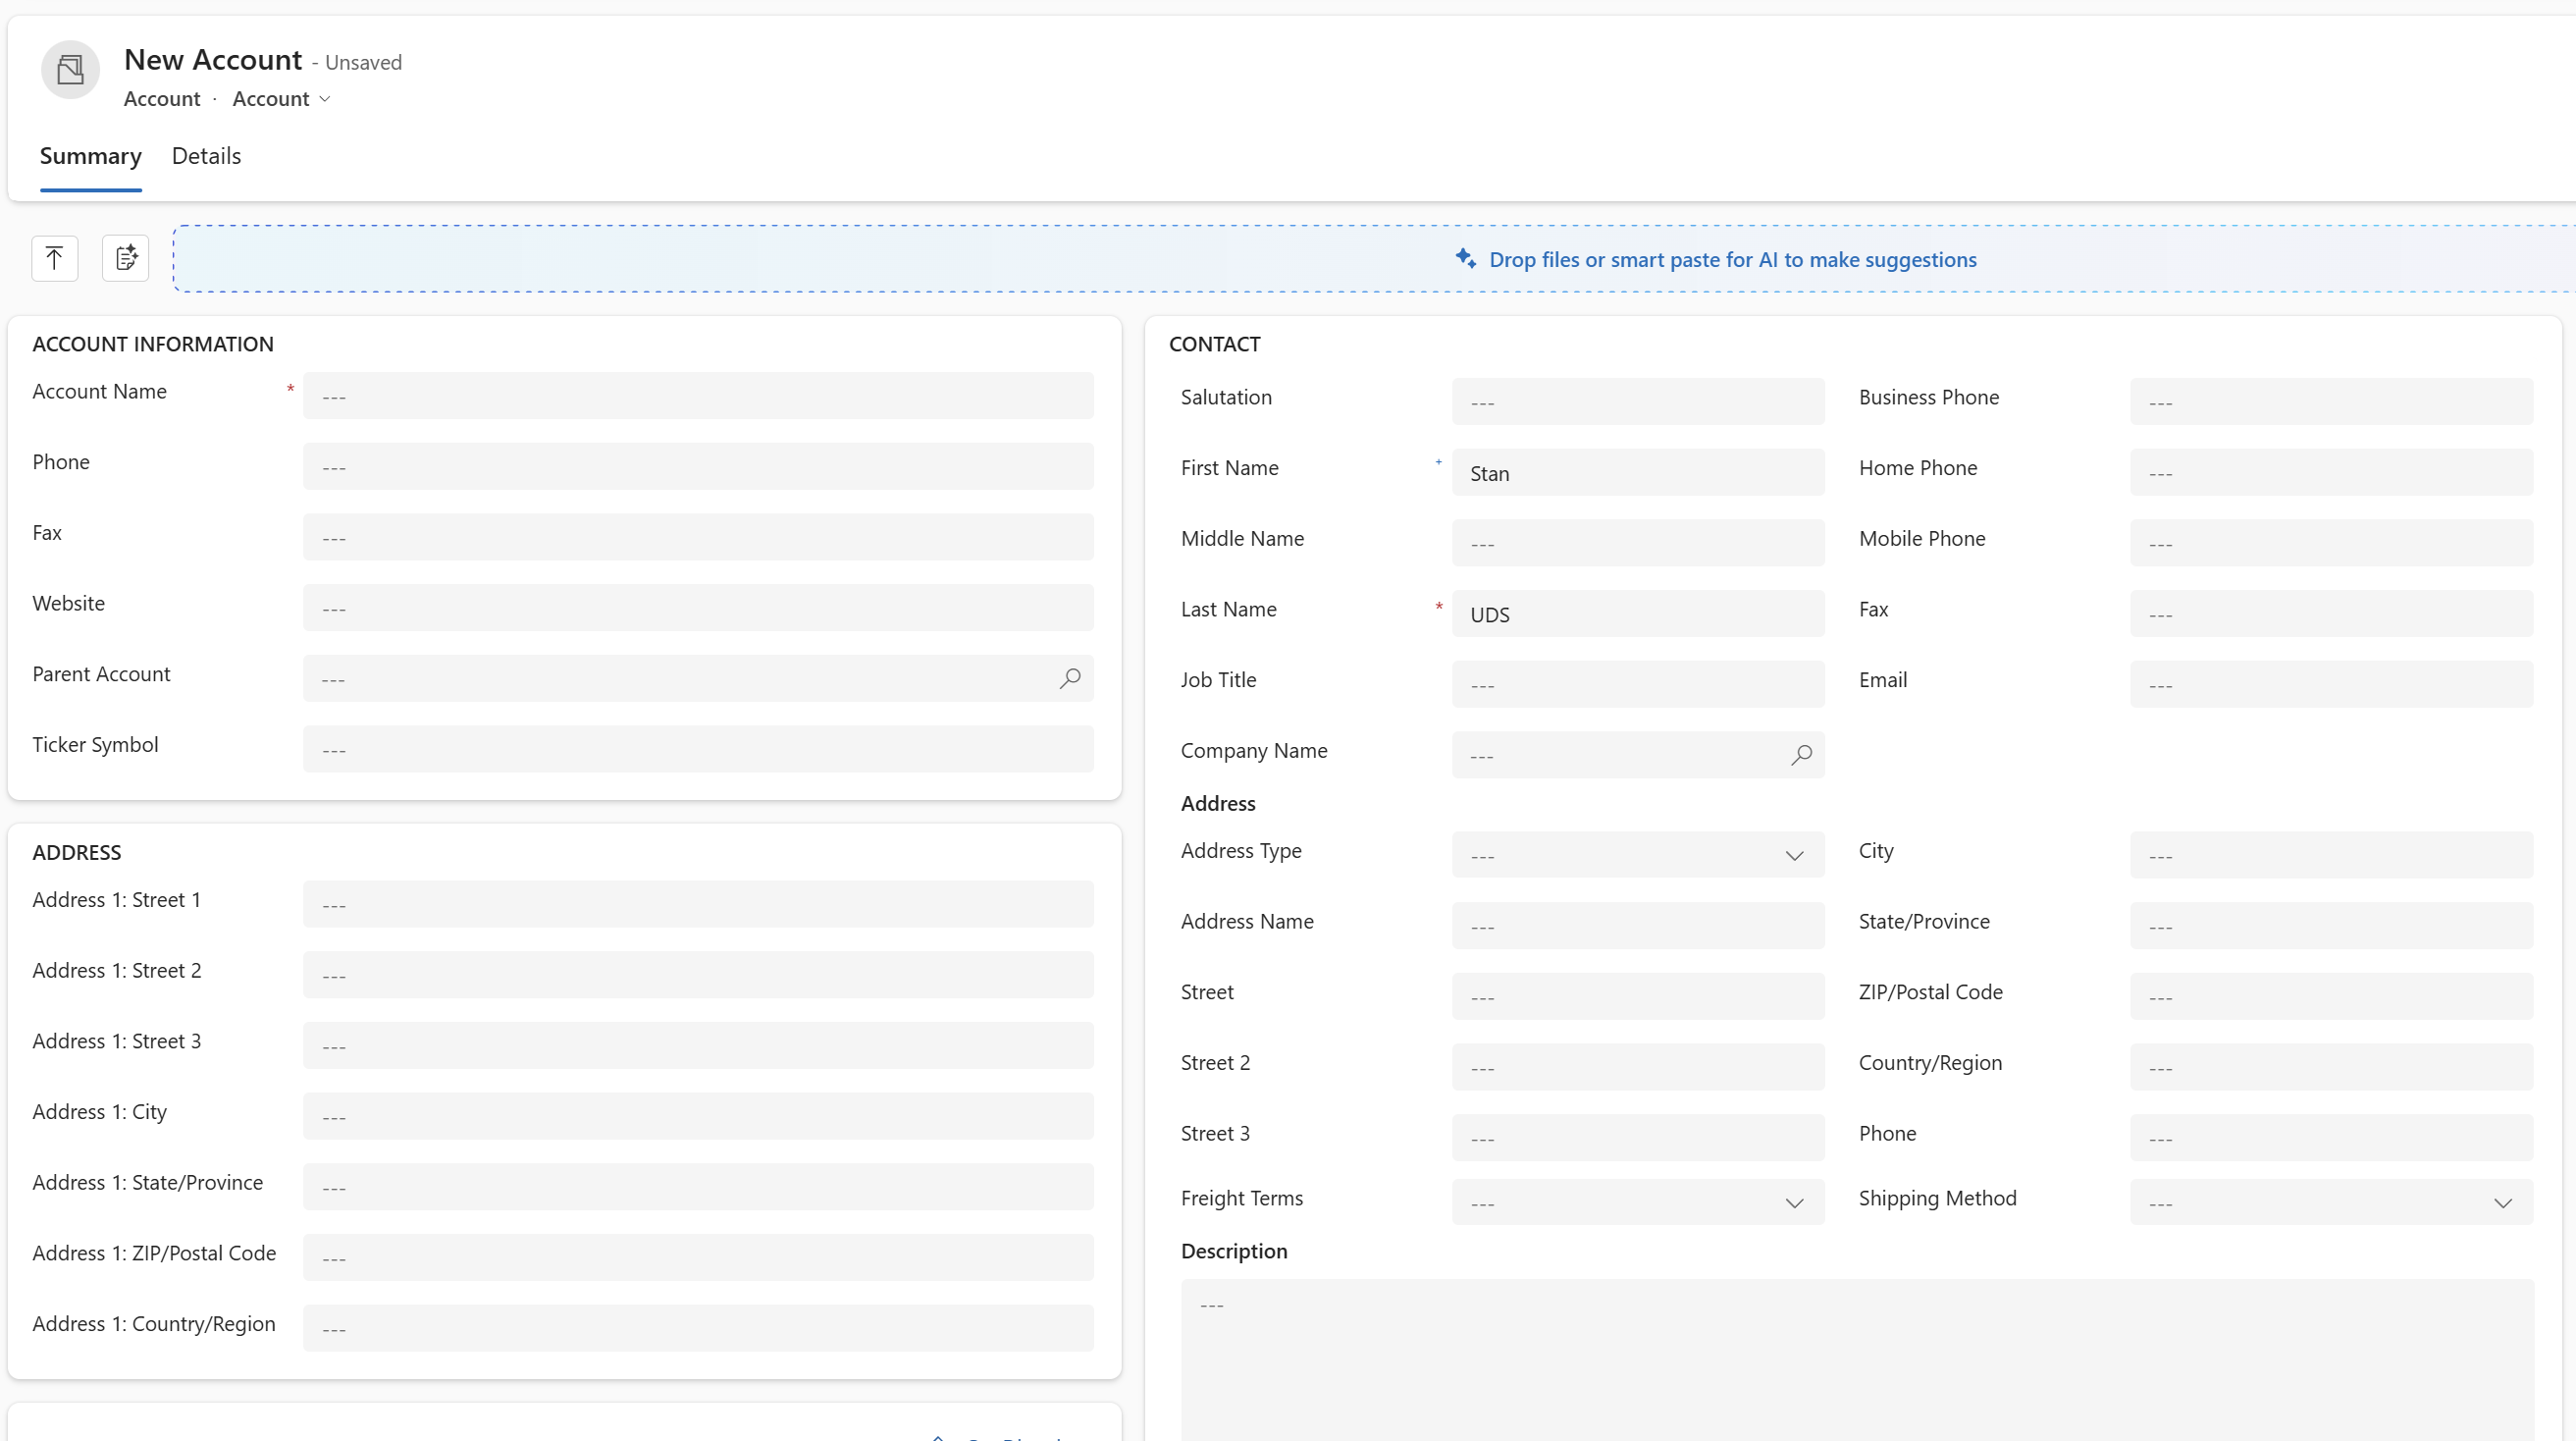
Now, go ahead and change the phone number right there, then save the account. It updates the contact record directly, with no extra tab and no extra click.
When you Only Need One Field
Here is a case that comes up more than you would expect: you do not want the whole related form, just one field from it. Building an entire component for a single field seems overkilled at first, but this is exactly where it shines.
The trick is to make a new main form on the related table with nothing on it but that one field. Then embed that form through the "Form" component on the parent form. What you get is a field that sits on the form, looking completely native, with no box around it, no "Contact" form label, and nothing to suggest. It is technically coming from a different record.
! Note. If there is a column "Security" profile on that field, it still applies inside the embedded form. The same restrictions apply as if the user opened the "Contact" record directly. The field does not quietly bypass security just because it is showing up through a component. That is genuinely useful when part of your data has to stay hidden from certain roles while the form itself is something everyone can open.
Where it Comes in Handy
There are a couple of situations when it is useful:
-
Forming parent-child pairs where the child is needed immediately; a case and its related "Contact"; an order and a customer address; an "Application" and an "Applicant"; anywhere the user should not have to jump to a second record for one field
-
Getting rid of an old custom code
! Note. There are plenty of solutions where a similar effect was built with JavaScript pulling data through the Web API and rendering custom fields on the form. That is a maintenance headache. Now, the same result is a configuration, not code, which is reasonable enough to look at retiring some of those older customizations.
-
Speeding up the repetitive data entry
! Note. If someone is processing dozens of similar records for a shift, each extra tab click adds up. It may not seem substantial at first, but it adds up quickly when multiplied across a few hundred records each day.
What to Keep in Mind
This is not a one-size-fits-all replacement for everything. If an account can have several related contacts, a "Form" component will not help. It only shows one related record through a lookup, not a list. Subgrids are still the tool for that.
Security matters, too. Users only see and edit what their permissions on the related table allow. No access to the contact record means the component either shows nothing or shows it "read-only", depending on how security is set up. It makes sense in hindsight, but it is easy to forget until it trips someone up.
Conclusion
Form component control closes the gap that has existed for a while between "just show me the data" and "open a whole separate form for one field."
It takes a few minutes to configure, no code required, and it makes forms noticeably nicer to work with day-to-day. If your system has forms full of links pointing to related records to expose a field or two, it is worth trying this instead and seeing whether it actually makes things easier.
Frequently Asked Questions
The Form Component Control allows you to embed an editable main form from a related table directly into another form. Unlike a “Quick View” form, users can edit the related record without opening it separately.
A “Quick View” form is read-only and is mainly used to display selected information from a related record. A Form Component embeds a full main form and allows users to edit its fields directly within the parent form.
Yes. You can create a dedicated main form on the related table containing only the field you need and then embed it using the Form Component. This can make a single related field appear naturally on the parent form.
Form Components only support main forms and cannot be nested inside another Form Component. They also do not support “Quick Create”, “Quick View”, or “Card” forms as the embedded form. In addition, they display only one related record through a lookup, so subgrids are still needed when multiple related records must be shown.
Related Content
UDS Blog articles: