Introduction
Who has not heard about Microsoft Dynamics' magical Business Rules tool? For anyone working with Dynamics 365, Business Rules are a game-changer. They allow users to create and enforce rules and logic within forms without writing a single line of code. They offer a simple yet powerful way to enhance the functionality of your Dynamics environment, making it easier to implement consistent business processes and ensure data integrity.
Business Rules are designed to streamline decision-making processes within your organization by automating tasks that would otherwise require custom code or complex workflows. Whether it is setting default values, validating data, or showing and hiding fields based on specific criteria, Business Rules supplies a user-friendly interface to accomplish these tasks with just a few clicks.
In this article, we will explore Business Rules and find out why it is so valuable. We will also guide you through the steps to create one. Eventually, you will clearly understand how to utilize this mighty feature to perfect your Dynamics 365 experience.
What are Business Rules?
For those who are not quite familiar with this tool, let me briefly explain what Business Rules are in Microsoft Dynamics 365. Business Rules are a feature that allows users to apply logic and automation directly within forms, without needing to write any code. These rules help ensure that data is entered correctly and consistently, and they can automatically perform tasks based on specific conditions. Essentially, Business Rules provide a way to enforce your organization's policies and procedures within the Dynamics environment.
At their core, Business Rules work by setting up conditions that, when met, trigger specific actions. For example, a Business Rule can automatically hide or show fields, set default values, or validate data to ensure that it meets certain criteria. This allows you to create a more guided and user-friendly experience, helping users enter data accurately and follow the necessary business processes.
One of the primary pluses of Business Rules is their accessibility. They are constructed to be user-friendly, letting non-developers build and govern rules through a visual interface. This means that even those without programming knowledge can define important business logic, making it easier to adapt your Dynamics 365 environment to meet changing business needs.
Requirement
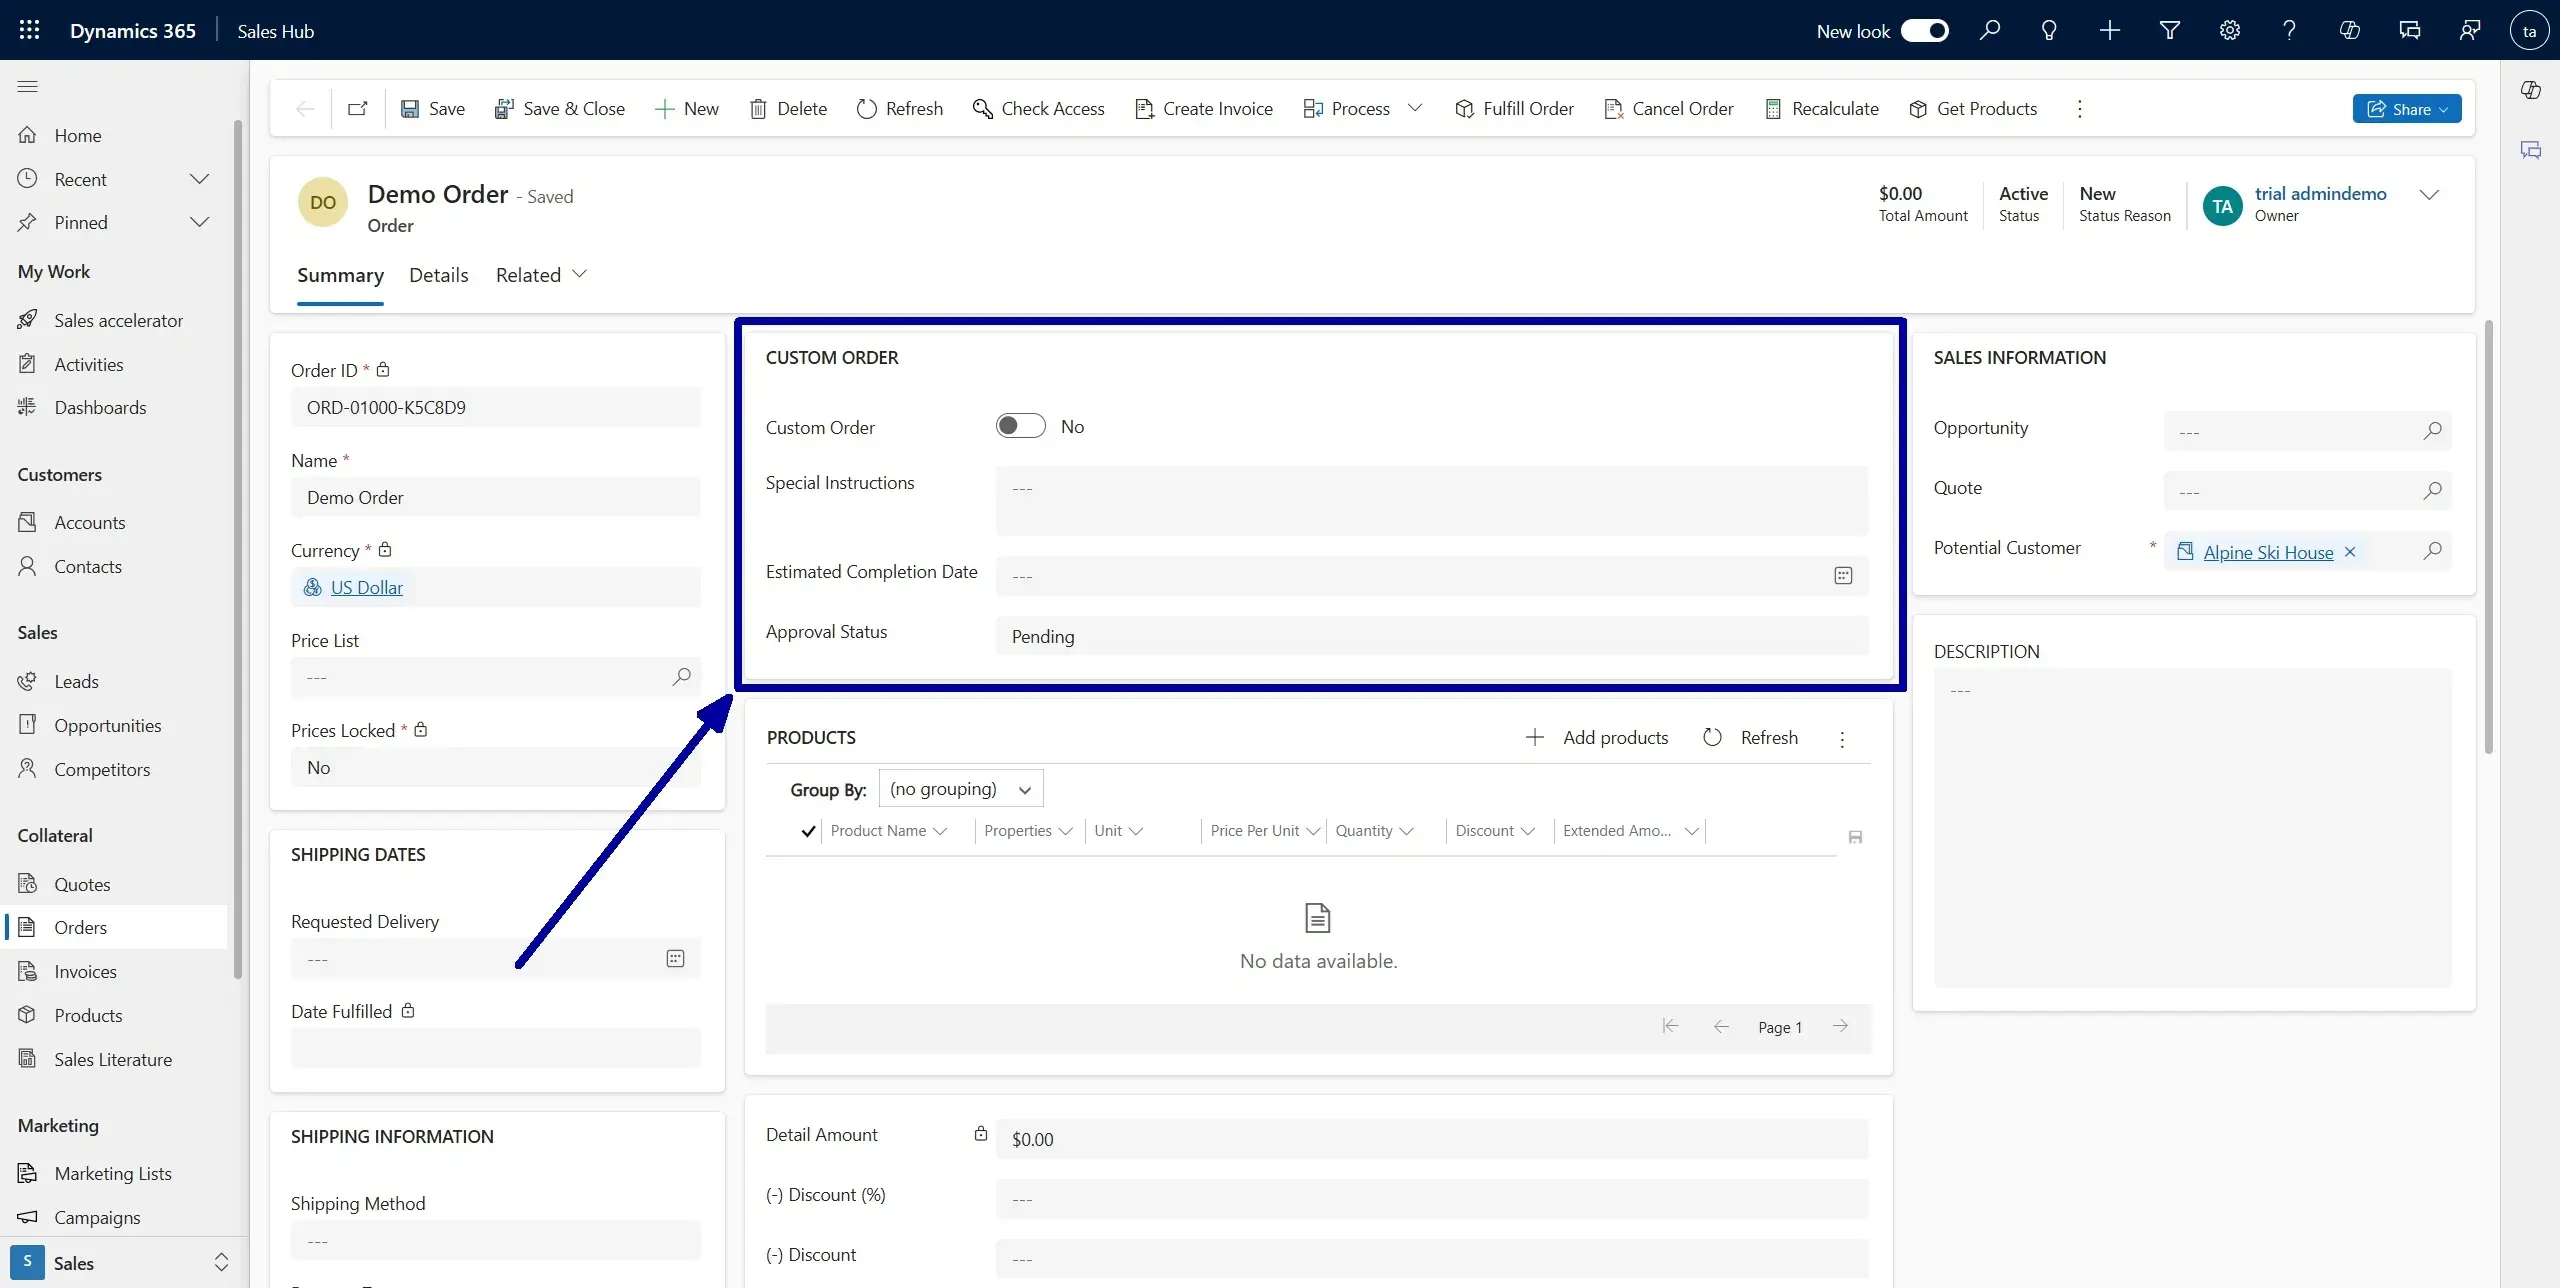
Imagine a company that frequently processes different types of orders, including standard and custom orders. The company wants to ensure that when a “Custom Order” option is selected, three additional fields (Special Instructions, Estimated Completion Date, and Approval Status) are displayed to capture detailed information. However, these fields should remain hidden for standard orders to keep the form simple and uncluttered.
The "Special Instructions" field is a multiline text field. The "Estimated Completion Date" field is a date picker field, and the "Approval Status" option is set with Pending/Approved/Rejected values.
Step by Step Instructions
Since you are likely to be already familiar with Dynamics 365 customization, let us assume that your Order form is prepared and contains all the necessary fields.
Now, you have two options to view, edit, or create a Business Rule:
Power Apps
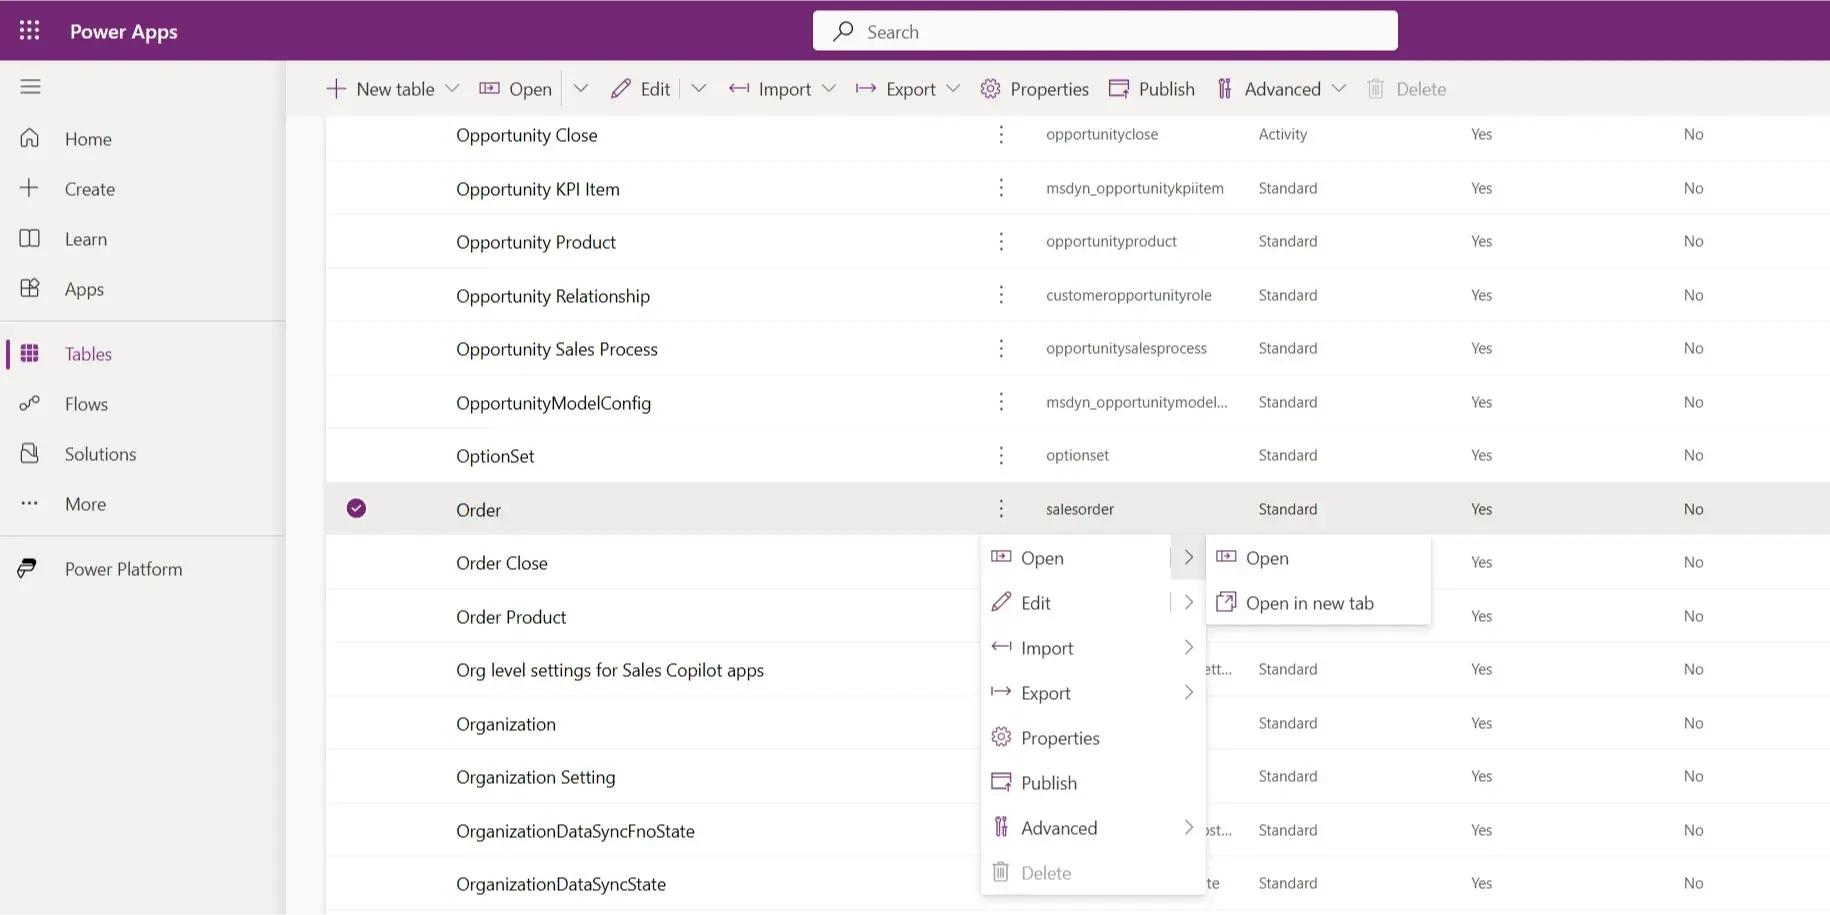
1. Open Power Apps by visiting https://make.powerapps.com/, after that, select the environment you are working in. Then, navigate to the Tables section in the left-hand navigation pane and open the Order table
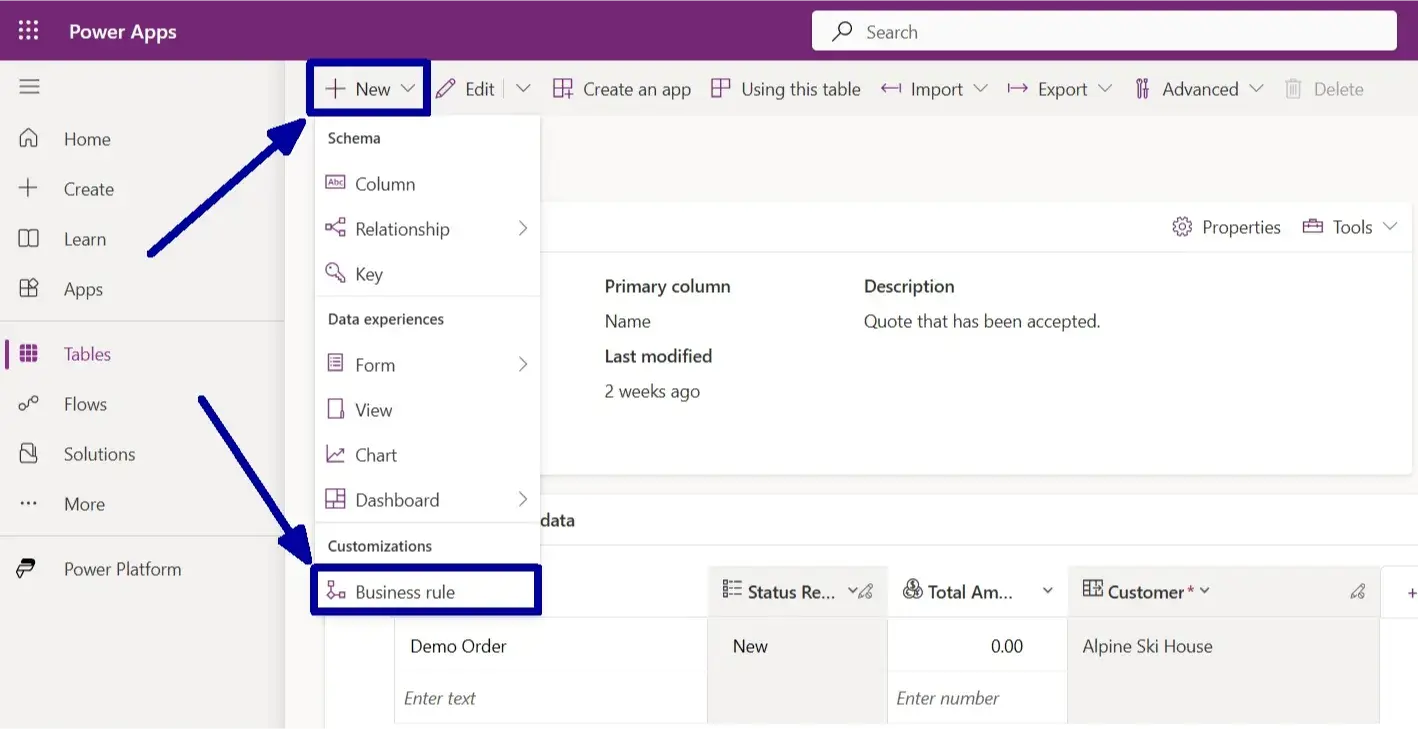
2. On the next page, open the “+ New” dropdown and choose the “Business Rule” option.
Form Designer
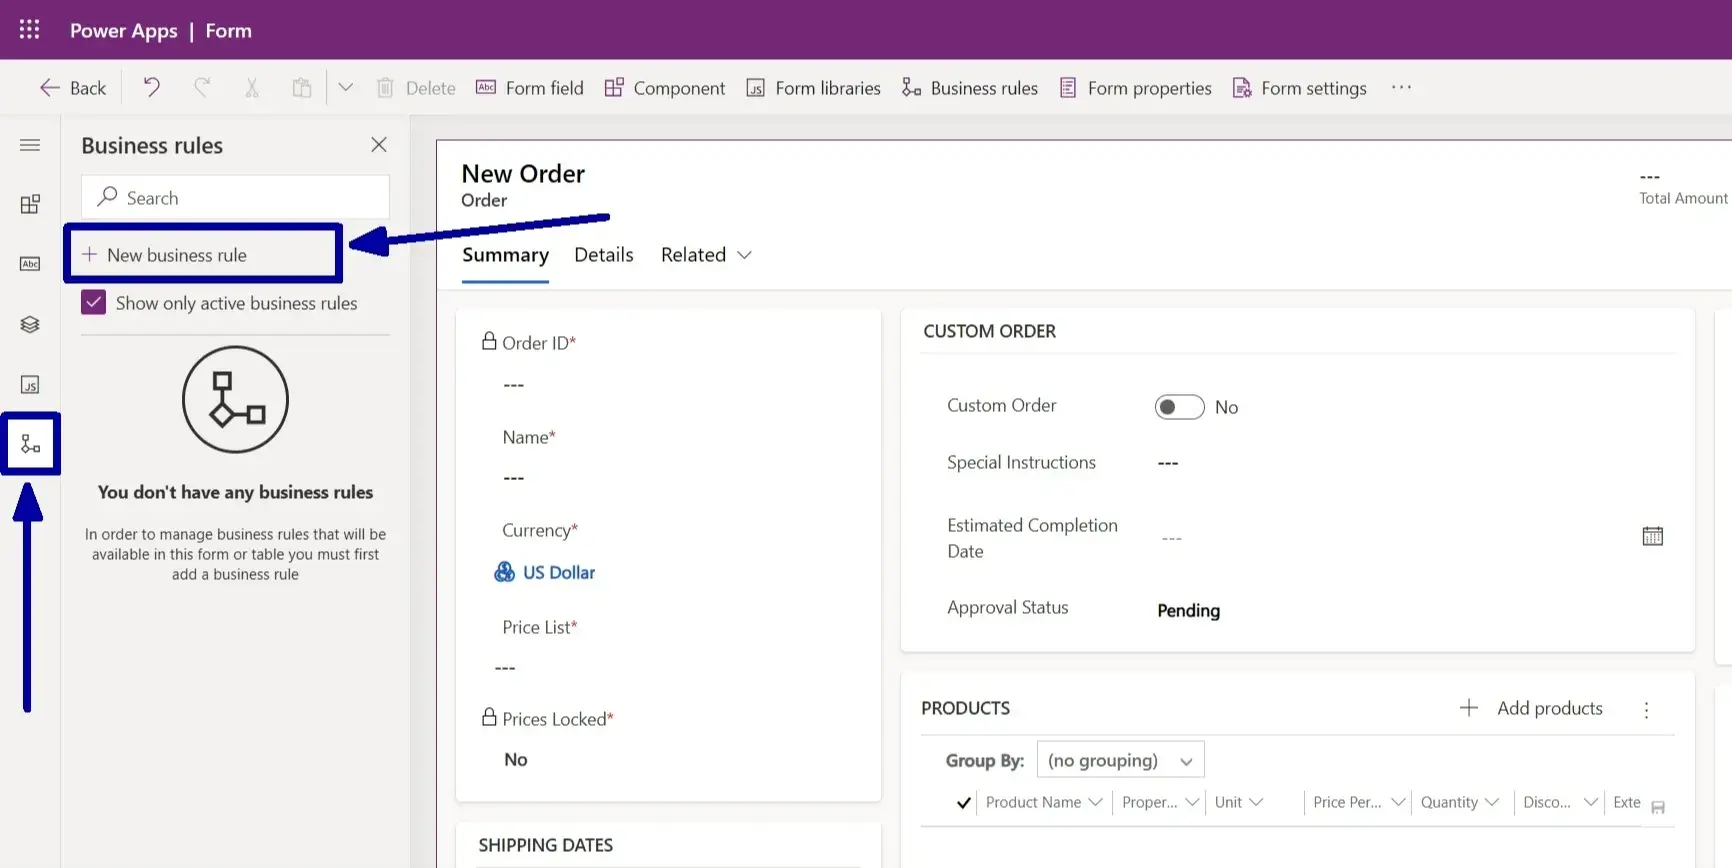
1. On the form designer left navigation pane, opt for the “Business rule” item, then click on the ‘+ New business rule’ option.
In both cases, you are to arrive at the Business Rule Designer Page. Once there, you need to complete two steps:
- Open the dropdown to give this Business rule a name and description (1).
- Select the form you want this rule to be applied to (2).
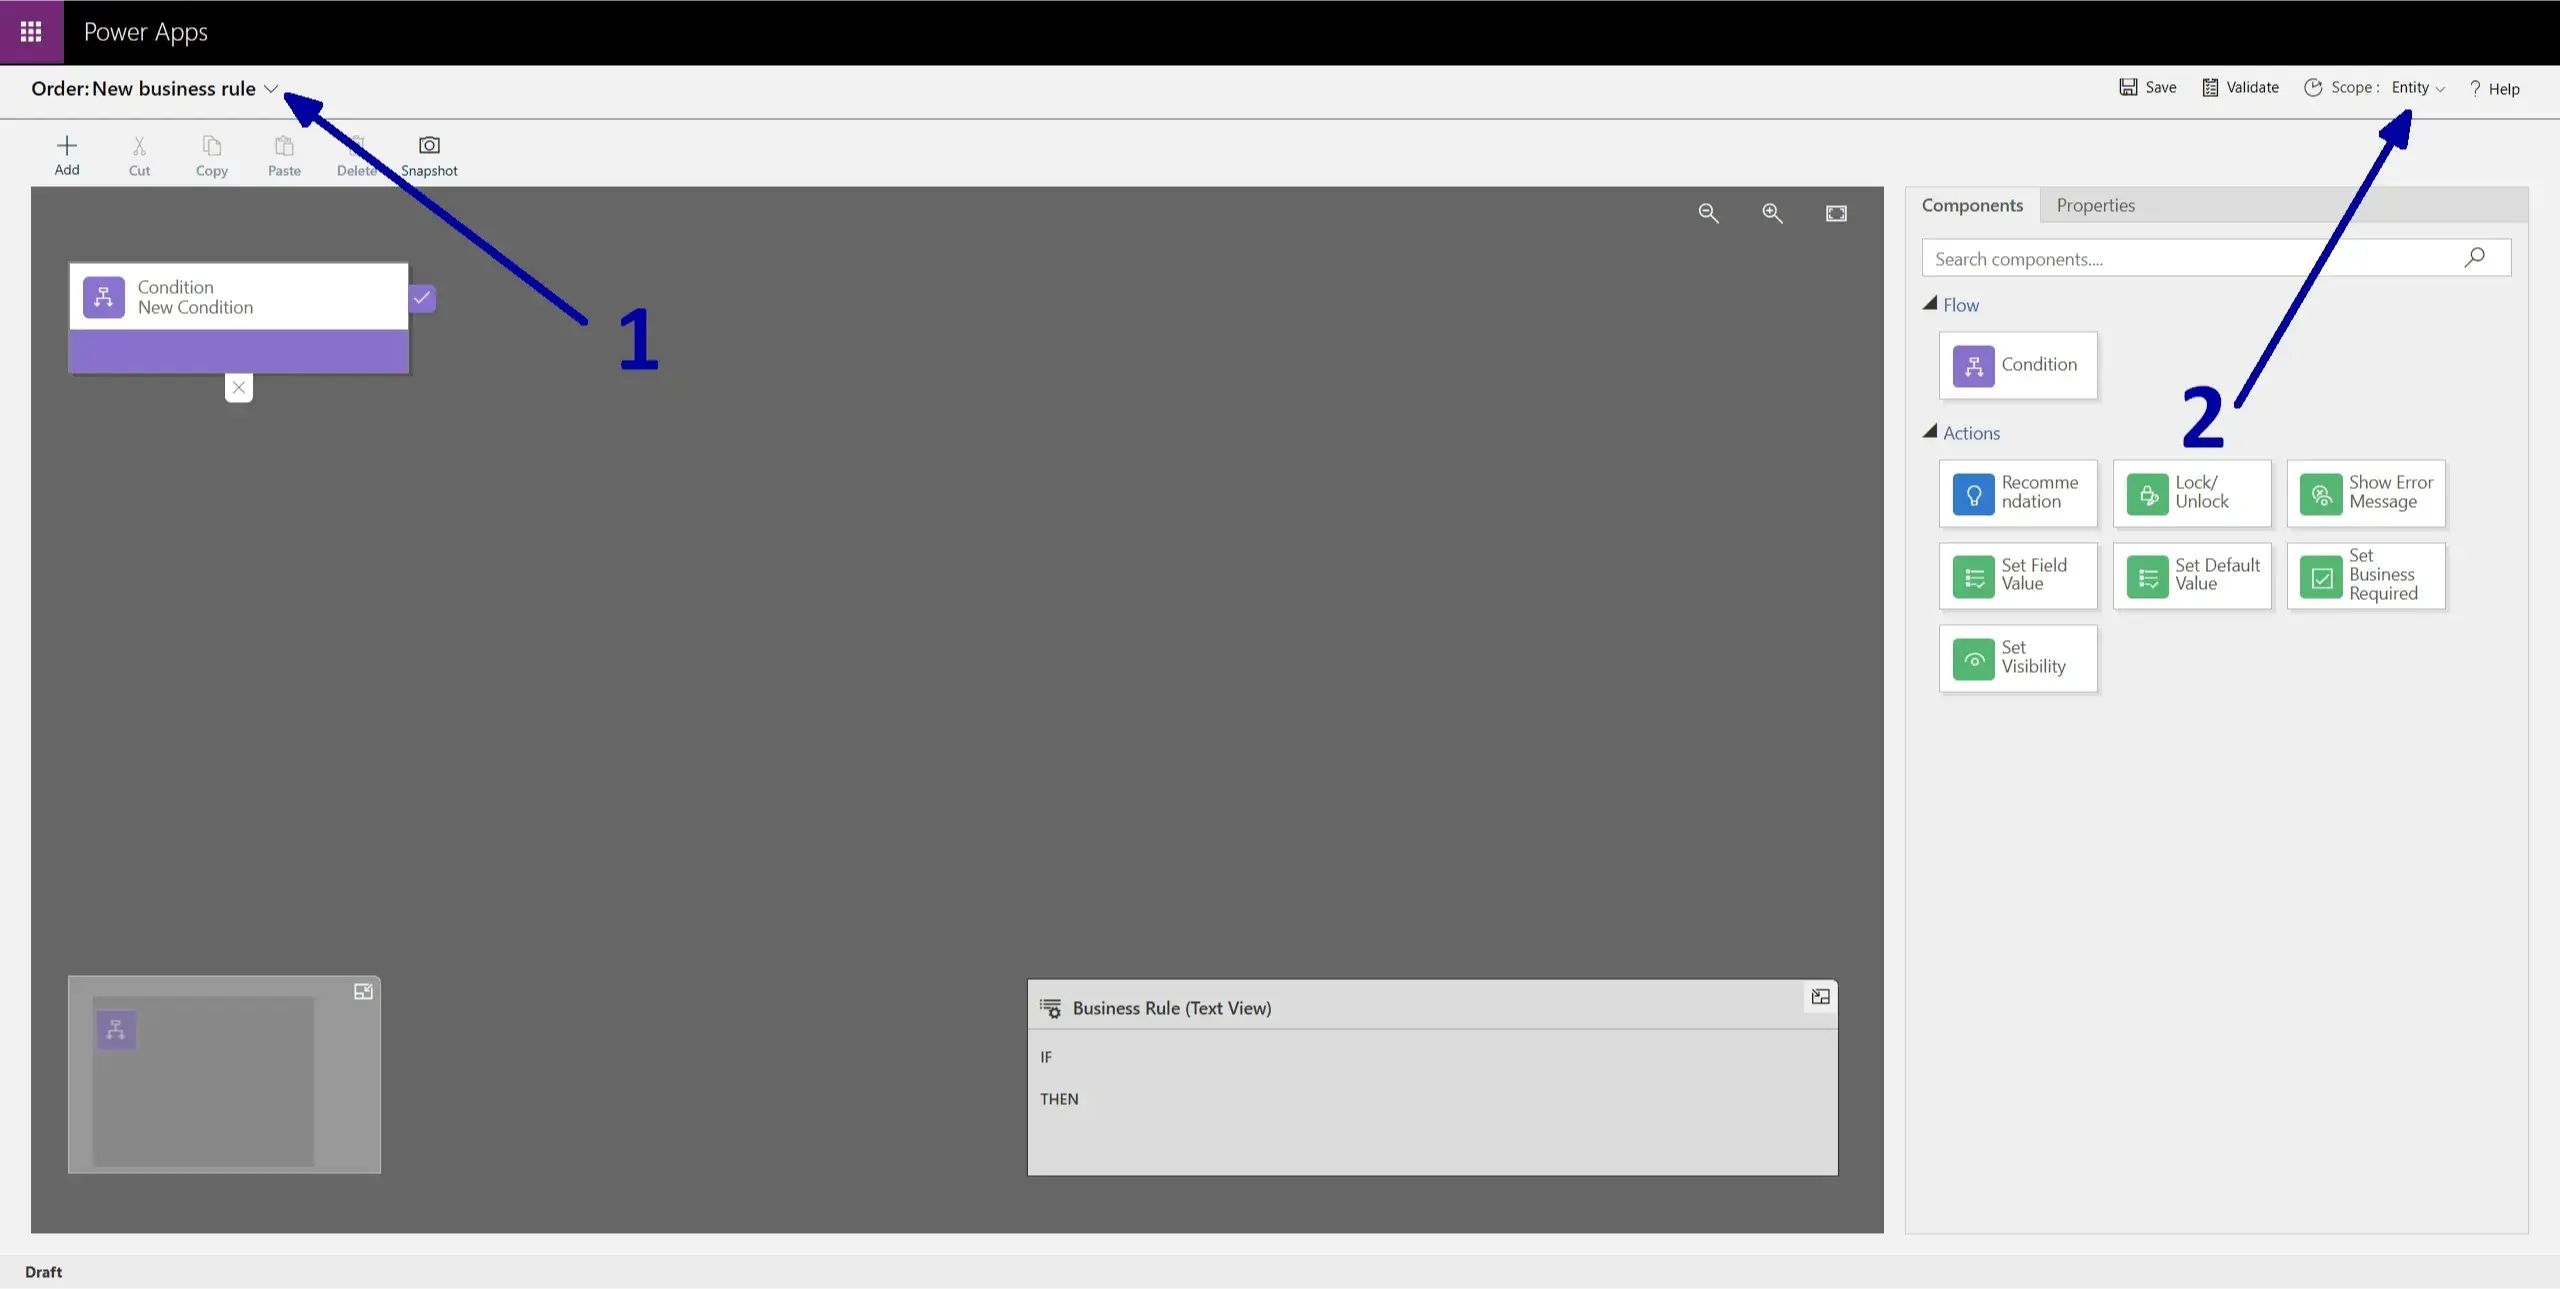
Your result is bound to look similar to this:
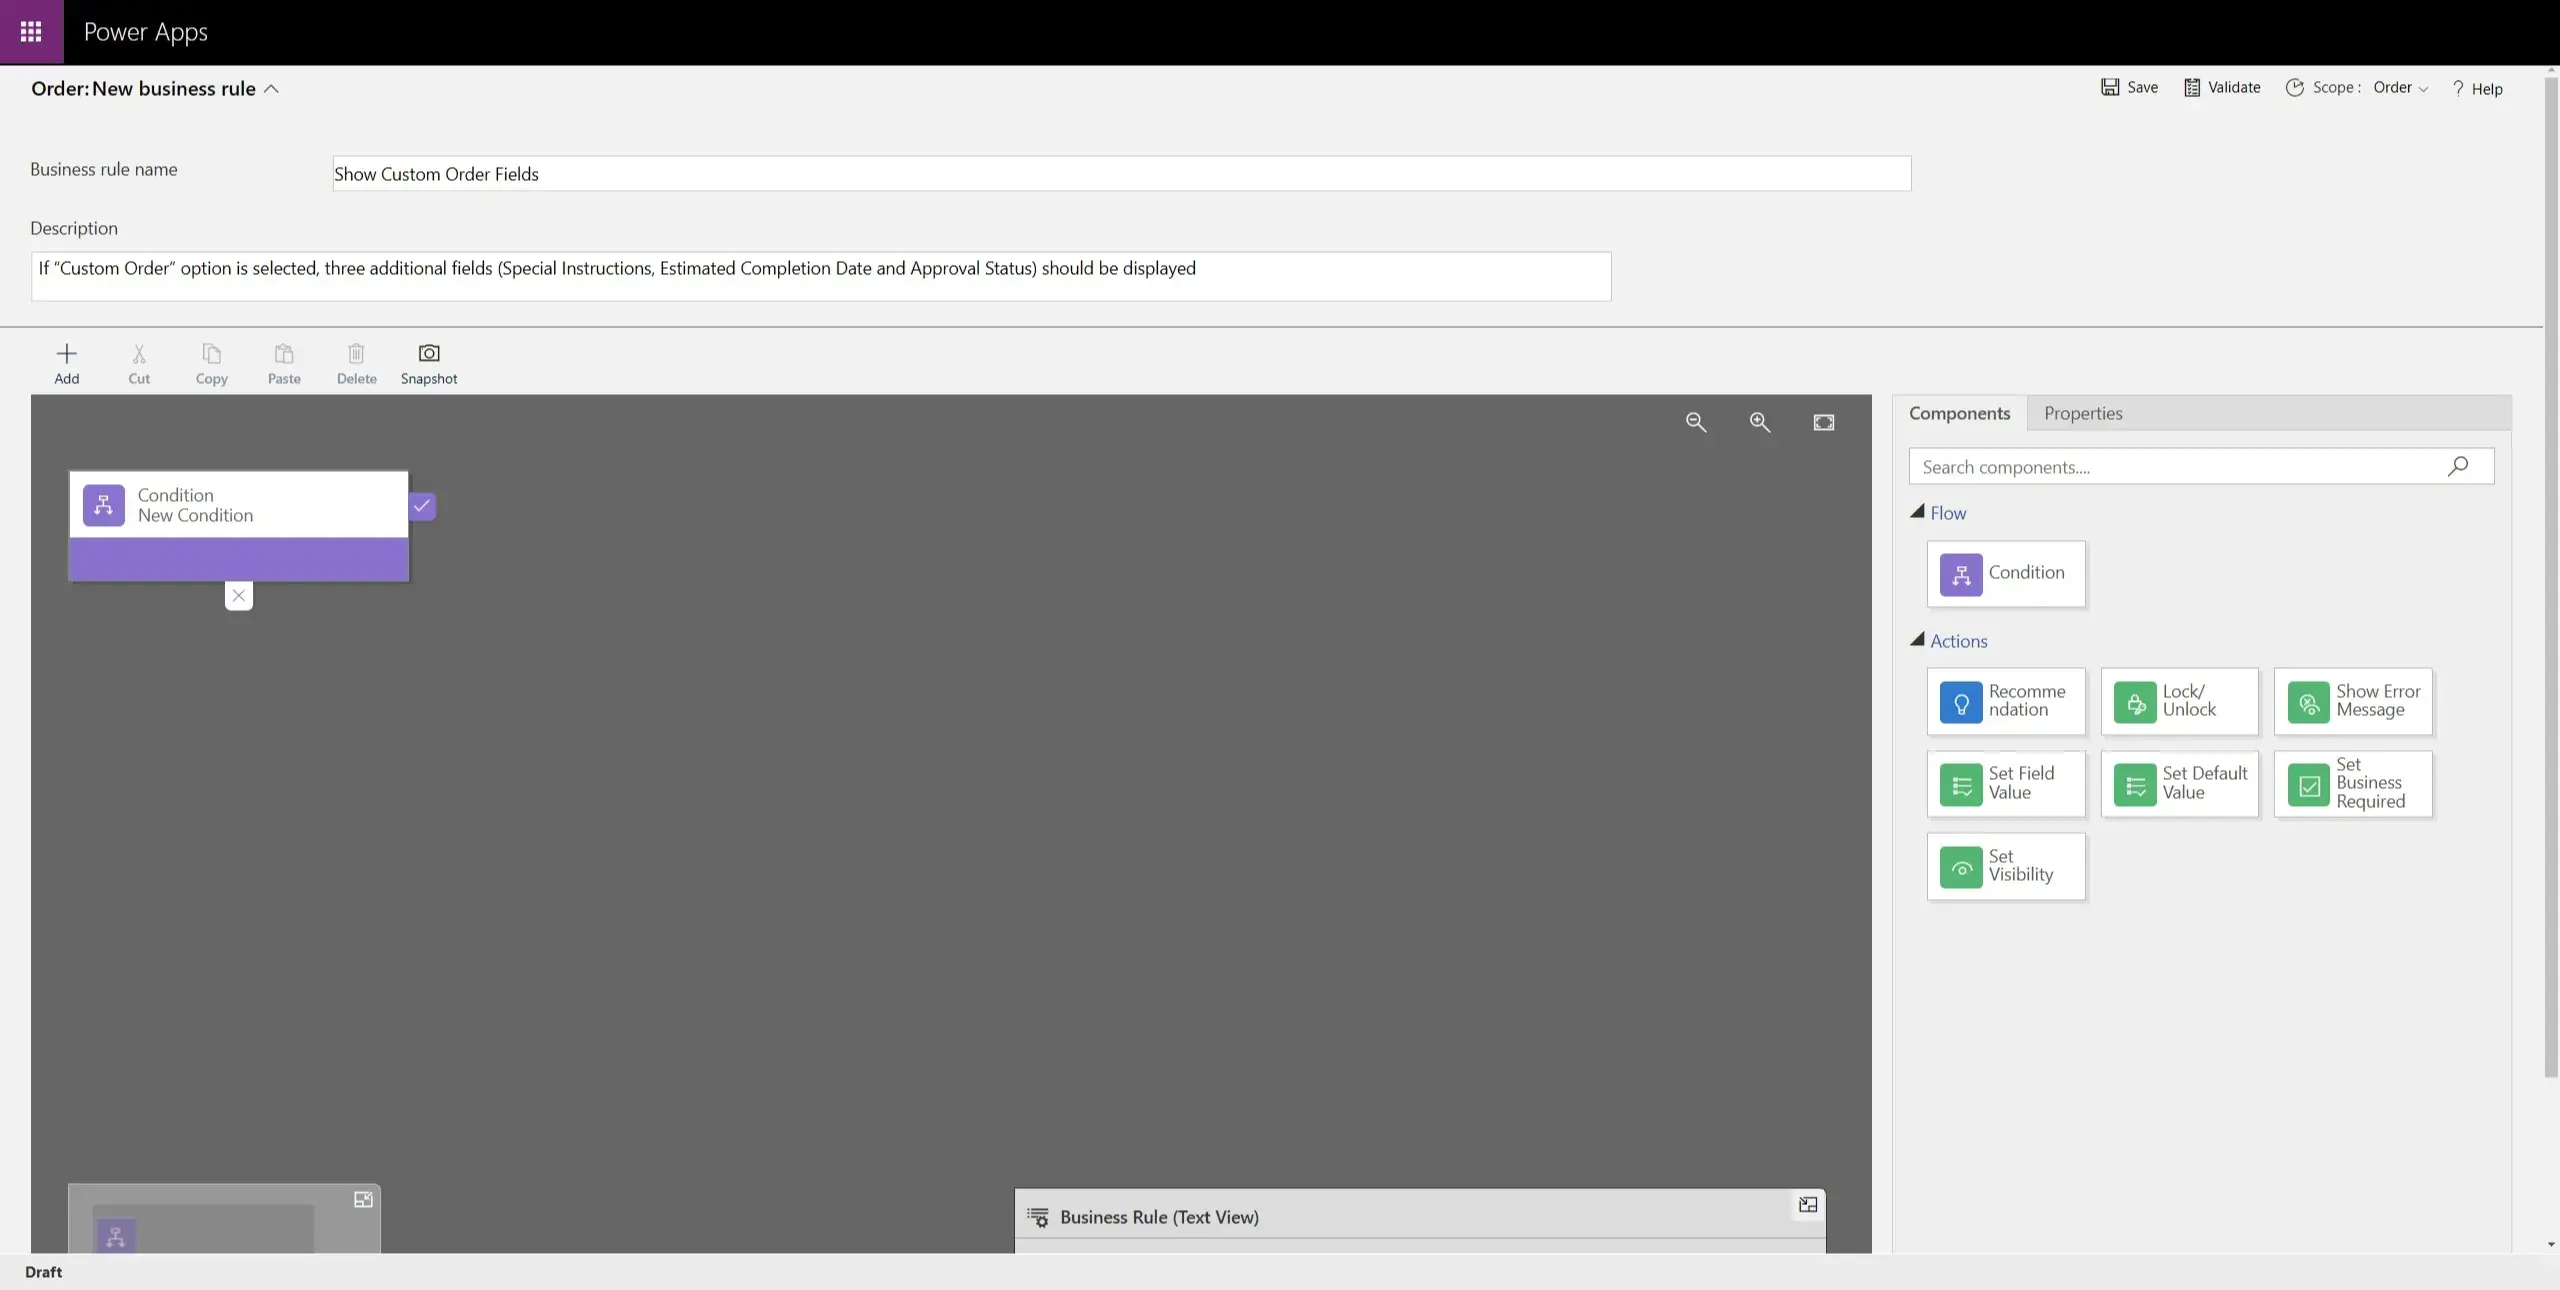
Now, let us create a Business Rule. The core of any well-designed rule is the condition.
To start, go through the following actions:
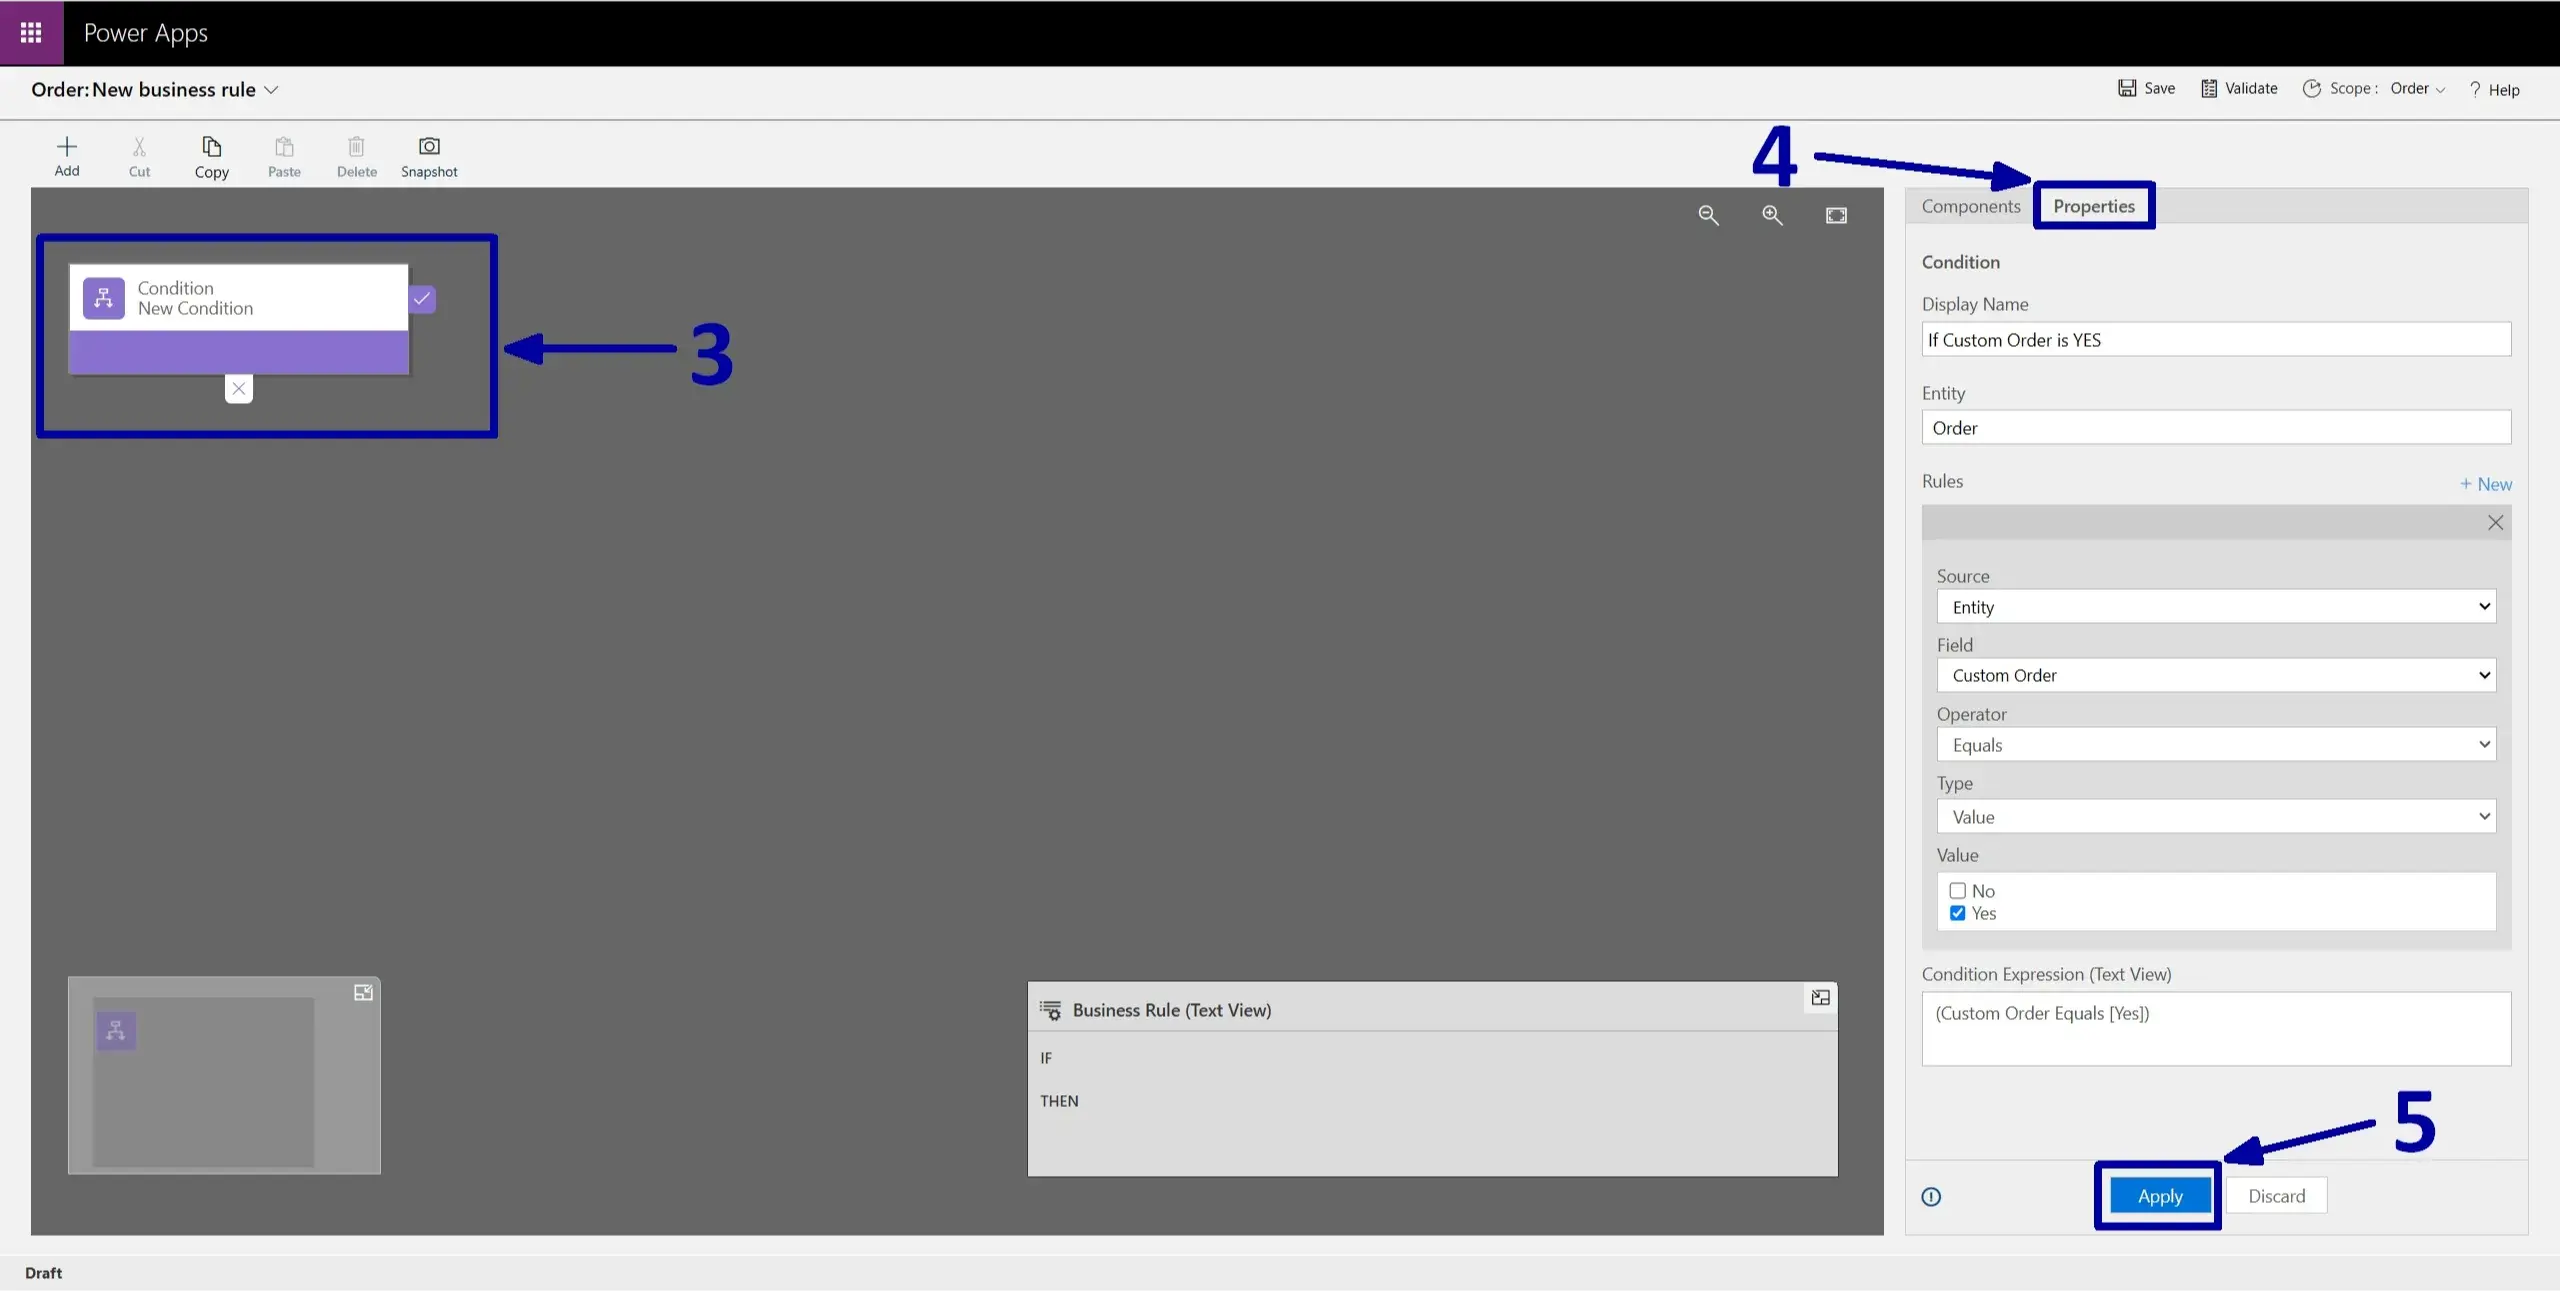
1. Click on the Condition box (3) and ensure that the Properties tab (4) is selected.
2. On this tab, give your condition a name (the Entity field is preselected for you).
3. In the Rules section, choose the appropriate condition values.
Your result should resemble the example shown in the screenshot below.
! Note: Remember to click on the Apply button (5) and save your alterations.
Next, we will define the actions for this condition:
1. Switch from the Properties tab to the Components tab.
2. Select the field for which you want to control visibility (in our example, the ‘Special Instructions’ field).
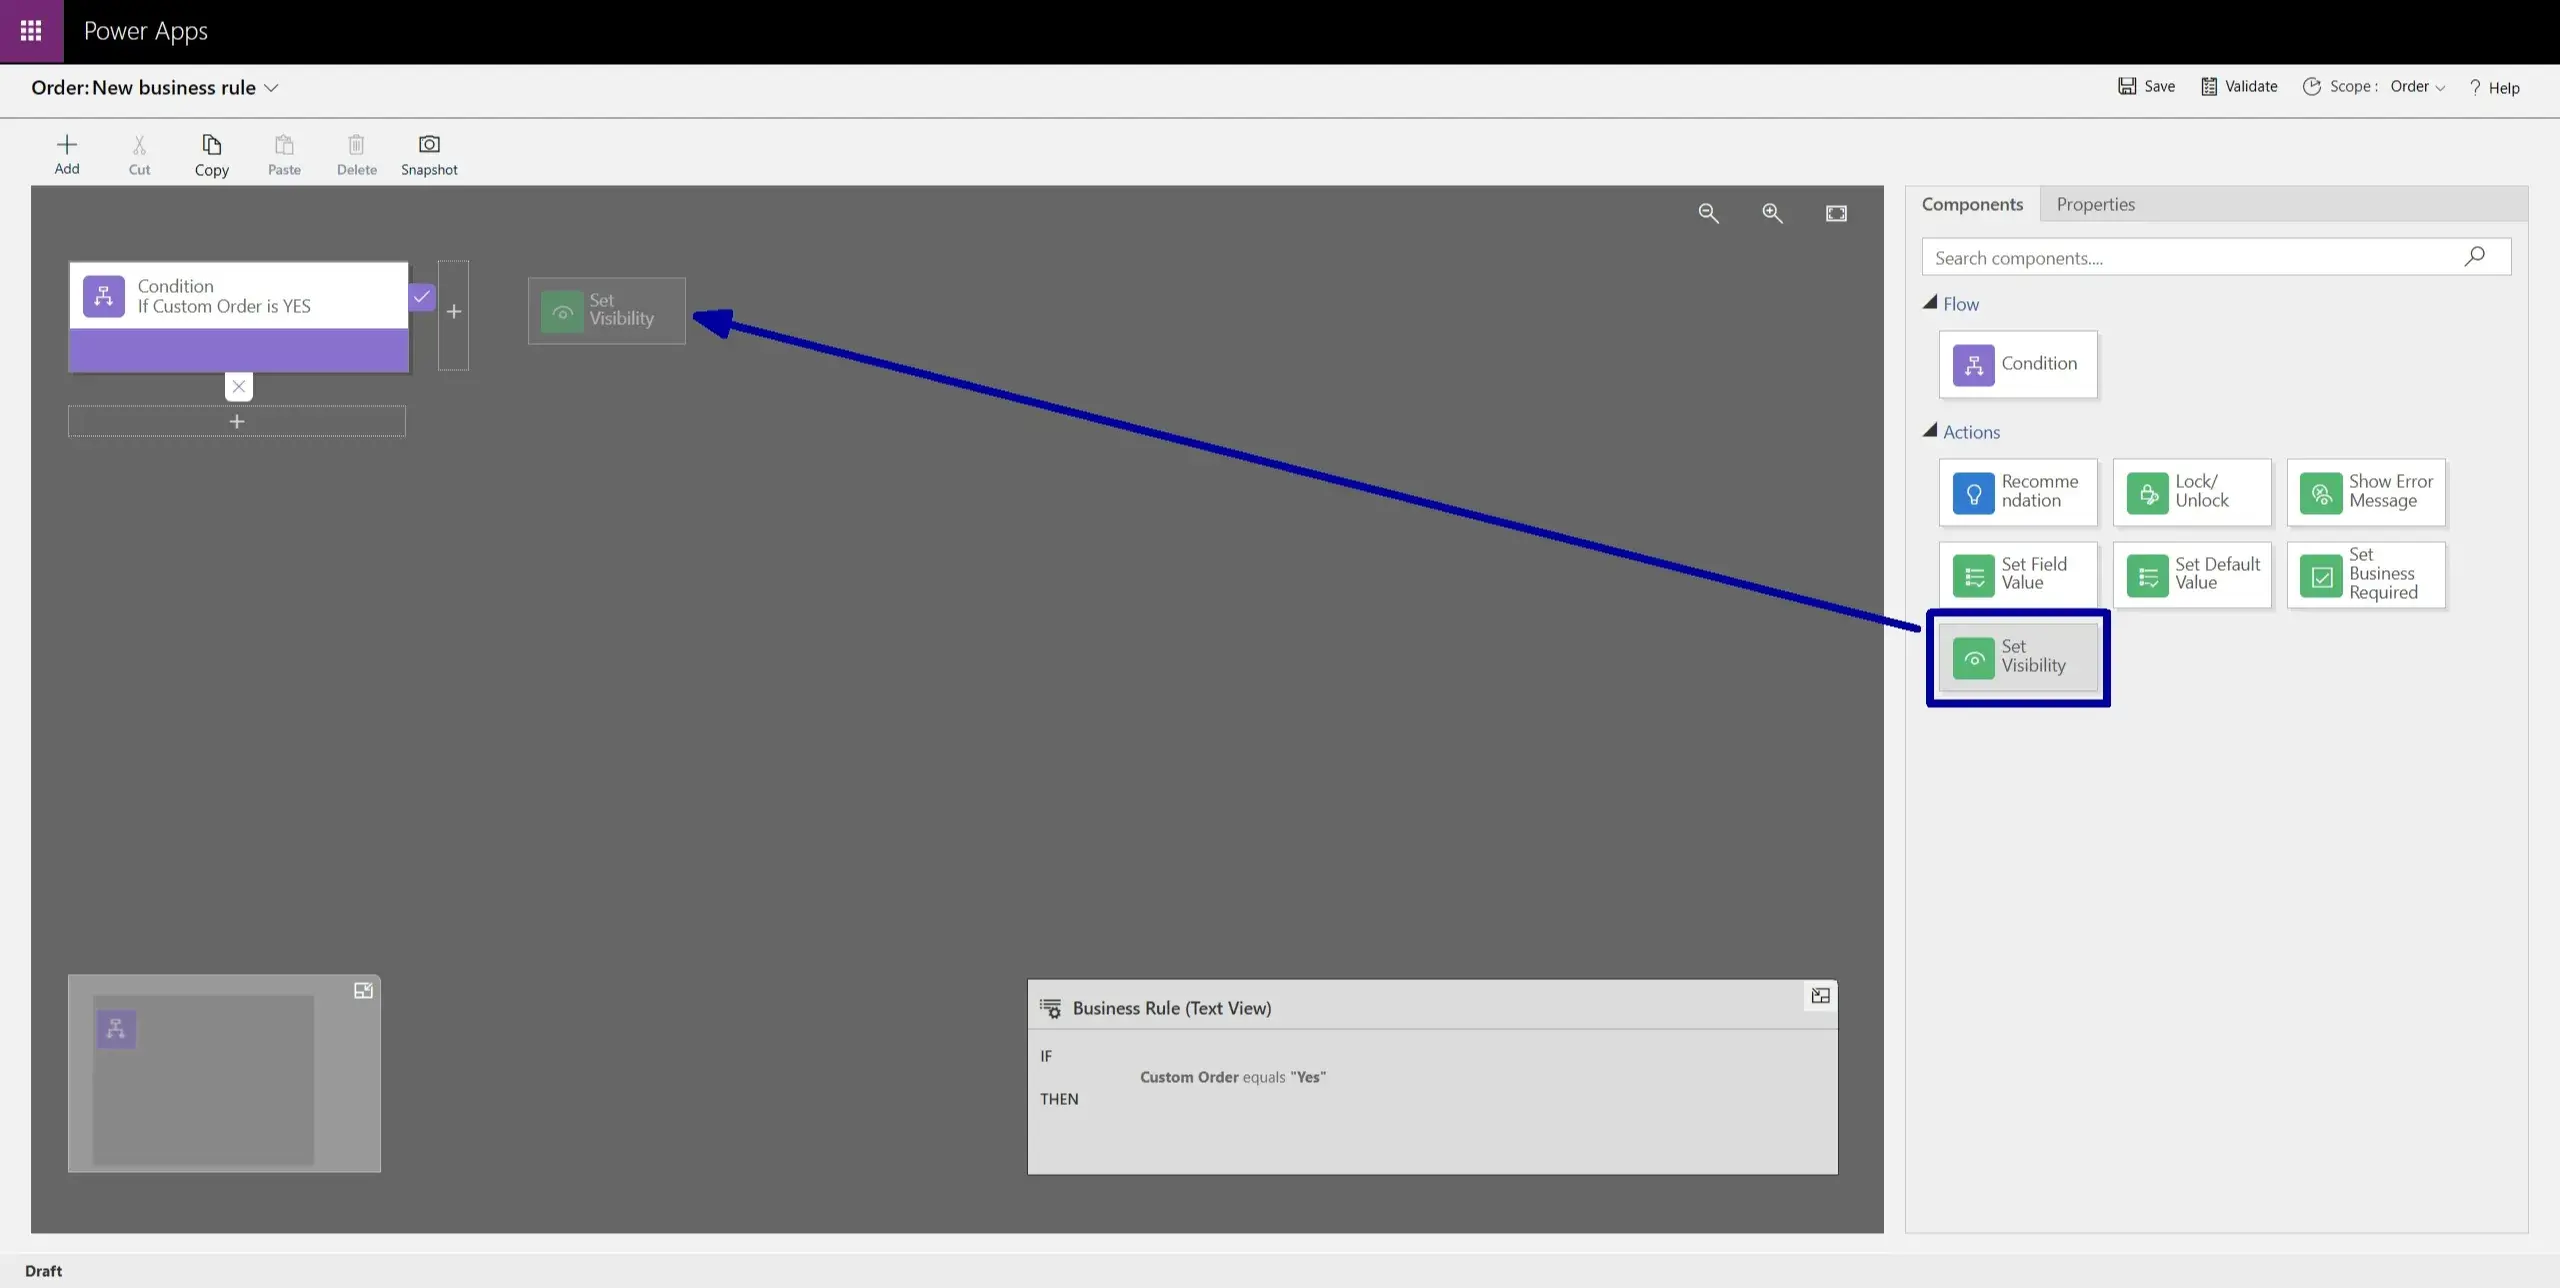
3. Click on the “Set Visibility” box, and ensure you are on the Properties tab in the right sidebar.
4. Select the field you want to control visibility for (in our example, the “Special Instructions” field).
! Note: Do not forget to press the Apply button in the bottom-right corner to be certain your variations have been saved.
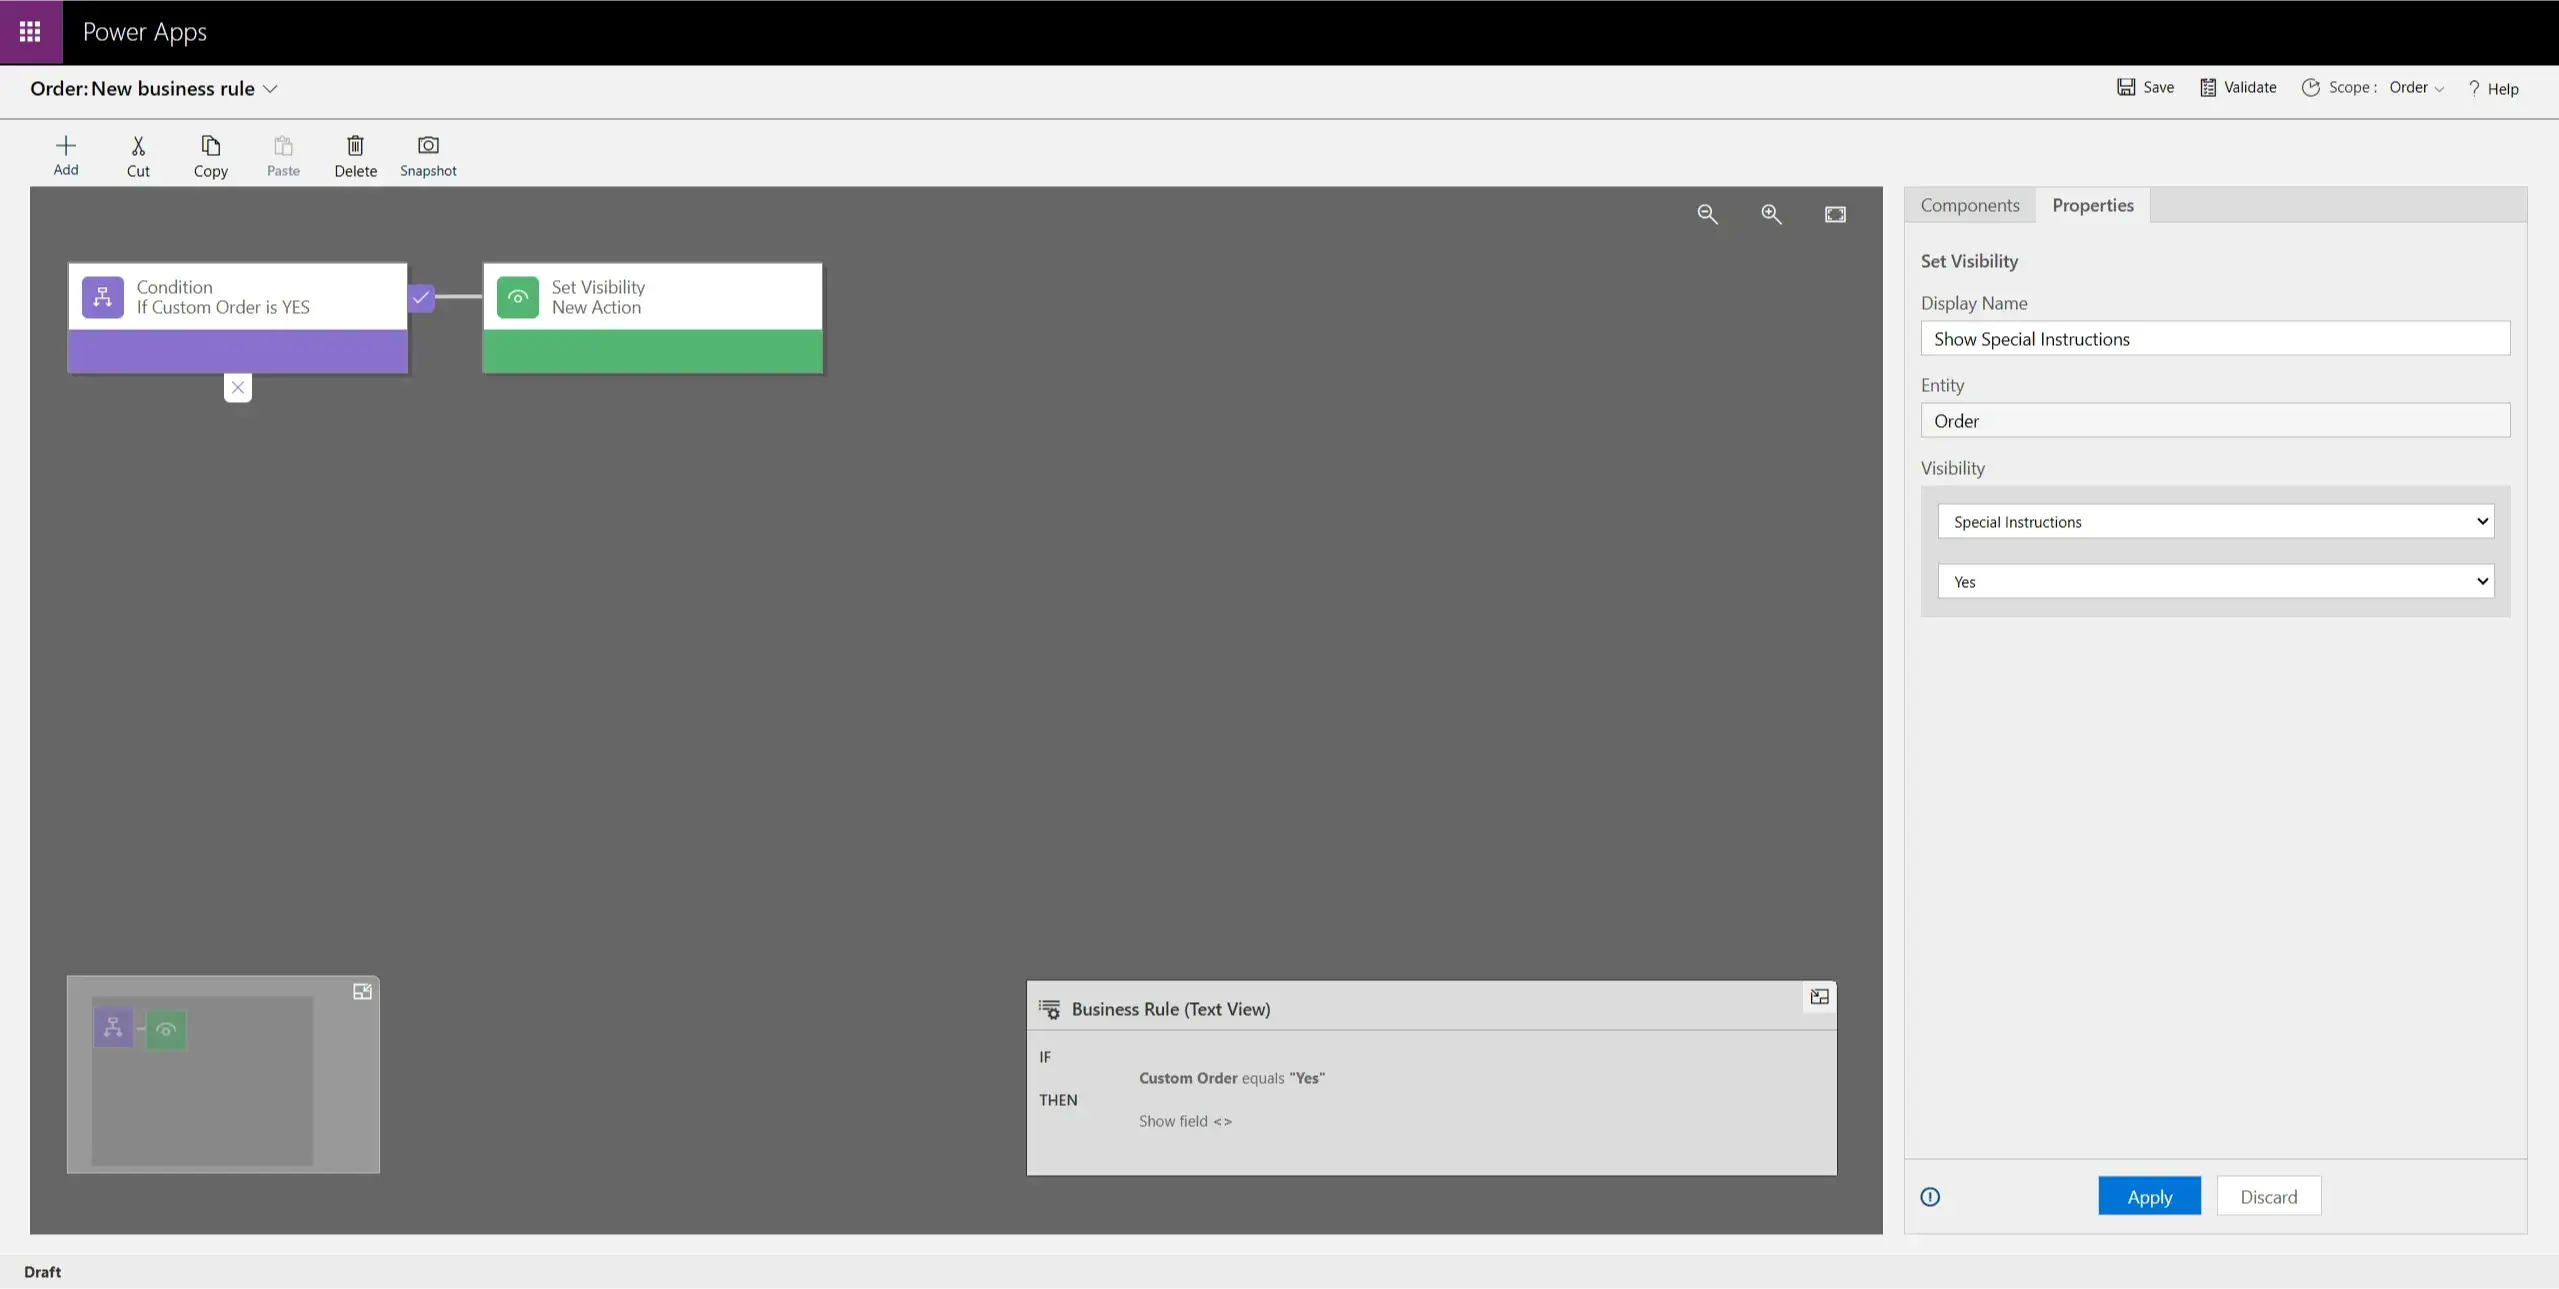
Do the same for the next two fields (Estimated Completion Date and Approval Status).
Your result is to look similar to this:

To account for the possibility that a user might mistakenly set the “Custom Order" option to YES, we need to handle the situation where the option is set back to NO, requiring the fields to be hidden.
For this scenario, perform these steps:
1. Drag a new Condition box to the X side of the original condition.
2. Add Set Visibility boxes to this new condition, but set these fields’ visibility to No.
Your result ought to resemble the example shown in the screenshot below:
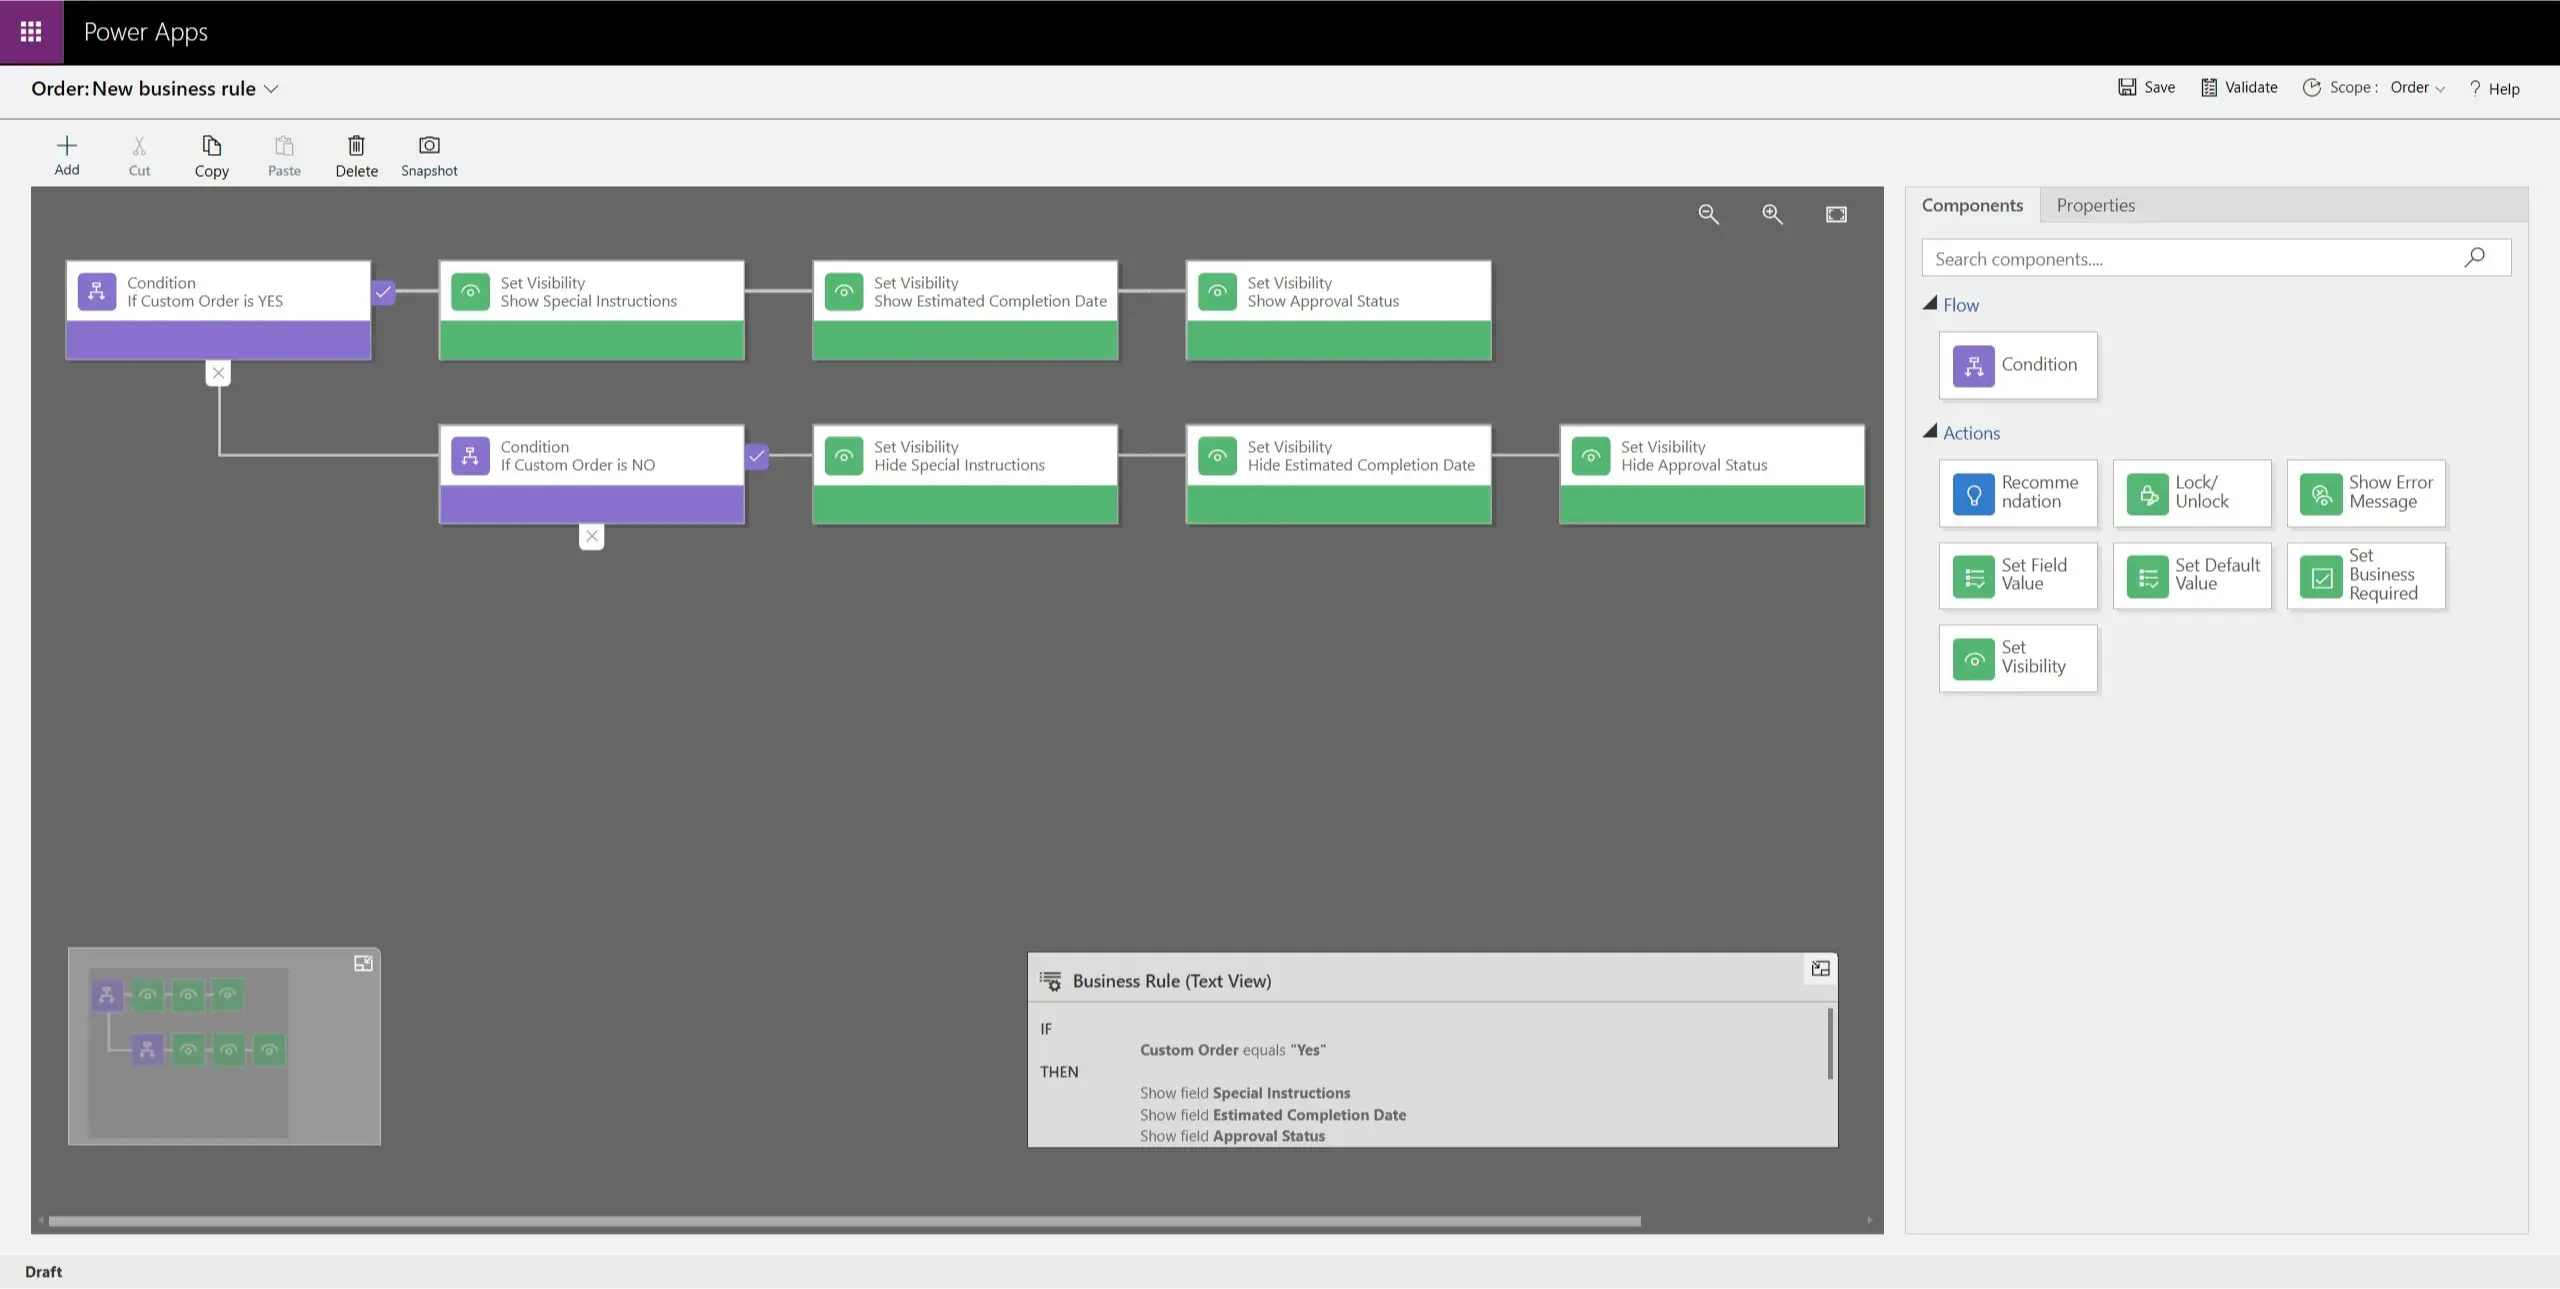
3. Click on the Save button at the top-right corner and wait for the save and validation process to complete. An ‘Activate’ button should appear on the same ribbon a few seconds later.
! Note: If the ‘Activate’ button is not visible immediately after saving, try refreshing the webpage.
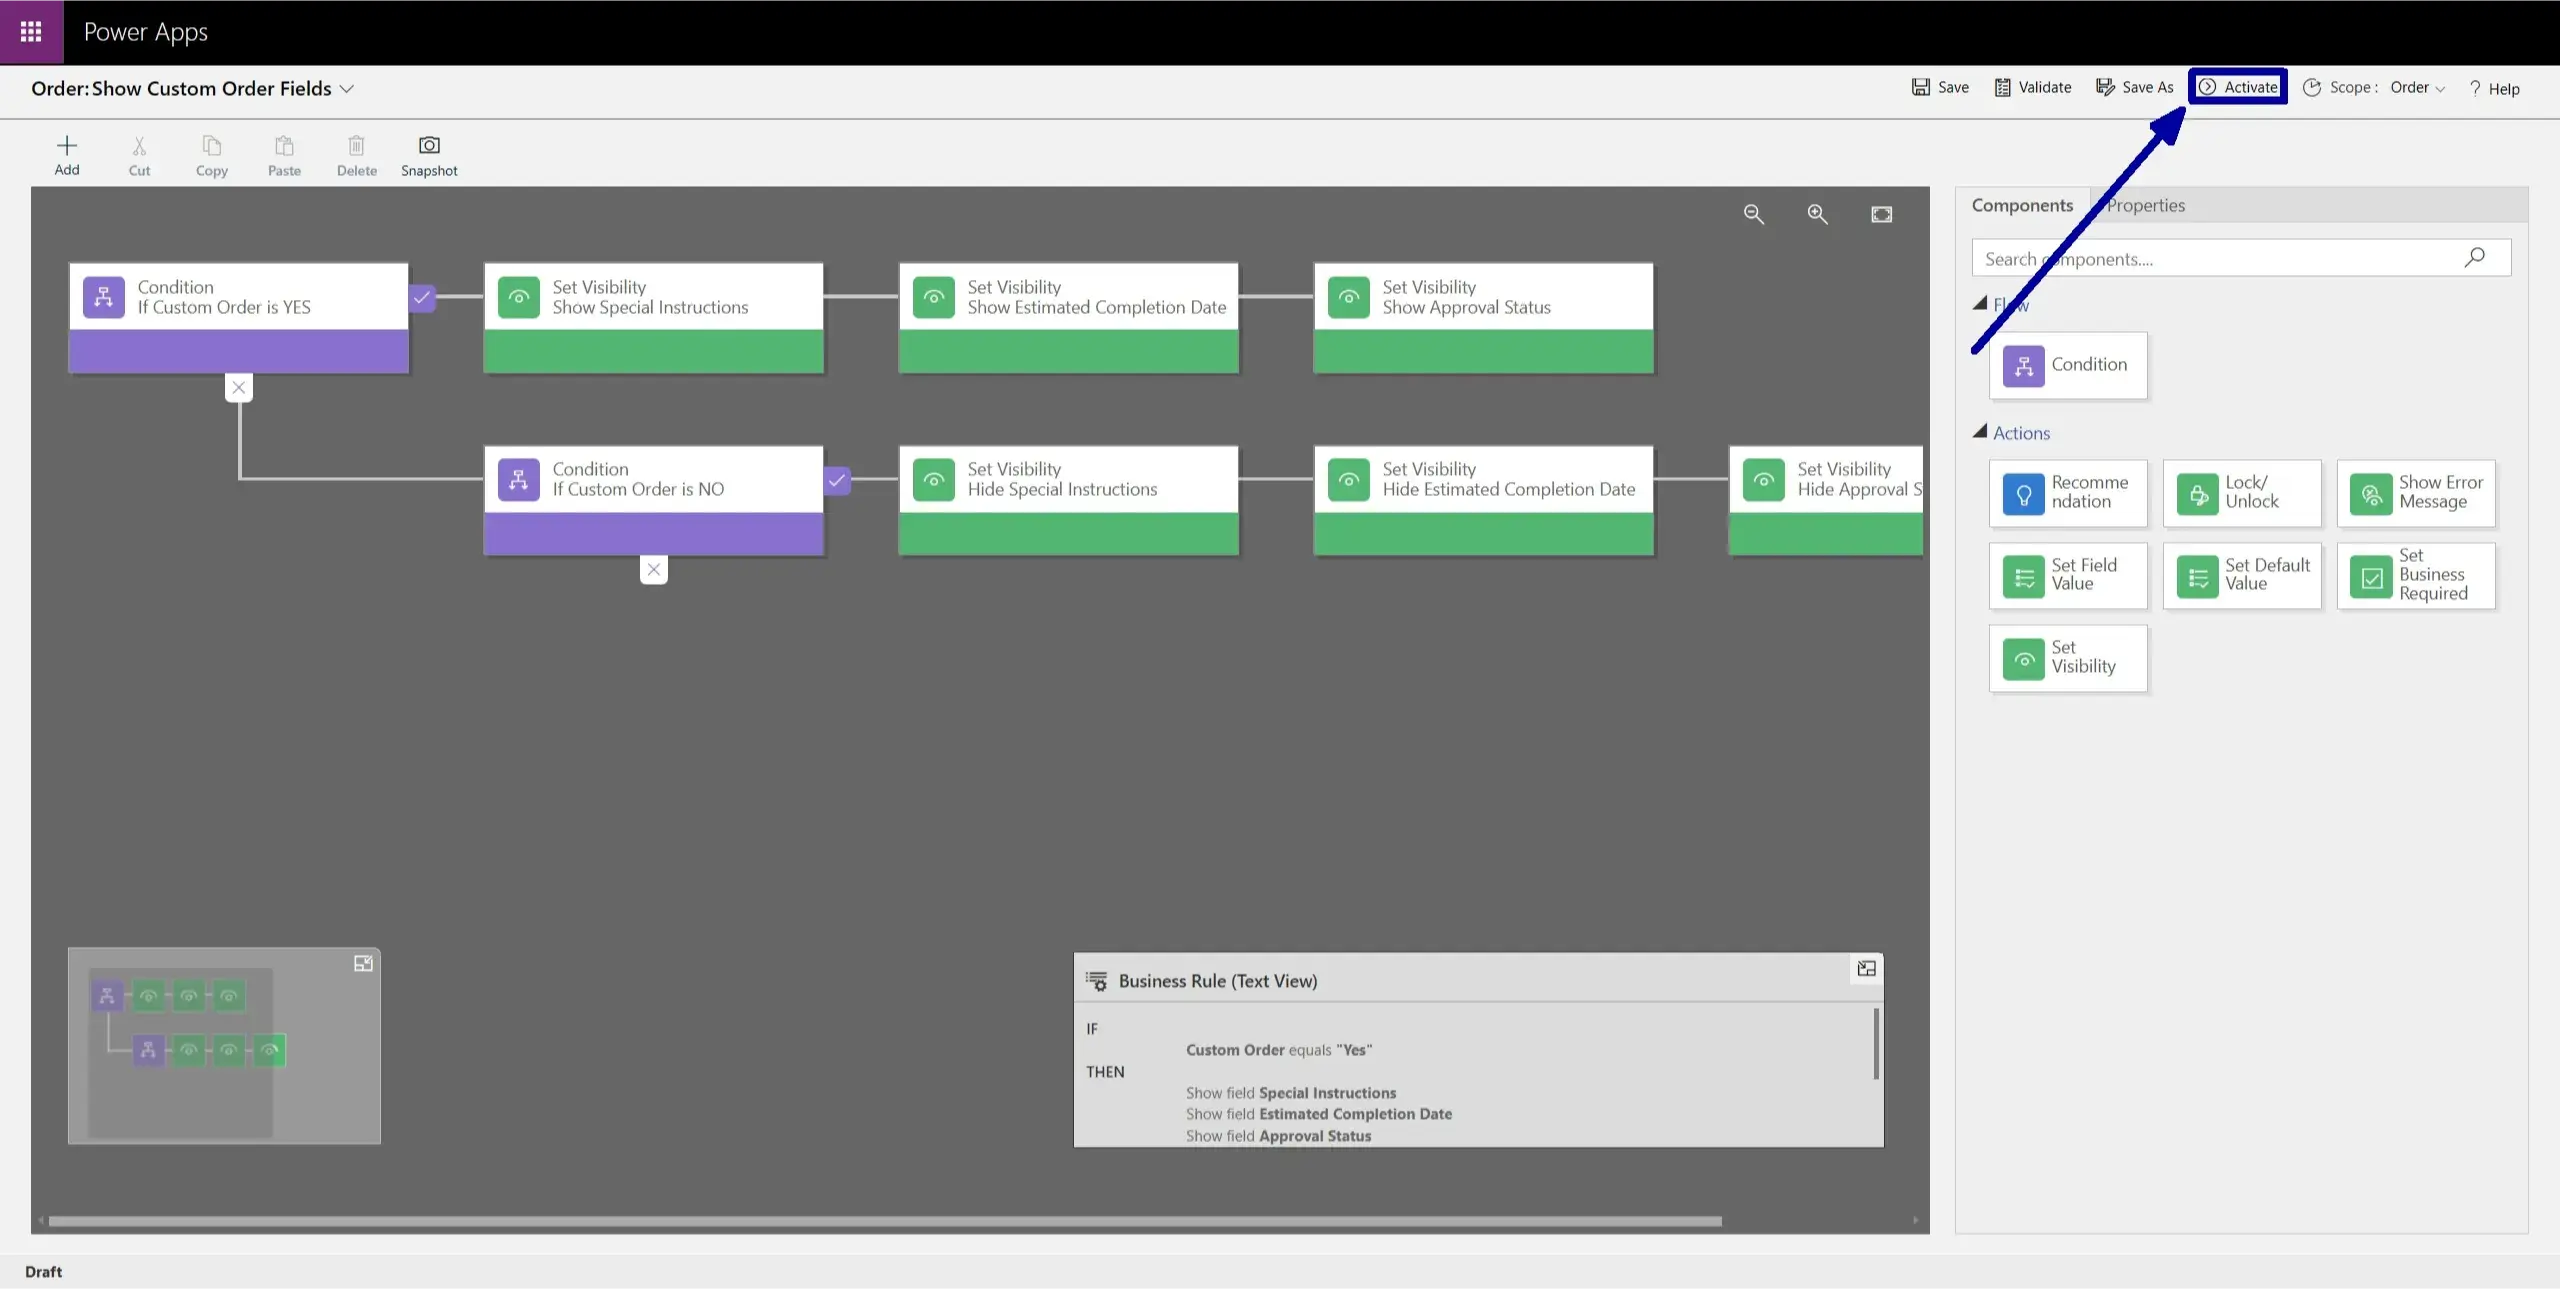
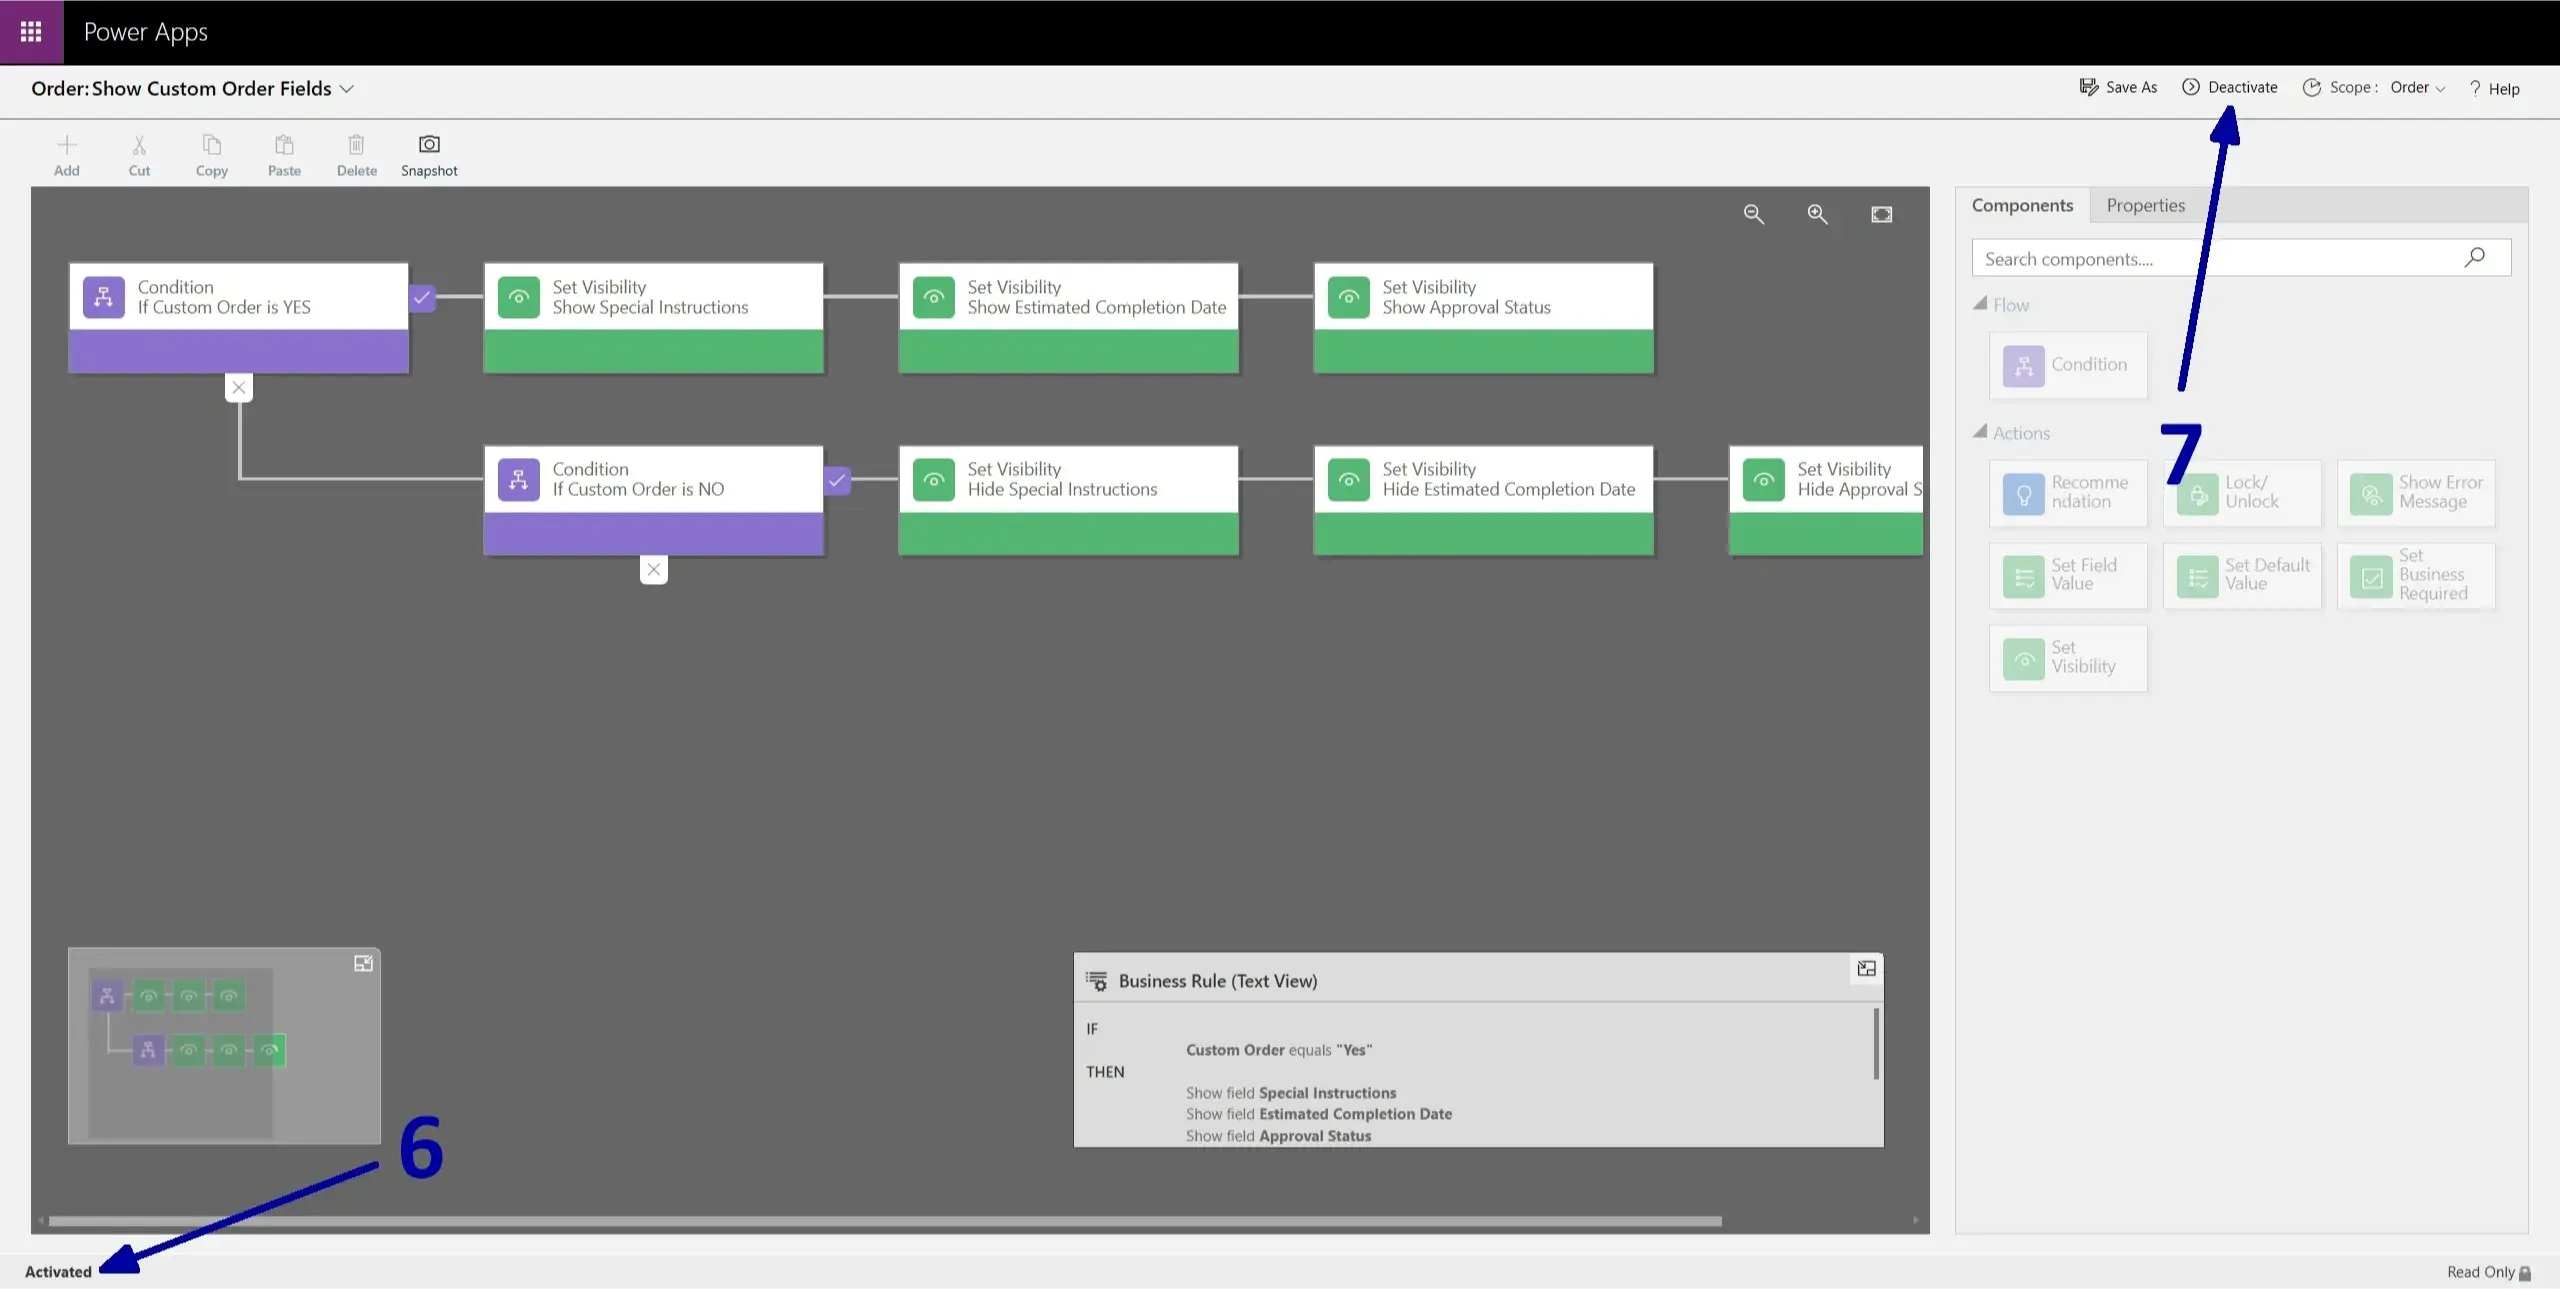
4. Press the ‘Activate’ button and confirm the activation of the Business Rule. If the status changes from Draft to Activated (6), it means everything was done correctly.
! Note: If you need to modify the rule, you must first deactivate it (7), after that, make your changes, and then activate it again.
Now it is time to check if the newly created rule works:
1. Open the Order form.
2. Refresh the page.
3. Switch the Custom Order toggle between No and Yes. If you have done everything correctly, the fields will appear and disappear as expected, confirming that the rule is functioning correctly.
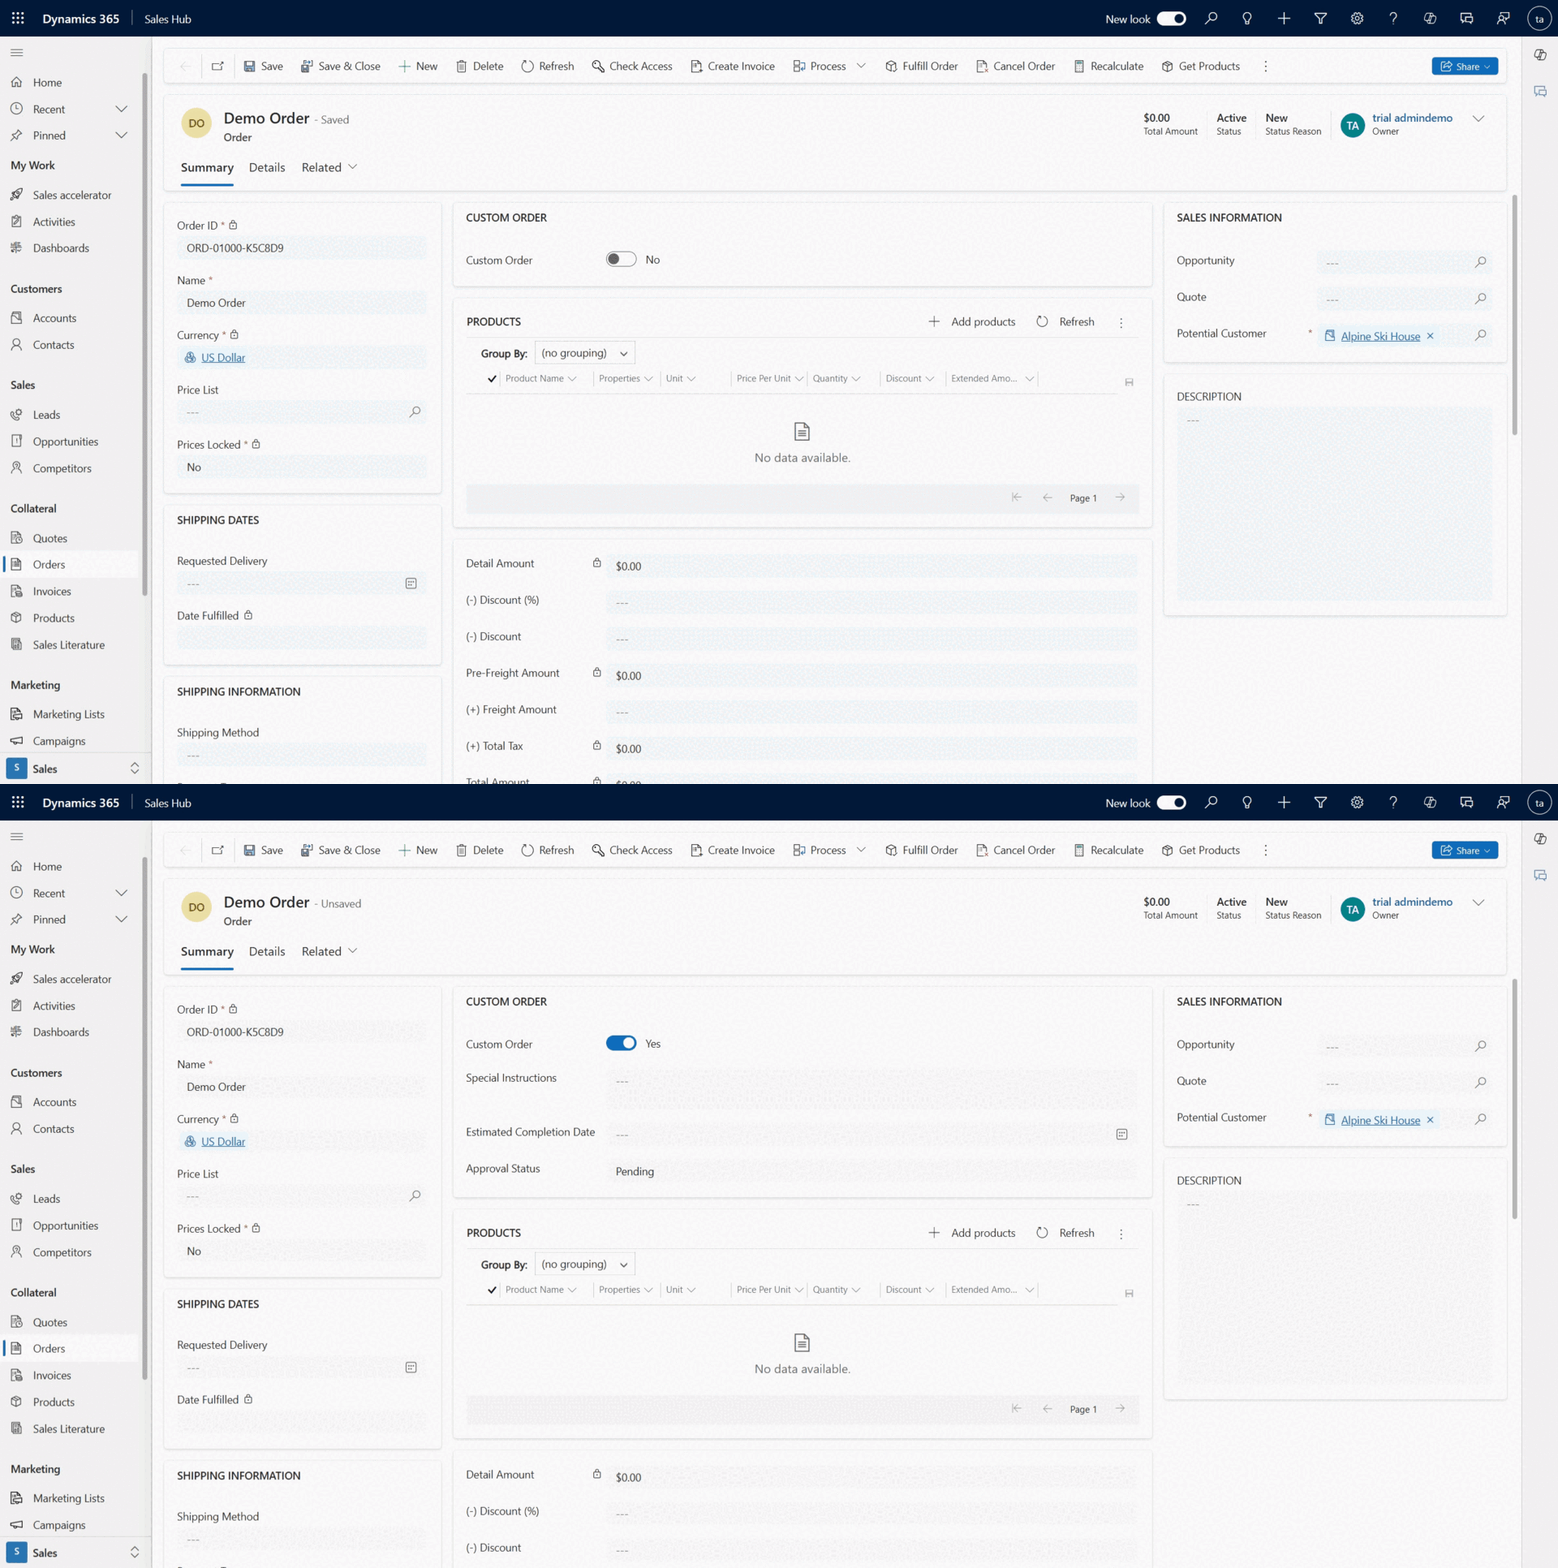
! Note: The only additional note is that sometimes when hiding fields, you may also need to clear the data within those fields.
In such cases, do the following:
1. Alongside setting the visibility, use the “Set Default Value” component in your Business Rule.
2. Opt for the Clear option for the field value.

Conclusion
In conclusion, Business Rules in Microsoft Dynamics 365 is a powerful tool that empowers users to automate and enforce business logic without extensive coding knowledge. When simplifying the process of applying rules and validations within forms, you will enhance the efficiency and consistency of data management across your organization.
As we have seen, creating a Business Rule is straightforward. It allows you to define actions based on specific conditions, ensuring that your system behaves in accordance with your business requirements. Whether you want to streamline data entry, enforce compliance, or improve the user experience, Business Rules gives a flexible and accessible solution.
By incorporating Business Rules into your Dynamics environment, you can get greater value from your CRM system, ensuring that your business processes are well-defined and rigorously enforced. So, as you continue to explore the capabilities of Dynamics 365, remember that Business Rules are your go-to tool for maintaining order and efficiency in the data-driven world.
Find more helpful information on the theme of Customization on the UDS Blog.

