
Introduction
In response to a client's request, our company has been entrusted with developing a specialized module for the Power Apps application. This module aims to empower users by allowing them to conveniently schedule job-related and non-job appointments. It includes three display modes: day, week, and month, and seeks to optimize employee schedules and ensure efficient management of their work.
We want to share this experience with you.
Choosing Development Tools
To create the calendar application and set up your development environment, we will be using the following tools:
- React
- TypeScript
- Vite as the builder for our project
- Redux Toolkit for managing state (consider using other libraries such as Zustand, MobX, effector, etc.)
- Date-fns for working with dates (other libraries like Day.js, Luxon are also options)
- React-date picker
Additionally, you can utilize a UI library to expedite the development of UI components. For example, Material UI or Fluent UI can be used to create a similar UI as in Power Apps.
Defining System API
Now we are ready to develop our application. First, we need to add some API methods and their corresponding types to retrieve data for our calendar.
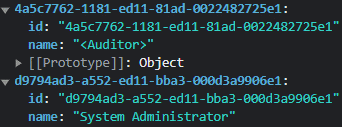
Here is an example of the services/SystemAPI.js file. It contains a class with API methods.
class SystemAPI {

  users = {
    getAll: async () => {
      return this.executeRequest('getAllUsers');
    }
  };
  appointments = {
     getAllOnDate: (options) => {
       return this.executeRequest('getAppointments', {
         Year: options.year,
         Month: options.month || null,
         Week: options.week || null,
         Day: options.day ?? null,
       })
  }};
}

export default SystemAPI;
This file's "executeRequest" method can vary based on your specific requirements. If you don't have a custom API for your application, you can utilize Power Apps WebAPI to retrieve data from a database.
And now, you can create the services/SystemAPI.d.ts file to define types for the API methods above.
interface BaseResponseModel {
  Success: boolean;
  ErrorMessage: string;
}

export interface UserModel {
  systemUserId: string;
  teamsIds: string[];
  fullName: string;
}

interface UsersResponseModel extends BaseResponseModel {
  users: AuditorModel[];
}

export interface AppointmentModel {

  appointmentId: string;
  scheduledStart: string;
  scheduledEnd: string;
  appointmentCategory: ‘Job’ | ‘Non-job’;
  systemUsersIds: string[];
}

export interface AppointmentsGetRequest {
  year: number;
  month: number | null;
  week: number | null;
  day: number | null;
}
interface AppointmentsResponseModel extends BaseResponseModel {
  appointments: AppointmentModel[];
}

declare class SystemAPI {
  users: {
    public getAll(): Promise<UsersResponseModel>;
  };
  appointments: {
    public getAllOnDate(options: AppointmentsGetRequest): Promise<AppointmentsResponseModel>;
    public getById(id: string): Promise<AppointmentGroupResponseModel>;
}

export default new SystemAPI();
Creating Store
At this stage, we need to create a store to organize the application state, which can be used in different components.
Let's create our first Redux Toolkit slice. We can name this file "calendarSlice.ts".
import { createSlice, PayloadAction } from '@reduxjs/toolkit';

interface CalendarState {
  calendarFilters: {
    searchUserValue: string;
  };
  loading: {
    calendar: boolean;
  };
}

const initialState: CalendarState = {
  loading: {
    calendar: false,
  },

  calendarFilters: {
    searchUserValue: '',
  },
};

const calendarSlice = createSlice({
  name: 'calendar',
  initialState,
  reducers: {
    setCalendarLoading: (state, action: PayloadAction<boolean>) => {
      state.loading.calendar = action.payload;
    },
    setSearchUserValue: (state, action: PayloadAction<string>) => {
      state.calendarFilters.searchUserValue = action.payload;
    },
  },
});

export const { setCalendarLoading, setSearchUserValue } = calendarSlice.actions;
export default calendarSlice.reducer;
And now, we can create a store that we will use in our application. To use a store, we need to create it. Let's create a folder named "store" and place a file called "index.ts" with the following code.
import { configureStore } from '@reduxjs/toolkit';
import calendarReducer from '@/features/calendarSlice';
const store = configureStore({
  reducer: {
    calendar: calendarReducer,
  },
});
export default store;
export type RootState = ReturnType<typeof store.getState>;
export type AppDispatch = typeof store.dispatch;
After creating the Redux store, we need to provide it to the Provider in the "main.tsx" file.
import React from 'react';
import ReactDOM from 'react-dom/client';
import { Provider } from 'react-redux';
import store from '@/store';
import App from './App';
import './index.css';
ReactDOM.createRoot(document.getElementById('root')!).render(
  <React.StrictMode>
      <Provider store={store}>
        <App />
      </Provider>
  </React.StrictMode>
);
Creating Components
Let's start by creating the Calendar component. First, we must create a folder containing all our components. We can name it "components." Our Calendar component should include other components, such as different calendar views and actions.
We can decompose the creation of all these components and their logic into the following steps:
- Create the Header component with input for filtering by the user's name.
import { setSearchUserValue } from '@/features/calendarSlice'; import { useAppDispatch, useAppSelector } from '@/hooks'; import classes from './Header.module.css'; const Header = () => { const { searchUserValue } = useAppSelector((state) => state.calendar.calendarFilters); const dispatch = useAppDispatch(); const handleChangeSearchUserValue = (event: React.ChangeEvent<HTMLInputElement>) => { dispatch(setSearchUserValue(event.target.value)); }; return ( <div className={classes.container}> <input type="text" value={searchUserValue} placeholder="Search by user" onChange={handleChangeSearchUserValue} /> </div> ); }; export default Header; - Create the useCalendar custom hook to handle calendar actions and work with data.
import { useState, useEffect, useCallback, useMemo } from 'react'; import { setCalendarLoading } from '@/features/calendarSlice'; import { DisplayMode } from '@/models'; import { getWeek, getMonth, getYear, getDayOfYear } from '@/utils/dates'; import { useAppSelector, useAppDispatch } from '@/hooks'; import SystemAPI, { AppointmentModel, UserModel } from '@/services/SystemAPI'; interface RequestsState { users: boolean; appointments: boolean; } function useCalendar() { const [calendarDateTime, setCalendarDateTime] = useState(new Date().getTime()); const [displayMode, setDisplayMode] = useState<DisplayMode>('Week'); const [users, setUsers] = useState<UserModel[]>([]); const [appointments, setAppointments] = useState<AppointmentModel[]>([]); const [requestsState, setRequestsState] = useState<RequestsState>({ users: false, appointments: false }); const { searchUserValue } = useAppSelector((state) => state.calendar.calendarFilters); const dispatch = useAppDispatch(); const fetchUsers = async () => { setRequestsState((rs) => ({ ...rs, users: true })); try { const res = await SystemAPI.users.getAll(); if (res.Success) { setUsers(res.users); } else { throw new Error(res.ErrorMessage); } } catch (err) { console.error(err); } setRequestsState((rs) => ({ ...rs, users: false })); }; const fetchAppointments = async () => { setRequestsState((rs) => ({ ...rs, appointments: true })); try { const res = await SystemAPI.appointments.getAllOnDate({ year: getYear(calendarDateTime), month: displayMode === 'Month' ? getMonth(calendarDateTime) + 1 : null, week: displayMode === 'Week' ? getWeek(calendarDateTime, { weekStartsOn: 1, firstWeekContainsDate: 4, }) : null, day: displayMode === 'Day' ? getDayOfYear(calendarDateTime) : null, }); if (res.Success) { return setAppointments(res.appointments); } else { throw new Error(res.ErrorMessage); } } catch (err) { console.error(err); } setRequestsState((rs) => ({ ...rs, appointments: false })); }; const changeCalendarDate = useCallback((dateTime: number) => { setCalendarDateTime(dateTime); }, []); const changeDisplayMode = useCallback((displayMode: DisplayMode) => { setDisplayMode(displayMode); }, []); const filteredUsers = useMemo(() => { return users.filter((user) => { const searchValue = searchUserValue.toLowerCase(); const userName = user.fullName.toLowerCase(); return searchValue.includes(userName); }); }, [users, searchUserValue]); useEffect(() => { fetchUsers(); }, []); useEffect(() => { fetchAppointments(); }, [displayMode, calendarDateTime]); useEffect(() => { if (requestsState.users || requestsState.appointments) { dispatch(setCalendarLoading(true)); } else { dispatch(setCalendarLoading(false)); } }, [requestsState, dispatch]); return { users: filteredUsers, appointments, displayMode, calendarDateTime, changeCalendarDate, changeDisplayMode, }; } export default useCalendar; - Create the ActionsBar component, containing the DatePicker from the react-datepicker library and buttons for changing the display mode.
import clsx from 'clsx'; import { DisplayMode } from '@/models'; import classes from './ActionsBar.module.css'; interface ActionsBarProps { displayMode: DisplayMode; calendarDateTime: number; onChangeDisplayMode: (displayMode: DisplayMode) => void; onChangeCalendarDate: (dateTime: number) => void; } const ActionsBar: React.FC<ActionsBarProps> = ({ displayMode, calendarDateTime, onChangeDisplayMode, onChangeCalendarDate, }) => { return ( <div> <div className={classes.datePickerContainer}> <DatePicker date={calendarDateTime} onChange={onChangeCalendarDate} options={{ type: 'control', mode: displayMode }} /> </div> <div className={classes.displayModeActionsContainer}> <button className={clsx({ [classes.isSelected]: displayMode === 'Day' })} onChange={() => onChangeDisplayMode('Day')} > Day </button> <button className={clsx({ [classes.isSelected]: displayMode === 'Week' })} onChange={() => onChangeDisplayMode('Week')} > Week </button> <button className={clsx({ [classes.isSelected]: displayMode === 'Month' })} onChange={() => onChangeDisplayMode('Month')} > Month </button> </div> </div> ); }; export default ActionsBar; - Create the WeekView component to display calendar rows in week display mode.
import clsx from 'clsx'; import { format, eachDayOfInterval, isWeekend, startOfWeek, endOfWeek } from '@/utils/dates'; import { AppointmentModel, UserModel } from '@/services'; import WeekRow from './WeekRow'; import classes from './WeekView.module.css'; function getScheduleBlocks(date: Date | number) { const startDay = startOfWeek(date, { weekStartsOn: 1 }); const endDay = endOfWeek(date, { weekStartsOn: 1 }); return eachDayOfInterval({ start: startDay, end: endDay }).map((dayDate) => ({ date: dayDate, isWeekend: isWeekend(dayDate), })); } interface WeekViewProps { users: UserModel[]; appointments: AppointmentModel[]; date: Date | number; } const WeekView: React.FC<WeekViewProps> = ({ users, appointments, date }) => { const dayBlocks = getScheduleBlocks(date); return ( <div className={classes.container}> <div className={classes.scheduleHeader}> <div className={classes.scheduleRow}> <div className={clsx(classes.scheduleBlock, classes.auditorScheduleBlock)} data-is-auditor-block> <span className={classes.scheduleBlockTitle}>User</span> </div> {dayBlocks.map((dayDate) => { return ( <div key={dayDate.date.getTime()} className={clsx(classes.scheduleBlock, { [classes.weekendScheduleBlock]: dayDate.isWeekend, })} > <span className={classes.scheduleBlockTitle}> {format(dayDate.date, !dayDate.isWeekend ? 'iiii' : 'iii')} </span> <span className={classes.scheduleBlockDescription}>{format(dayDate.date, 'MM/d')}</span> </div> ); })} </div> </div> <div> {users.map((user) => { const userAppointments = appointments.filter((appointment) => appointment.systemUsersIds.includes(user.systemUserId) ); return <WeekRow user={user} userAppointments={userAppointments} date={date} />; })} </div> </div> ); }; export default WeekView; - Create the WeekRow component to display a single row.
import clsx from 'clsx'; import { eachDayOfInterval, isWeekend, startOfWeek, endOfWeek } from '@/utils/dates'; import { AppointmentModel, UserModel } from '@/services'; import classes from './WeekRow.module.css'; function getWeekDays(date: Date | number) { const startDay = startOfWeek(date, { weekStartsOn: 1 }); const endDay = endOfWeek(date, { weekStartsOn: 1 }); return eachDayOfInterval({ start: startDay, end: endDay }).map((dayDate) => ({ date: dayDate, isWeekend: isWeekend(dayDate), })); } interface WeekRowProps { user: UserModel; userAppointments: AppointmentModel[]; date: Date | number; } const WeekRow: React.FC<WeekRowProps> = ({ user, userAppointments, date }) => { const weekDays = getWeekDays(date); return ( <div className={classes.scheduleRow}> <div className={clsx(classes.scheduleBlock, classes.auditorScheduleBlock)}> <span className={classes.scheduleBlockTitle}>{user.fullName}</span> </div> {weekDays.map((dayDate, dayIdx) => { return ( <div key={`${user.systemUserId}-${dayIdx}`} className={clsx(classes.scheduleBlock, classes.appointmentBlock, { [classes.weekendScheduleBlock]: dayDate.isWeekend, })} > {/* You can pass userAppointments here but you need additional logic for displaying them correctly */} </div> ); })} </div> ); }; export default WeekRow; - Put everything together in the Calendar component.
import { DayView, WeekView, MonthView } from './Views'; import useCalendar from './useCalendar'; import ActionsBar from './ActionsBar'; import classes from './Calendar.module.css'; const Calendar = () => { const { users, appointments, displayMode, calendarDateTime, changeCalendarDate, changeDisplayMode } = useCalendar(); return ( <div className={classes.calendarContainer}> <ActionsBar displayMode={displayMode} calendarDateTime={calendarDateTime} onChangeCalendarDate={changeCalendarDate} onChangeDisplayMode={changeDisplayMode} /> {displayMode === 'Day' ? ( <DayView users={users} appointments={appointments} date={calendarDateTime} /> ) : displayMode === 'Week' ? ( <WeekView users={users} appointments={appointments} date={calendarDateTime} /> ) : ( <MonthView users={users} appointments={appointments} date={calendarDateTime} /> )} </div> ); }; export default Calendar; - Add the created components to "App.tsx".
import Header from '@/components/Header';
import Calendar from '@/components/Calendar';
import classes from './App.module.css';
import { useAppSelector } from './hooks';

function App() {
  const isCalendarLoading = useAppSelector((state) => state.calendar.loading.calendar);

  if (isCalendarLoading) {
    return <div>Loading...</div>;
  }

  return (
    <div className={classes.container}>
      <Header />

      <Calendar />
    </div>
  );
}

export default App;
After completing all these steps, the "components" folder will look like this:

Additional Helpers
Some helpers can be useful for you:
- Getting the current user ID: If you need to retrieve the current user ID, you can use this code:
window.parent.getGlobalContextObject().getUserId();
-
Getting user roles: In situations where you need to impose restrictions for users who don't have specific roles, you can retrieve user roles using Power Apps WebAPI. The following code allows you to obtain all authorized user roles:
window.parent.getGlobalContextObject().userSettings.roles._collection;
You will receive the user roles data as a result.
-
Getting the user's time zone Power Apps option: Users in your system may have different time zones set in their personal settings, and sometimes you need to retrieve their time zones to format dates in your application. To accomplish this, you can use the following code:
window.parent.getGlobalContextObject().userSettings.getTimeZoneOffsetMinutes();
This code will give you the time zone offset in minutes.
Please note that all applications built in Power Apps as web resources are contained within iframes. Therefore, you need to use window.parent working with WebAPI.
How to Embed Applications in Power Apps
Embedding custom applications in Power Apps includes the following steps:
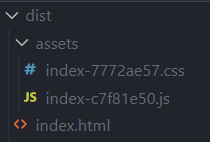
1. Build your application. Usually, it can be built using the commands "npm run build" or "yarn build." After building, you will see these files.
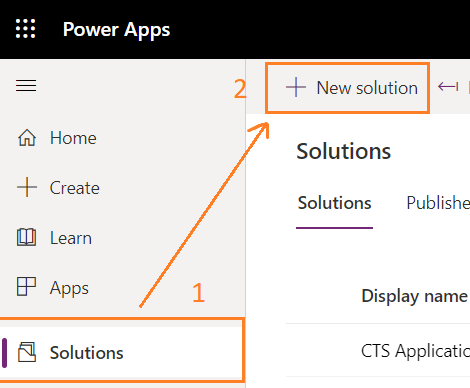
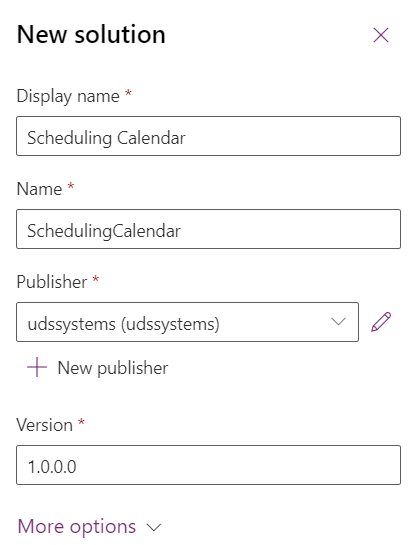
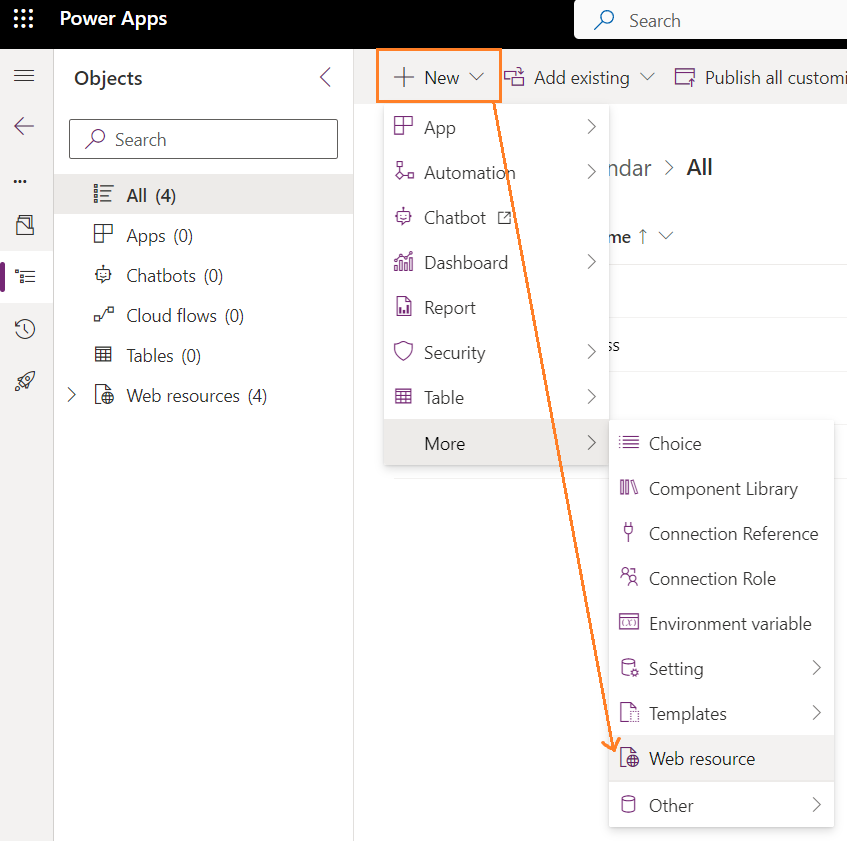
2. Create a new solution in Power Apps.
3. Add new web resources to the created solution. There should be three web resources for each file of your built application.
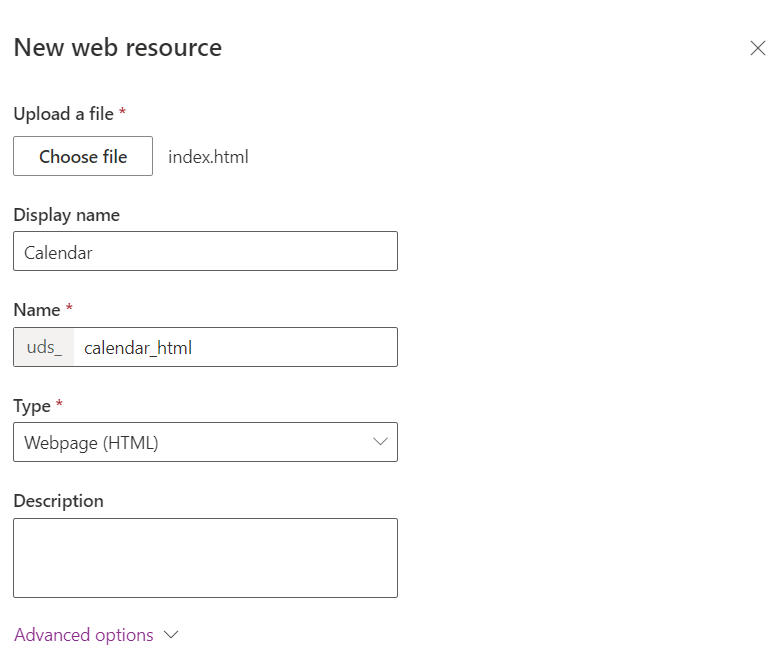
As a result, you will see three files.

4. Create a new page for your calendar application. First, you need to edit your application in Power Apps.

When you see a window for editing your application, you need to add a new page containing your application. In my case, I will add a new page to the "Activities" group.


Here, you should select a web resource that was created for an HTML file.

If everything looks the way you want, you can save and publish your changes.

Below, you can see the result of our work.

Summary
The Scheduling module has already begun to assist our clients in effectively managing their resources through appointment scheduling, display mode changes, and filters. It significantly reduces the time our clients spend checking their employees' workload. The user-friendly design ensures that understanding and operating the Scheduling module is quick and easy.
You can read more details about this in our cases: https://uds.systems/cases/web-application-for-payroll-audit.
Thank you for reading this article. We hope this will assist you in developing your own applications using Power Apps. If you have any questions, don't hesitate to contact us.