
Introduction
SharePoint integration with Dynamics 365 deserves detailed consideration to see all its pluses for the consumer.
Above all things, D365 integration with SharePoint assumes at least three beneficial things for the utilizer:
- SharePoint integration in Dynamics 365 is characterized by its incredible ease of implementation.
- This wide-scale content platform, with its robust security measures, lets you safely cooperate, synchronize, store, and share diverse content.
-It gives you the possibility to increase your productivity, saving time and human effort due to its unified content management.
Thus, this article will assist you in developing a clear insight into what happens during the process.
The Core Peculiarities of Dynamics 365 and SharePoint Integration
The Core Peculiarities of Dynamics 365 and SharePoint Integration
SharePoint supplies enterprises with a great chance to store documents related to opportunities, leads, and services in one centralized occurrence, simplifying the access and management of critical business records and enhancing the lead generation capacities.
When utilizing SharePoint Online alongside Dynamics 365, you gain such aptitudes:
- Make, upload, look at, and delete the docs kept in SharePoint directly from the inside of the Dynamics 365 apps.
- Readily keep, find, and share info across the bunch.
- Use SharePoint document management facilities, like seeing the doc check-in/out version history, reviewing records, and editing doc properties.
- Empower non-Dynamics 365 consumers, such as customers reviewing bids, to access SharePoint documents directly, provided they possess appropriate authorizations.
It is compulsory to make certain Dynamics 365 and the SharePoint Online site are in the same version of Office 365 to potentiate the integration.
Step-by-Step Integration Process
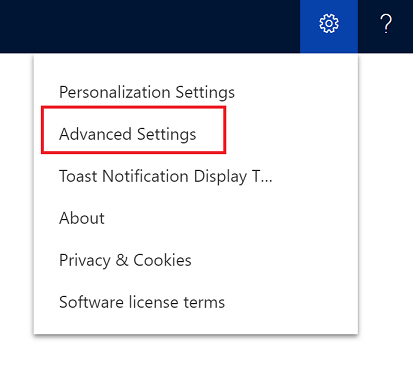
1. Go to Settings > Advanced Settings.
Note: Ensure you have Admin rights.
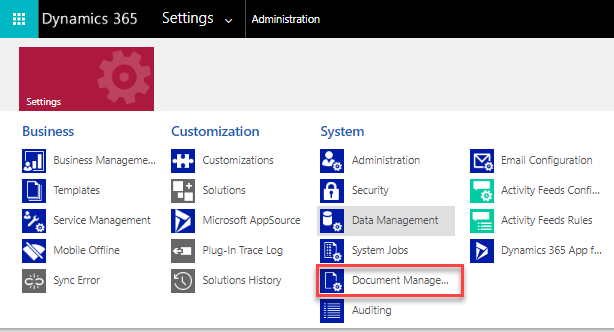
2. Navigate to Settings > Document Management.
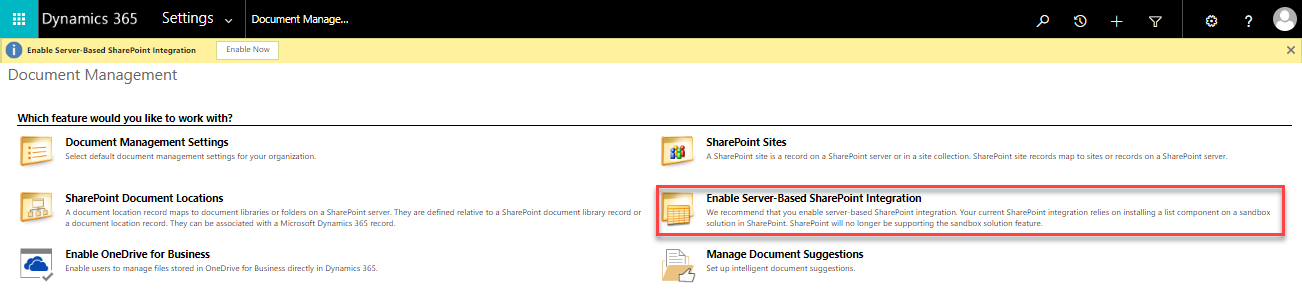
3. Pick ‘Enable Server-Based SharePoint Integration’.
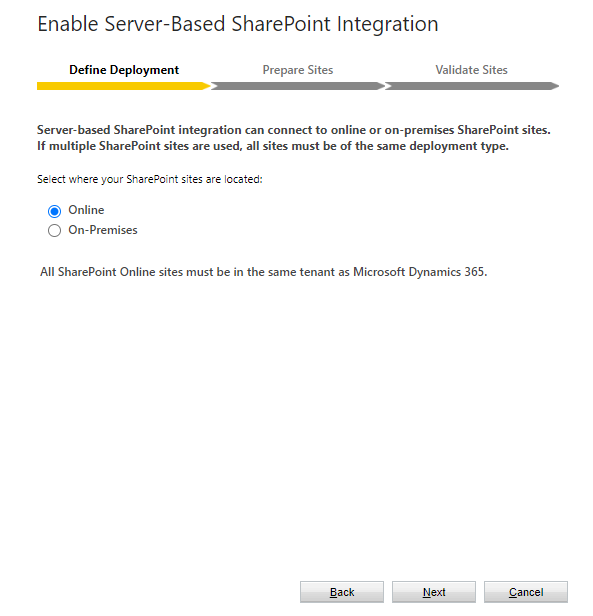
4. Choose online or on-premises SharePoint.
Note: SharePoint integration may establish connections with multiple SharePoint sites. Even so, these websites are supposed to be online or on-premises.
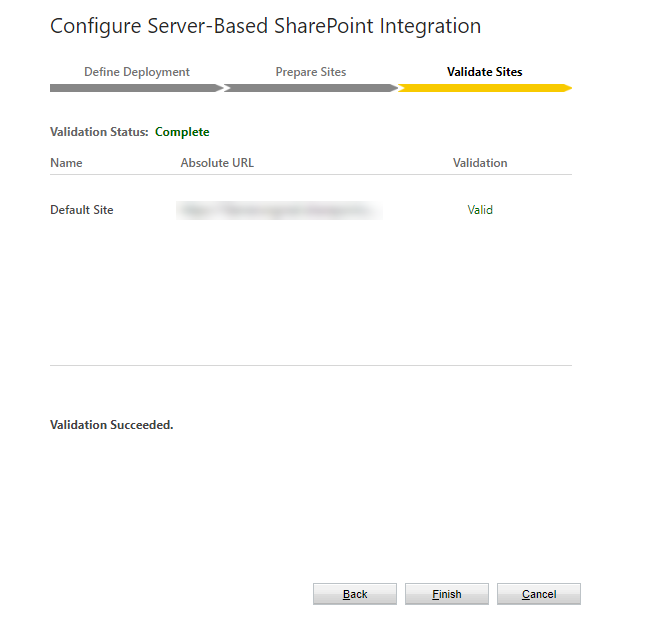
5. Enter the SharePoint site URL.
Note: You can copy the URL of the main page of the site, and the wizard will verify it after you press the knob ‘Next.’

6. If the validation is successful, click on the ‘Finish’ key to render active the Server-Based SharePoint Integration.
Note: You can authorize the entities for Document Management Integration this way:
- Revert to the Document Management page.
- Click on the Document Management Settings.
- Select the entities where you intend to store the documents.
- Click on ‘Next’.

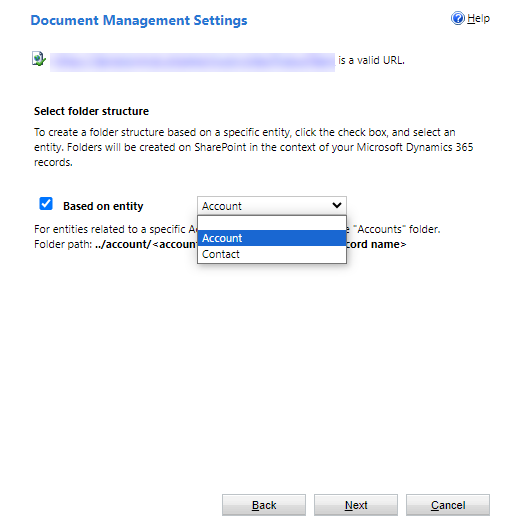
7. Define the folder pattern:
Option 1: ‘Based on the unchecked entity’: the folders will not be automatically made.
Option 2: ‘Based on the checked entity’ and ‘selected Account’: the folder structure will be created based on the 'Account' entity, repulsing your Dynamics 365 ‘Account’ notes. The folders for the entities bound to a specific ‘Account’ are nested under the ‘Accounts’ folder.
A Folder Path example: ../account/<account name>/<entity name>/<record name>
Option 3: ‘Based on the checked entity’ and ‘selected Contact’: the folder structure will be created based on the 'Contact' entity, representing your Dynamics 365 ‘Contact’ records. The folders for the entities linked to a particular ‘Account’ are placed under the ‘Accounts’ folder.
A Folder Path example: ../contact/<contact name>/<entity name>/<record name>
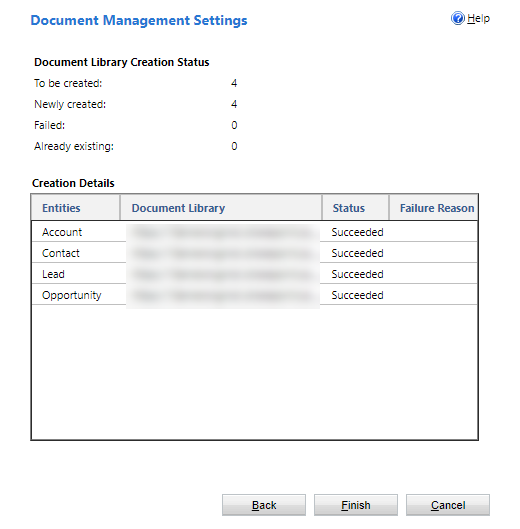
8. Press the key ‘Next’ and wait until the document libraries are created.
Note: The operation might last for some time.
9. Click on ‘Finish’ as ever the process is finalized.
Utilizing Document Management
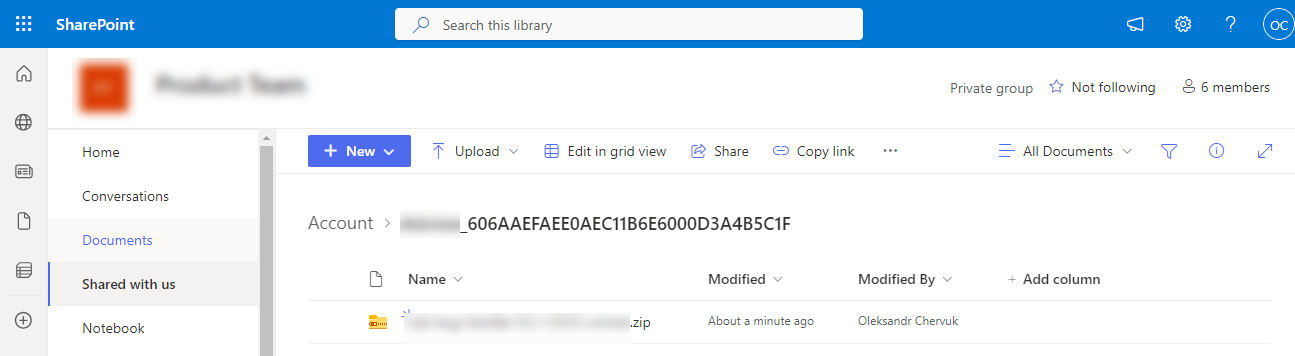
Now, it is high time to consolidate the document storage locations with the previously enabled entities and start managing the documents. Start by accessing a document management-enabled record, such as an
Account:
1. Browse to Your Web Application.
2. Unlock the record with the empowered document management, for instance, Account.
3. On the entry’s form, elect Related > Documents.

4. Select ‘Upload’ and browse the document to insert it in the new folder on your Microsoft 365 SharePoint Online Team site.

5. To see the record on your Microsoft 365 SharePoint Online Team site:
- Click to the left of the document name (you will spot a checkmark).
- Then select ‘Open Location’.
OR
- Click on ‘Open Location’ drop-down and select the location to open.
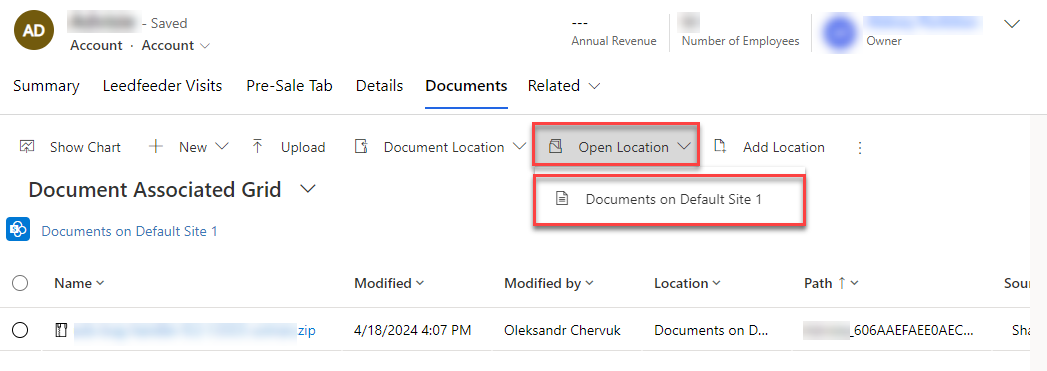
6. The Microsoft 365 Team Site folder will open in a new inset.
7. Pick ‘Site Contents’ to observe all the document atheneums created for the entities you have elected to be managed by Document Management.
Note: The entities will appear as document libraries (for instance, Account, Article, Case, Lead, Opportunity, Product, Quote, etc.).
Summarizing
Therefore, you are now more aware of SharePoint integration in Dynamics 365 after you have gone through the whole process of integration. We feel hopeful it was useful for you, and you will now be able to repeat such a process on your own.
Nevertheless, if you have any questions or require any further assistance, please, reserve a personal call or reach out. We are here to aid you in unlocking the full potential of your data.