Introduction
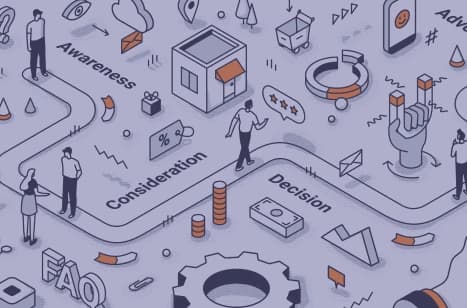
The Marketing solution in Dynamics 365 offers various tools and strategies for reaching customers. Two key approaches for customer journey creation are outbound marketing and real-time marketing. In this article, we'll explore the differences between these approaches, highlighting their advantages and specific use cases. Additionally, we'll provide step-by-step tutorials on how to create customer journeys for both outbound and real-time marketing.
Outbound Marketing Customer Journeys
Outbound marketing typically involves planned and structured campaigns where marketing content is delivered to a predefined audience at scheduled times.
Here are the key aspects of outbound marketing customer journeys:
· Structured campaigns: outbound marketing is ideal for creating planned, structured campaigns, making it suitable for consistent messaging.
· Predictable timing: campaigns can be scheduled in advance, allowing for predictable timing and resource allocation.
· Efficient resource management: since outbound campaigns are planned, resources can be allocated efficiently, and marketing content can be prepared well in advance.
· Brand consistency: outbound marketing campaigns enable the maintenance of brand consistency across all customer interactions.
· Scalability: these campaigns can be scaled for larger audiences or more extensive marketing efforts.
Use cases for Outbound Marketing:
· Product launches with scheduled email campaigns.
· Regular newsletters to keep the audience informed.
· Promotional campaigns with preplanned content.
· Brand awareness initiatives.
Tutorial: Creating Outbound Marketing Customer Journeys in Dynamics 365
Creating an outbound marketing customer journey in Dynamics 365 allows you to design structured campaigns and automate marketing processes. By following the steps below, you'll learn how to set up a customer journey, create your campaign, configure tiles, choose the target audience, set general options, and go live with your campaign.
Step 1. Set up a Customer Journey
· Access Dynamics 365: log in to your Dynamics 365 account.
· Navigate to Customer Journeys: go to "Outbound marketing" > "Marketing Execution" > "Customer Journeys."
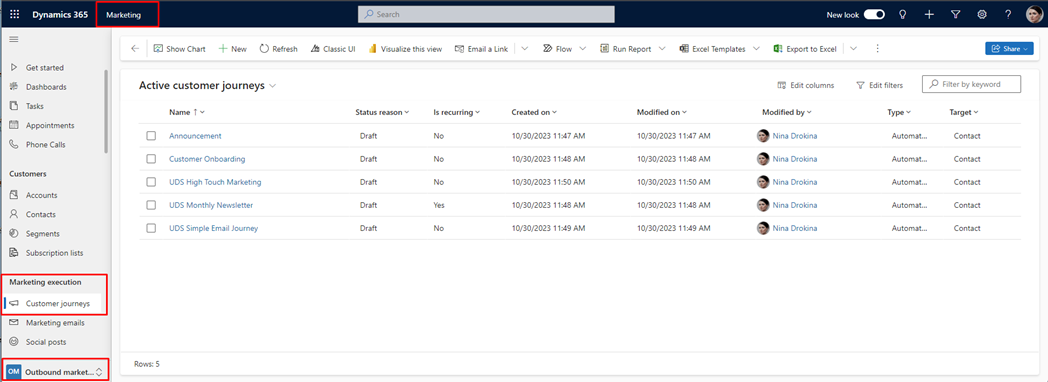
· Create a New Journey: click the "New" button on the command bar.
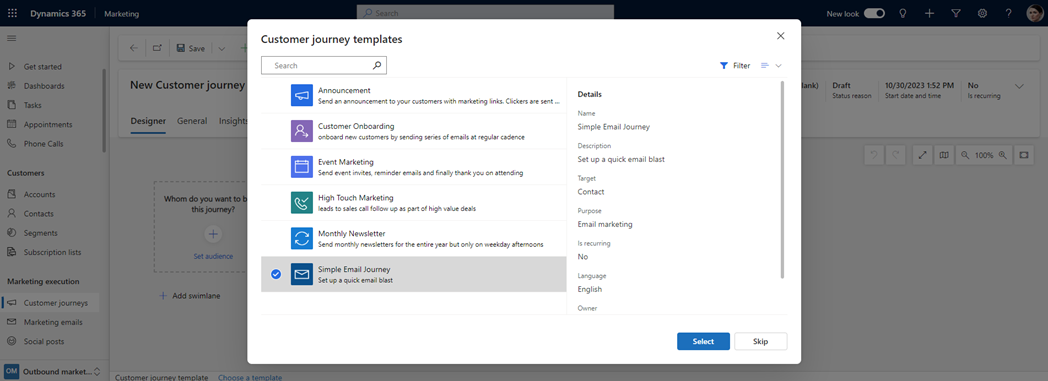
· Select a Template (Optional): Dynamics 365 provides customer journey templates to help you get started quickly. Choose a template that suits your campaign type. You can also start from scratch.
· Design your Journey: once on the customer journey form page, you'll see the canvas on the "Designer" tab. Here, you'll build your campaign pipeline by adding and configuring tiles representing each step.
Step 2. Design your Journey
· Add Tiles to the Pipeline: to add tiles to the pipeline, click the "+" button on the canvas and select a tile type from the in-place menu. The first tile should establish the target audience for the journey, typically a segment tile to define the contacts.
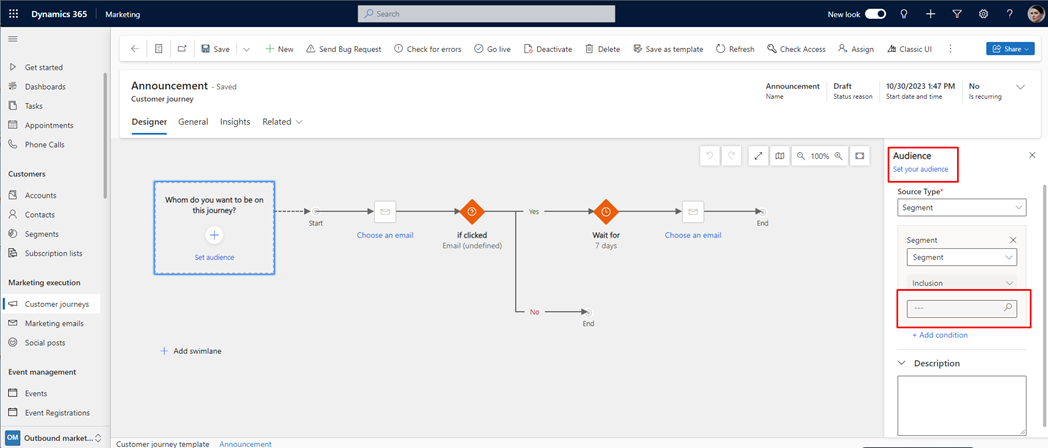
· Configure Tiles: configure each tile by selecting it and accessing the settings tab to the right of the canvas. You can specify what happens at each step, such as sending an email, waiting, or performing other actions.

Step 3. Choose the Journey's Target Segment
· Target a Standard Segment: To define the target audience, use a segment tile. You can combine segments and set logic for combining them (e.g., union/intersection).
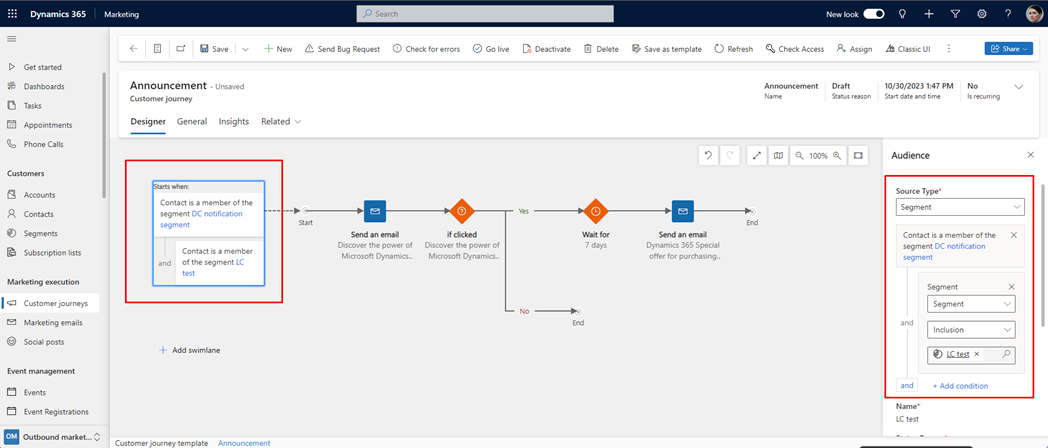
· Target a Subscription List (Optional): If you have subscription lists, place a segment tile configured to load a subscription list as the first tile. It targets contacts who signed up for mailing lists.
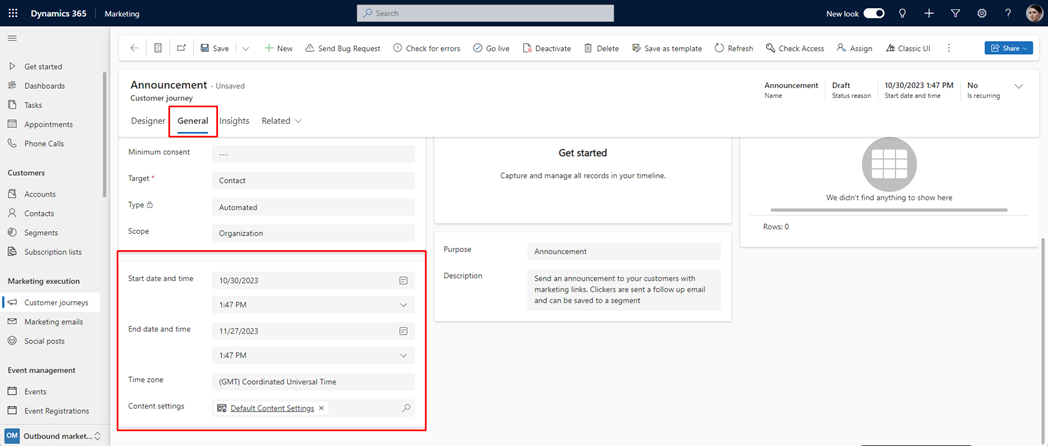
Step 4. Set General options
· Set the Execution Schedule: Define the start and end dates for your campaign on the "General" tab. Specify the time zone for interpreting these values.
· Choose Content Settings: Select content settings to be used for your journey. These settings include standard values for email messages, like subscription center links and social media links.
· Set Business-Unit Scope (Optional): If enabled, business-unit scopes allow you to control which contacts can join the journey based on business-unit ownership.
· Set the Minimum Consent Level: If data protection is enabled, configure the minimum level of consent required for contacts to participate in the journey.
Step 5. Set Up a Recurring Journey (Optional)
· If you want the journey to run in regular intervals, enable the recurring option and set the recurrence interval and count.
Step 6. Add a Suppression Segment (Optional)
· A suppression segment contains contacts that won't receive messages from the journey, even if they're in targeted segments. Configure a suppression segment if necessary.
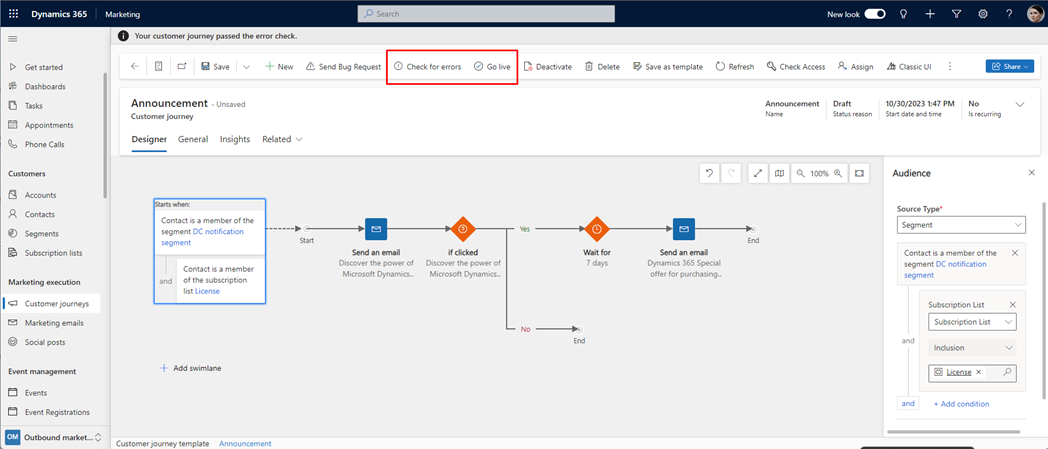
Step 7. Go live to start running the Journey
· Double-check the start and end dates to ensure they are accurate.
· Select "Check for Errors" to verify your campaign setup. Address any reported errors.
· When everything is ready, select "Go Live" in the command bar. It will start your journey.
Your outbound marketing customer journey is live now and will process contacts based on your configured campaign steps. Monitor the journey's progress and analyze results to gain insights into your marketing activities.
Real-Time Marketing Customer Journeys
Real-time marketing focuses on instantaneous, personalized customer interactions based on their behaviors and actions.
Here's what sets real-time marketing apart:
· Personalization: real-time marketing allows for highly personalized interactions. Messages and offers can be tailored to individual behaviors and preferences.
· Immediate response: this approach responds instantly to customer actions, increasing the chances of conversion, especially for time-sensitive events like cart abandonment.
· Higher engagement: real-time marketing captures customer attention when they are most engaged, leading to higher open and click-through rates.
· Behavior-driven: customer journeys are driven by specific behaviors or triggers, making the marketing highly relevant and context-specific.
· Recovery and retention: real-time marketing can recover potentially lost opportunities, such as abandoned shopping carts, and help with customer retention through personalized follow-ups.
Use cases for Real-Time Marketing:
· Abandoned shopping cart recovery.
· Triggered emails based on website behavior.
· Personalized recommendations based on customer history.
· Real-time responses to customer inquiries and feedback.
Tutorial: Creating Real-time Marketing Customer Journeys in Dynamics 365
Real-time marketing customer journeys enable you to respond to customer interactions and convert their interest into a sale. These journeys can be segment-based or trigger-based. This tutorial will walk you through the process of creating such journeys:
Step 1: Access Customer Journeys in Dynamics 365
- To access customer journeys, go to “Real-time marketing” > “Engagement” > “Journeys” in Dynamics 365.
Preparation: Before building your customer journey, ensure that you have created the necessary segments, triggers, and content that you will use within the journey.
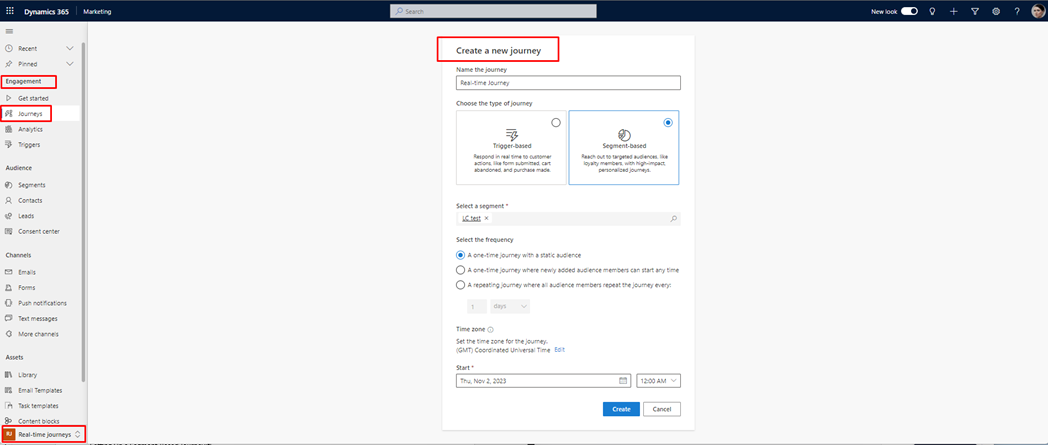
Step 2: Setting up a new Journey
- To create a new journey, select + New journey in the command bar.
- Enter a Name for your journey.
- Choose the type of journey:
· Trigger-based: People start the journey based on specific events or actions.
· Segment-based: People start the journey if they belong to a specific audience segment.
Setting Up a Trigger-based Journey:
If you're creating a trigger-based journey, provide the following information:
· Choose a trigger: This is the event or action that customers must perform to start the journey.
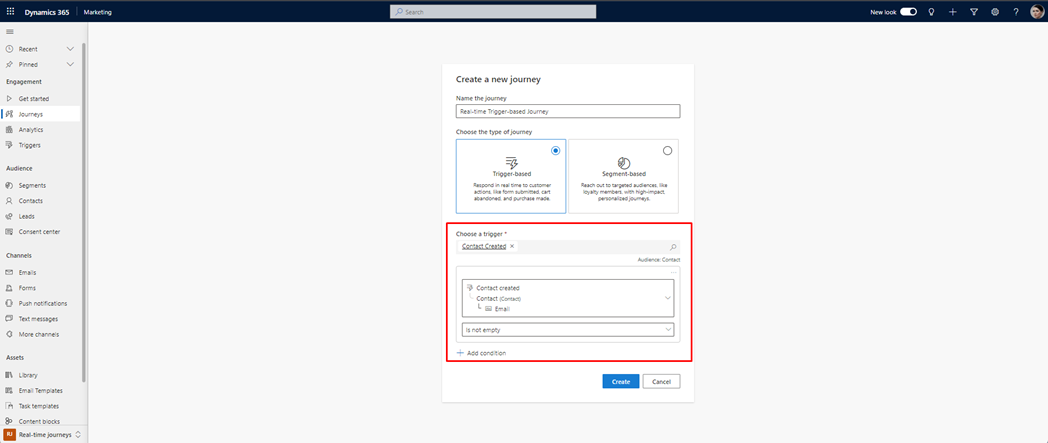
· Repeating this journey: Specify whether a customer can repeat the journey and the timeframe for repetition.
· Start date and time: Customers can start the journey only if they perform the trigger after this start date and time.
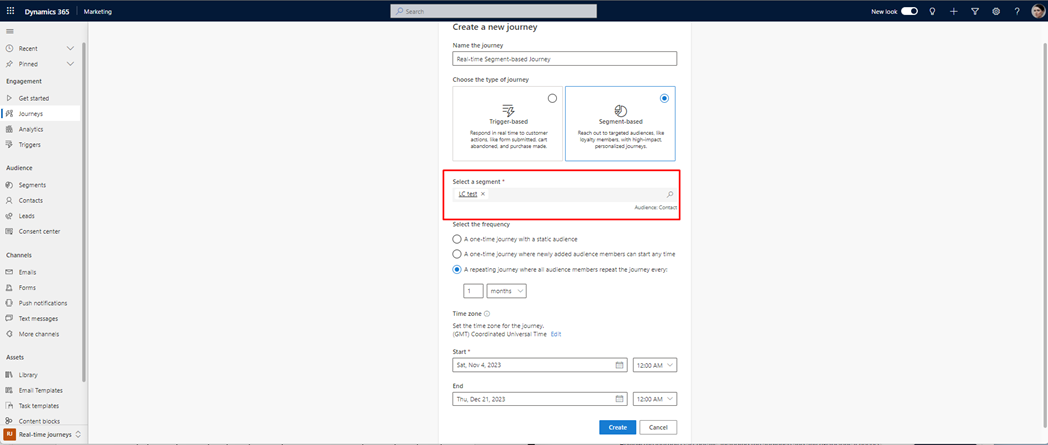
Setting Up a Segment-based Journey:
If you're creating a segment-based journey, provide the following information:
· Select a segment: Segment-based journeys work with segments from outbound marketing and Customer Insights.
· Frequency: Specify if this journey is one-time, repeating, or one-time with the option for newly added audience members to start at any time.
· Start date and time: Specify when you want to begin the journey.
Step 3: Review the Journey start details
· Review the journey start details, including the audience and any exclusions if necessary. You can also specify an “End date and time” for the journey.
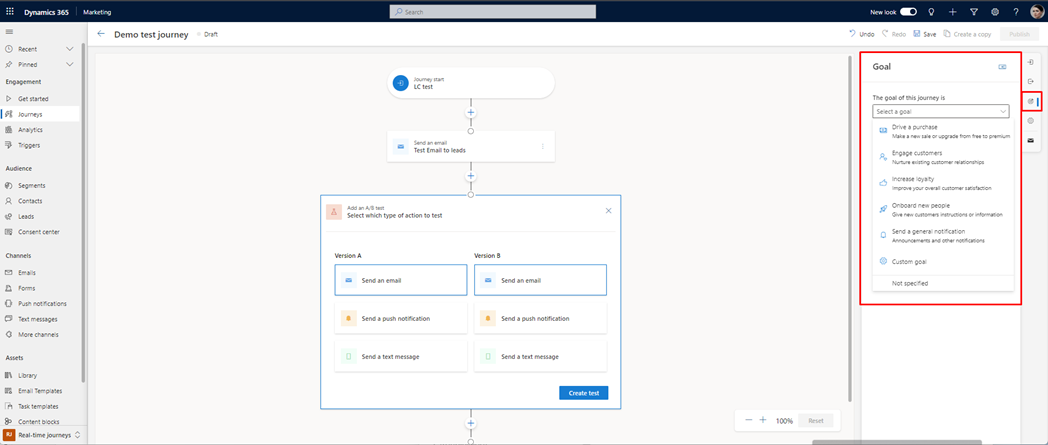
Step 4: Setting the Journey goal
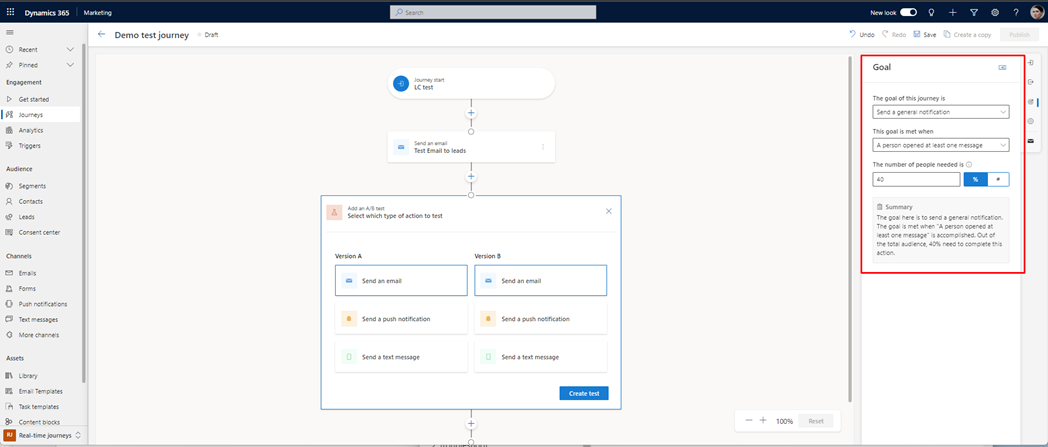
Define the goal of your customer journey. Goals are crucial for measuring the journey's success. To set the goal:
· In the Journey settings pane, select Goal.
· Choose the general purpose of the journey.
· Define what action people must perform to meet the goal.
· Specify the target amount for the goal, which can be a percentage or a number.
Step 5: Setting the Journey end details
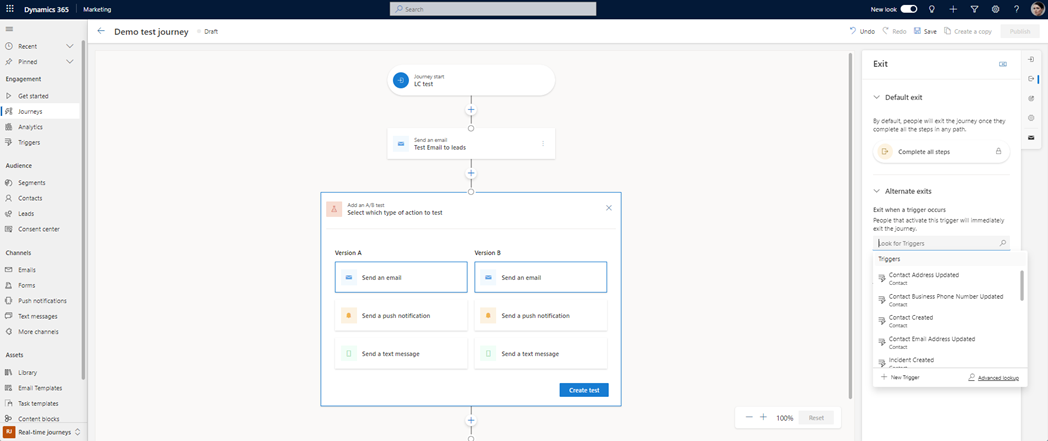
By default, the journey ends when customers complete all steps. However, you can set alternative exits for the journey. These exits allow you to remove customers from the journey when they meet specific criteria to avoid sending them irrelevant messages.
· Exit when an event occurs: Customers exit the journey when they perform a specific trigger.
· Exit by segment: Customers within a specified segment exit the journey.
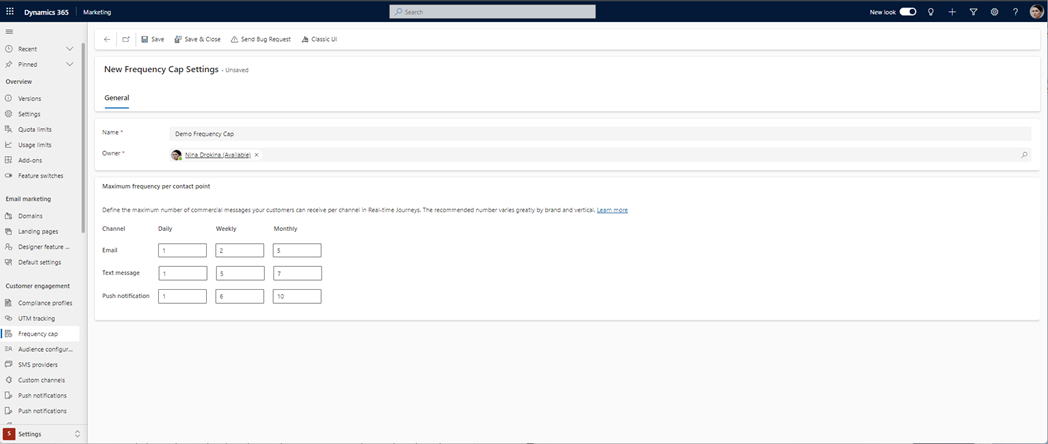
Step 6: Frequency Cap
The frequency cap feature limits the number of messages customers receive within a specific timeframe through a particular channel. This feature helps optimize customer engagement and prevent message overload. To enable or disable a frequency cap for your journey:
· Navigate to journeys.
· Select a journey to edit.
· Under Other settings, find Frequency cap, and you can exclude the journey from the frequency cap.

By following these steps, you can create real-time marketing customer journeys in Dynamics 365, allowing you to engage with customers based on their interactions and drive specific actions to achieve your marketing goals.
Finding The Right Balance
The most effective marketing strategies often combine elements of both outbound and real-time marketing. By understanding the advantages and use cases of each approach, businesses can find the right balance to create powerful and adaptable customer journeys in Dynamics 365.
The key is to choose the right strategy for each specific marketing objective, harnessing the strengths of each approach to achieve the best results.
Conclusion
In summary, whether you choose outbound or real-time marketing in Dynamics 365, it's essential to understand the strengths of each approach and adapt your strategies to specific marketing objectives. By leveraging both approaches strategically, you can create effective customer journeys that engage and convert your audience.