
Introduction
Everyone is familiar with the out-of-the-box CSV file import functionality. It's helpful when transferring records between environments or importing new data into a CRM. However, there are instances where the basic import process may not be enough, and you may require additional logic. So, I want to provide you with a Power Automate flow for these needs.
Client`s request
One of our clients presented us with an interesting request. Their usual process involved managers uploading local CSV files containing new contact information to the CRM system. However, duplicates were not allowed in our case, so managers had to manually review each duplicate record and make updates if the CSV data varied from the current information in the CRM.
The client requested a feature that enables managers to manually upload a CSV file from their laptops, with semicolons as field dividers. And we did it. Catch the instructions to complete the path by yourself.
CSV Upload Setup
In our example, a CSV file has the following structure:
FirstName;LastName;Email;Mobile

Tony;Stark;tstark4562123@gmail.com;+3737945612351

Thor;Odinson;todinson351534168@gmail.com;+3805412365822

Steve;Rogers;srogers3132158@gmail.com;+13025486621223
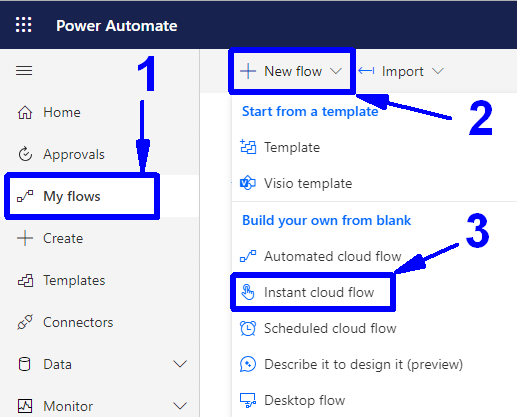
First, open Power Automate and select the environment you are working with at the top right corner. After, go to the "My flows" item on the left (1), open the "+ New flow" dropdown (2), and select the "Instant Cloud Flow" option (3).
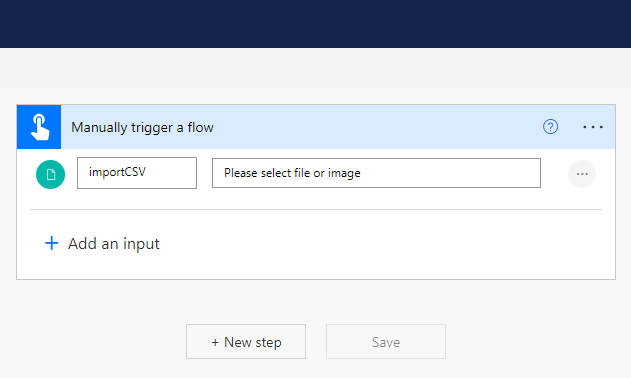
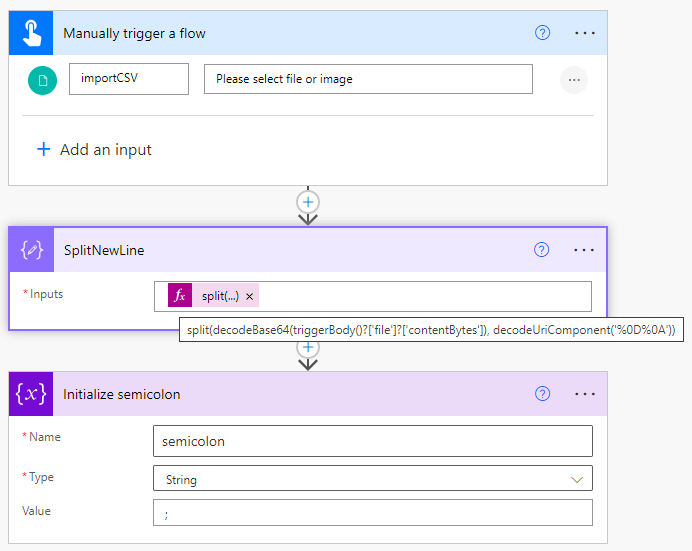
Provide a name for this workflow and select the trigger as shown in the screenshot.

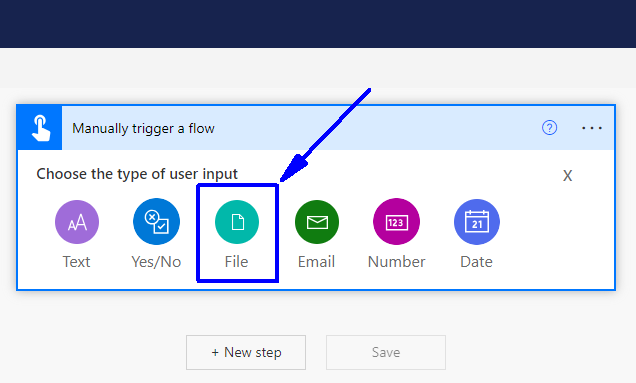
Click on "+ Add an input," select the File option, and name this input ("import CSV" in my case).
Add a new step for your flow and select a Compose action from Data Operation.

Split Function
The next crucial step involves two essential tasks when uploading your local CSV files.
First, you must split the CSV file into an array of lines. Second, you need to decode the file data.
Let's do these.
In the Input area, you need to insert the following function:
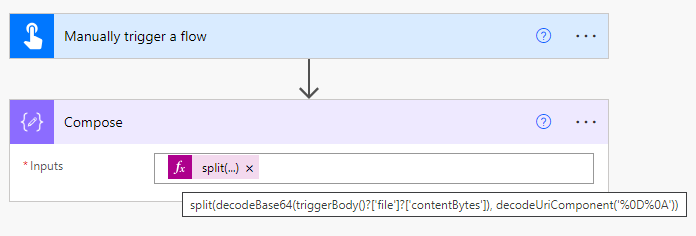
Attention: In my case, the CSV file is generated in Windows, where the line ending is represented as "\r\n" (CR-LF). Therefore, we require the decodeURIComponent('%0D%0A') expression to split the file correctly. (For further clarification on decoding and line endings, kindly see NOTE 1 at the end of the article.)
Now, let's create a variable to represent our field divider, a semicolon in this case (you can use a different symbol if needed). Once the variable is set, we can save the flow. The initial three steps of the process should resemble the following (to make the process steps easier to read, I have renamed the "Compose" step to "SplitNewLine."):
Now you can execute your workflow and upload a local file to verify its functioning correctly (refer to NOTE 2 for additional instructions). Your output should resemble the following example:

Skip Function
After successfully creating an array of lines from the file, you need to iterate through each line for processing.
It's important to note that in most cases, CSV files have a first line containing column names, which you don't need to process. To exclude this line from the "Apply to each" loop, we will add a "skip" function along with the following expression within the "Apply to each" control:
skip(outputs('splitNewLine'),1)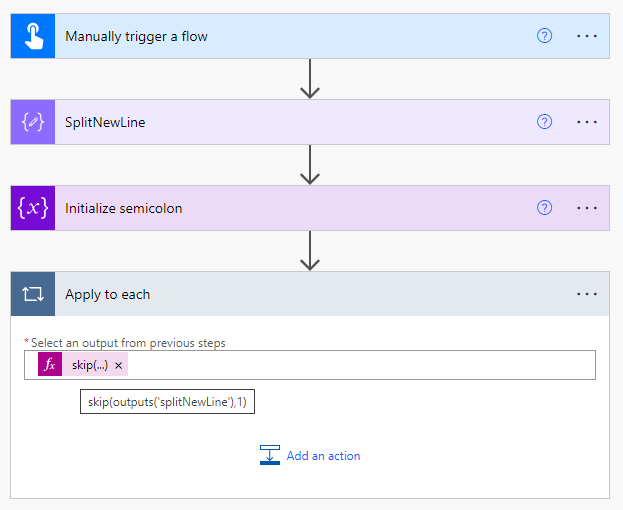
As a result, we will process one line at a time in a loop. Each line will be converted into an array of data for processing.
Compose Actions
Now, let's add a couple of Compose Actions:
-
Click on "Add an action" within the "Apply to each" control.
-
Add another Data Operation Compose Action.
-
In the input, use the following expression:
split(item(),variables('semicolon'))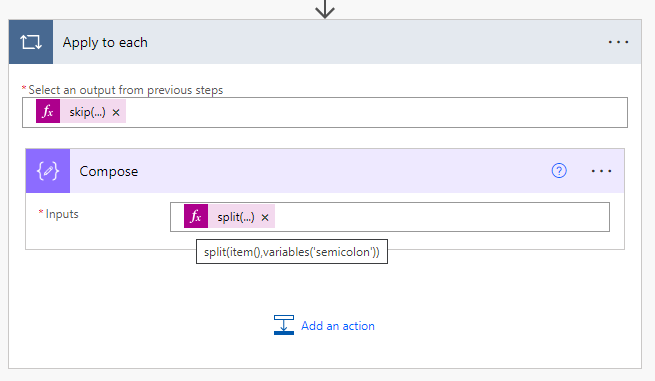
As a result, you will split our lines into segments using a semicolon as the divider. Please note that if your CSV uses a different symbol as the delimiter, specify it accordingly.
We need to incorporate a second Compose Action and manually generate an empty record JSON within it.

Afterward, within the quotes for the first column header, you need to insert the following expression:
outputs('Compose')?[0]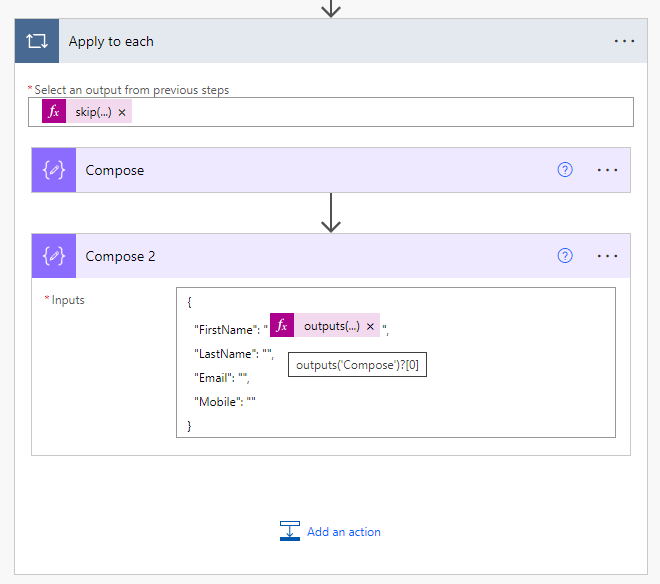
That expression represents the first array element from the Compose step.
To obtain the second element, you can use the following expression:
outputs('Compose')?[1]and so on.
Now let's examine the flow and upload the CSV file.
It is the expected output we should receive for the first line:

Please save a copy of this output, as we need it for the next step.
Parse JSON
Now, utilizing the processed data in the subsequent steps is essential. We need to include one final step in our flow to achieve this.
Follow these instructions to add the step:
- Click on "Add an action" within the same "Apply to each" control.
- Select the "Data Operation" category and the "Parse JSON" action.
- In the "Content" field, insert the output from the "Compose_2" action.
- For the "Schema," click the "Generate from sample" button.
- Insert the previously copied output into the sample field and click "Done."
Following these steps, your Parse JSON action should resemble the final configuration.

And that's it!
Once you have completed the process, you can utilize the parsed data in subsequent steps.

NOTES:
-
If your file contains Unix standard line feed characters (LF) displayed as \n, you should use the decodeURIComponent('%0A') expression. And, if you choose to upload your file to the OneDrive folder instead of using a local file, the decodeBase64() function will not be necessary.
-
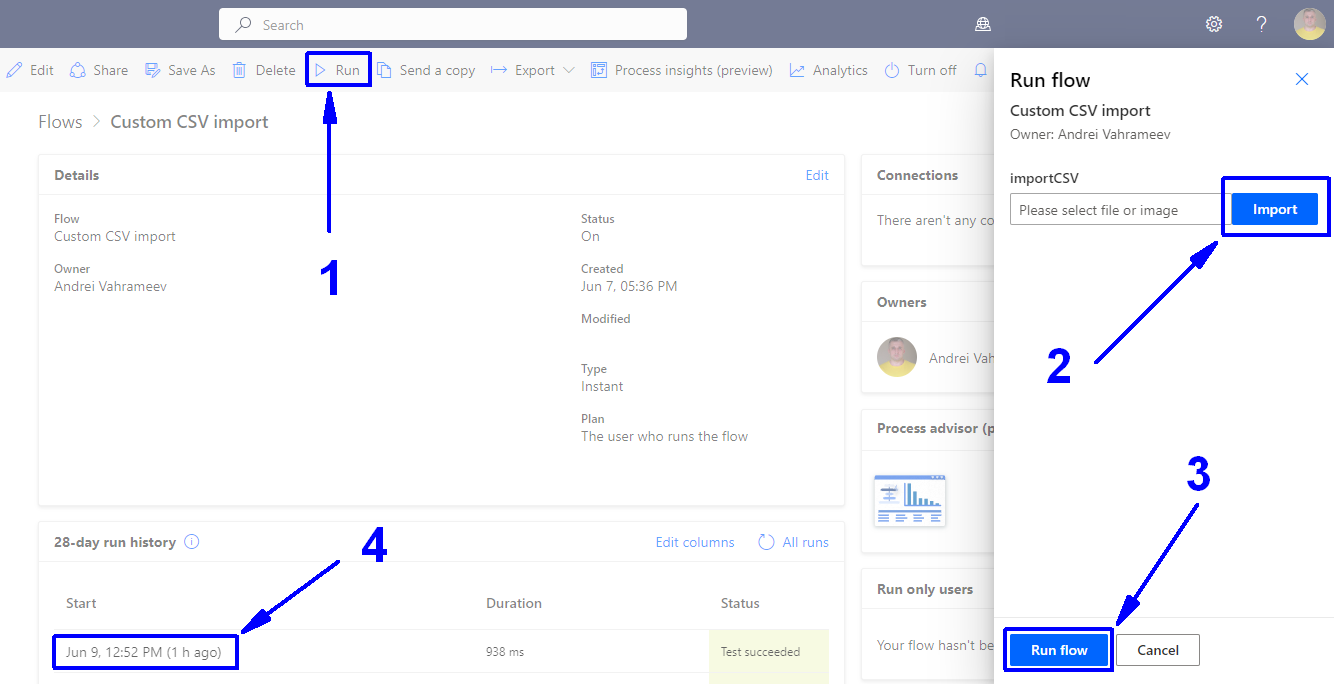
To upload a file and execute this flow, follow these steps:
-
Open the flow and click on "Run" (1).
-
In the sidebar, click on "Import" (2).
-
Select the CSV file you want to upload.
-
Click on "Run flow" (3).
If you want to view the result of your flow, click on the timestamp when the flow was triggered (4).
-
Summary
As a result of our work, we developed a comprehensive flow that enables the system to efficiently perform duplicate checks using email addresses and automatically update phone numbers for any duplicates identified. Additionally, the flow creates new contacts when no duplicates are found.
Furthermore, we have expanded this flow to incorporate additional functionalities such as Leads check, Lead qualification, and Opportunity updates. However, it is important to note that our method is not designed to replace the out-of-the-box solution. Instead, it provides a valuable alternative in situations with specific requirements, offering increased flexibility and scalability.