
How to Setup Chat for Dynamics 365 Portal
Chat for Dynamics 365 is an engagement channel that enables chat operators to connect with customers in real time. Chat can only be used if you have an active subscription to Microsoft Dynamics 365 for Customer Service Enterprise or Customer Engagement Plan in your tenant. This guide explains the steps to help you sign up for a trial of Chat for Dynamics 365.
This article consists of 2 parts and covers such topics:
- Part I. Initial setup
By the end of reading it, you will be able to set up the Portal Chat and start using it.
Initial Setup
START A TRIAL
Important. Please, be sure that you have Dynamics 365 for Customer Engagement apps version 9.1.0000.3653 or higher.
Follow these steps to start a trial version of the Portal Chat:
- Login to https://portal.office.com/ as a global administrator
- Go to Billing > Purchase Services, and select Add-on subscriptions>
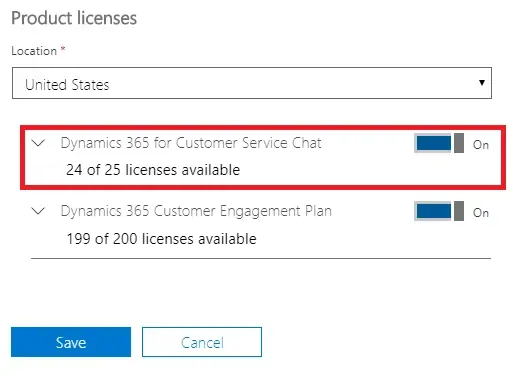
You`ll see Dynamics 365 for Customer Service Chat under Add-on subscriptions. You must already have a paid license of either Customer Service Enterprise or Customer Engagement Plan in your tenant; otherwise, the Dynamics 365 for Customer Service Chat option won`t be visible.

Purchasing a license for chat
You can start a 30-day trial of Chat with 25 user licenses. After signing up for a trial, you must assign licenses of Chat to the users who need to engage with customers and provide support via Chat. This can be done by selecting one or more active users and editing their product licenses. After you`re done, click the Save button.
ENABLE CHAT IN YOUR ORGANIZATION
Once you have the subscription for Chat and assigned licenses to desired users, you can enable Chat in your organizations from Dynamics 365 admin center.
In Dynamics 365 admin center, go to the Applications tab, select the Omnichannel for Customer Service application, and select Configure.
PROVIDE DATA ACCESS CONSENT
To allow Omnichannel for Customer Service to read and write data on behalf of users, follow the below steps:
- Go to Data access consent URL
- Log in as a Global Tenant Admin
- Select the checkbox Consent on behalf of your organization
- Select Accept to grant data access consent
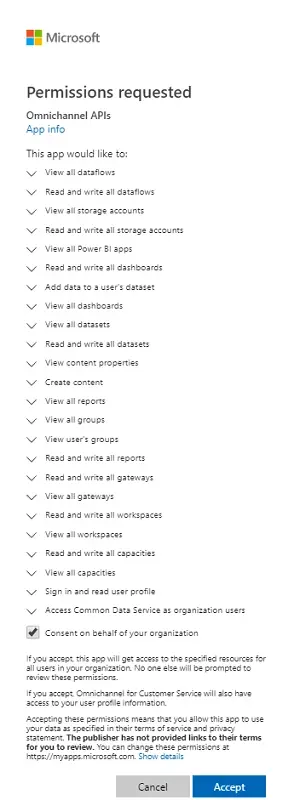
Providing data access consent
In the next part, I will tell you how to configure the Omnichannel Chat and how to test it properly.
Try this setup guide, and let us know what you think. Contact us.