Introduction
In the ever-evolving landscape of technology, the past few years have witnessed a remarkable surge in the popularity of AI applications. These intelligent programs have rapidly gained ground, permeated our daily lives, and transformed the way we interact with technology. Understanding their significance and being able to create them has become a quintessential skill in today's digital age.
One category that has gained exceptional prominence is voice-powered AI apps. These sophisticated applications harness the power of natural language processing and voice recognition to provide users with an unparalleled level of convenience and utility. From virtual assistants that streamline daily tasks to voice-controlled smart homes, the range of their applications is vast and diverse. Voice-powered AI apps have become indispensable tools for both individuals and businesses, offering hands-free control, accessibility, and an entirely new way to interact with technology.
In this article, we will construct a relatively simple voice-powered translation app. This app will record user voices, convert audio to text (and vice versa), play back audio, and send prompts to ChatGPT. Using this foundation, you can develop your voice-powered AI app tailored for various roles, such as an interviewer, foreign language teacher, personal assistant, etc.
Important Note!
This is not a guide on creating a React project or a Web API project from scratch. Familiarity with .Net and React is assumed.
Preparations
For converting audio to text and subsequently translating this text, we'll use OpenAI services:
First, create an account on https://openai.com if you haven’t already.
Click the “Get started” button and follow the instructions.
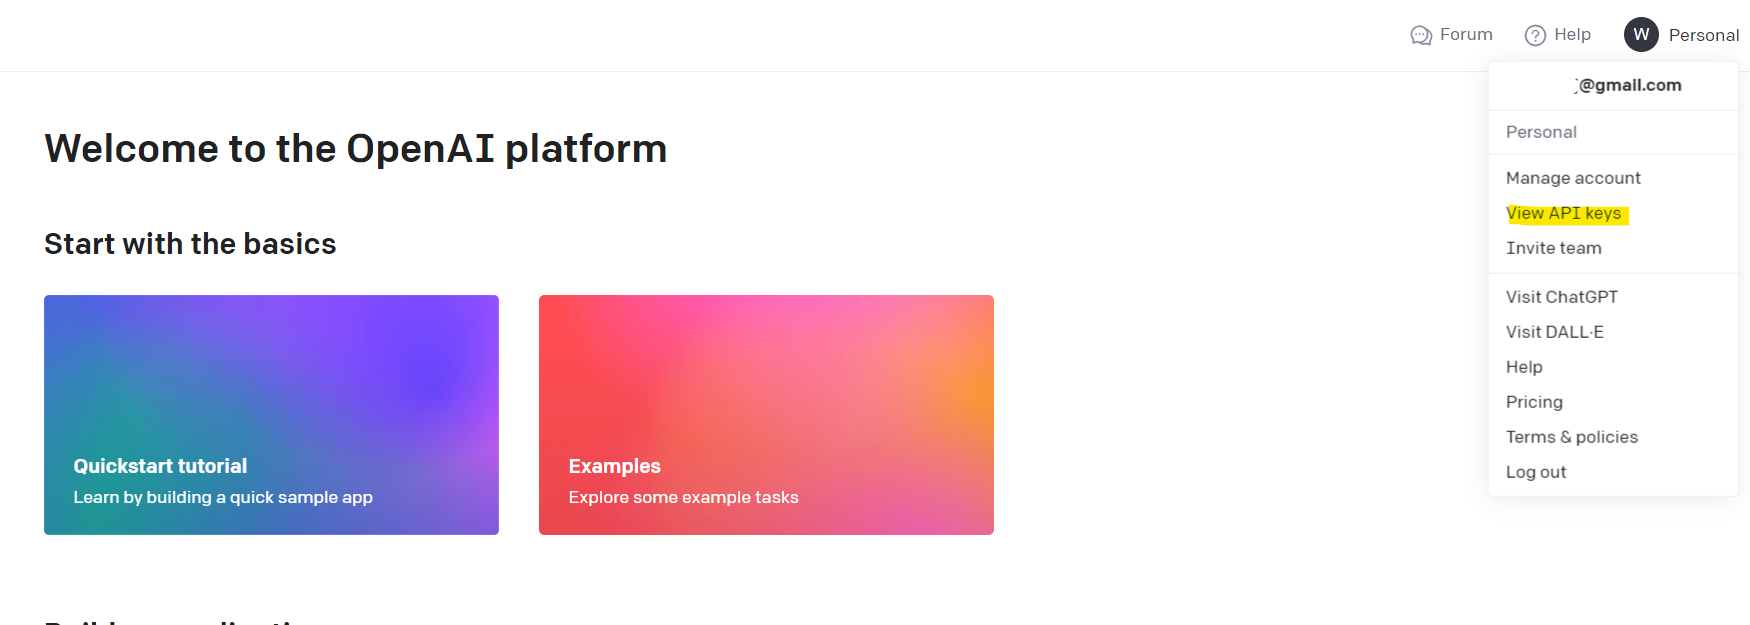
After registration, create your API Key. Navigate to https://platform.openai.com, click the account icon in the upper right corner, and select “View API keys” from the dropdown.

Then click the “Create new secret key” button and follow the instructions.

We'll use the Eleven Labs service to convert the translated text back into audio. Based on my observations, Eleven Labs produces human-like voice outputs. They also provide comprehensive documentation with Swagger.
To utilize this service, create an account at https://elevenlabs.io.
Click the “Sign up” button and follow the instructions.
Post-registration, you can retrieve your API Key. Click on the account icon in the upper right corner and select the Profile menu item.


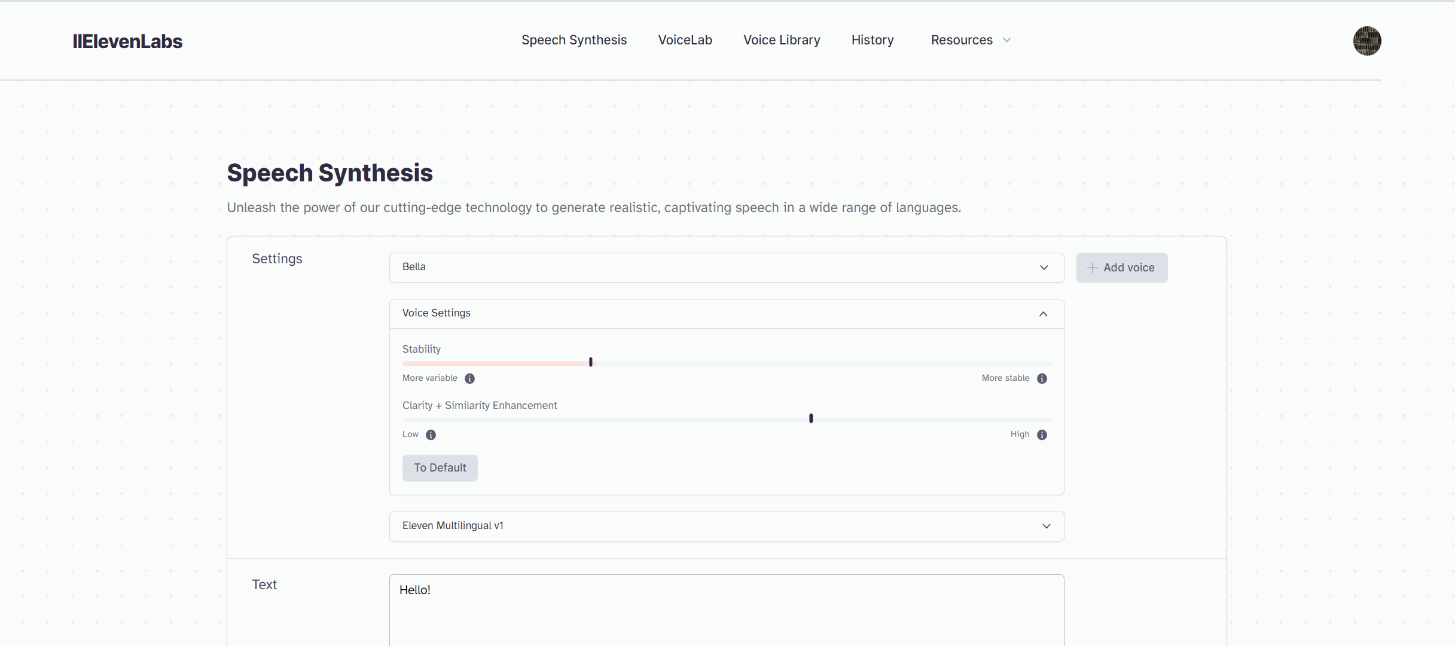
To experiment with voices and select the perfect one for your project, visit the "Speech Synthesis" page.

To use any voice in our project, we need its ID. Navigate to the Documentation page and locate the "voices" method.

Click the “Try it out” button, input your API key into the “xi-api-key” field, and then click “Execute”.
In response, you will receive a JSON object. By the way, you can download it, and I suggest doing so for future reference in case you need to use another voice.

Currently, we are interested in two primary fields within this JSON object: "voice_id", which is the ID of the voice we were searching for, and "name." Using the "name" field will make it easier to search for another voice ID if necessary.
Backend
Now, with preparations complete, let’s delve into the backend functions. For this example, our backend is a .net core Web API application.
First, we require a function to accept audio data and transcribe it (convert it to text).
public async Task<string?> GetTextFromAudio(byte[] audioBytes)
    {
        WhisperResponse? whisperResponse = null;

        // Create the form data
        var formContent = new MultipartFormDataContent();
        formContent.Add(new ByteArrayContent(audioBytes), "file", "fromUser.mp3");//We just need to give some name to this file. It can be any name.
        formContent.Add(new StringContent("whisper-1"), "model");//name and version of needed mod

// Create the HTTP request
        var httpRequest = new HttpRequestMessage
        {
            Method = HttpMethod.Post,
            RequestUri = new Uri(whisperUrl),
            Headers =
                {
                    { "Authorization", $"Bearer {_apiKey}" },
                },
            Content = formContent
        };

        using HttpClient client = new HttpClient();

        // Send the request to OpenAI
        var response = await client.SendAsync(httpRequest);

        // Handle the response
        if (response.IsSuccessStatusCode)
        {
            // Read the transcription from the response
            var transcription = await response.Content.ReadAsStringAsync();
            if (!string.IsNullOrEmpty(transcription))
            {
                whisperResponse = JsonConvert.DeserializeObject<WhisperResponse>(transcription);
                return whisperResponse!.text;
            }
            else
            {
                throw new Exception("No response from Whisper service");
            }
        }
        else
        {
            // Handle error response
            throw new Exception($"OpenAI API request failed with status code: {response.StatusCode}");
        }
    }
whisperUrl – the endpoint.
_apiKey – the string variable, the API key from OpenAI.
WhisperResponse – a model for the service response.
public class WhisperResponse
{
    public string? text { get; set; }
}
After obtaining the transcription from the audio data, we need to formulate a prompt for ChatGPT.
We will use the 'Chat completions API' for this purpose.
Typically, it appears as follows:
messages=[
        {"role": "system", "content": "You are a helpful assistant."},
        {"role": "user", "content": "Who won the world series in 2020?"},
        {"role": "assistant", "content": "The Los Angeles Dodgers won the World Series in 2020."},
        {"role": "user", "content": "Where was it played?"}
    ]
This structure allows users to track conversation history and ask additional questions about the topic.
In our case, we don't need to track conversation history because we're creating a simple translation app.
private List<MessageForGpt>? ComposeMessages(string userMessage, string selectedLanguage)
    {
        string systemPrompt = "You are professional translator from user's language to [lang] language. Your translation must be suitable for everyday talk.";
        systemPrompt = systemPrompt.Replace("[lang]", selectedLanguage);

        List<MessageForGpt> messages = new List<MessageForGpt>() {
                new MessageForGpt(){role="system", content=systemPrompt},
                new MessageForGpt(){role="user", content=userMessage}
            };

        return messages;
    }
userMessage – transcription of the audio file.
selectedLanguage – the language selected by the user on the frontend app.
MessageForGpt – a model for the Chat completion API.
public class MessageForGpt
{
    public string? role { get; set; }
    public string? content { get; set; }
}
After composing the message, we will send it to GPT:
public async Task<GptResponse?> GetAnswerFromGPT(List<MessageForGpt> messages)
    {
        GptResponse? gptResponse = null;

        GptRequest gptRequest = new GptRequest()
        {
            model = "gpt-3.5-turbo",
            messages = messages,
            temperature = 0.3,// between 0 and 2. Higher values like 0.8 will make the output more random, while lower values like 0.2 will make it more focused and deterministic.
            n = 1//How many completions to generate for each prompt.
        };

        string requestData = JsonConvert.SerializeObject(gptRequest);

        using HttpClient client = new HttpClient();

        var request = new HttpRequestMessage(HttpMethod.Post, gptUrl);
        request.Headers.Add("Authorization", $"Bearer {_apiKey}");
        var content = new StringContent(requestData, null, "application/json");
        request.Content = content;
        var response = await client.SendAsync(request);

        if (response.IsSuccessStatusCode)
        {
            string tmp = await response.Content.ReadAsStringAsync();
            gptResponse = JsonConvert.DeserializeObject<GptResponse>(tmp)!;

            return gptResponse;
        }
        else
        {
            // Handle error response
            throw new Exception($"OpenAI API request failed with status code: {response.StatusCode}");
        }
    }
gptUrl – https://api.openai.com/v1/chat/completions
public class GptResponse
{
    public string? id { get; set; }//unique id
    public int created { get; set; }//unix date of request
    public string model { get; set; }//name of the model which has been used
    public List<GptChoice>? choices { get; set; }//The answer from GPT
    public GptUsage? usage { get; set; }//information about tokens usage
}

public class GptChoice
    {
        public int index { get; set; }
        public MessageForGpt? message { get; set; }
        public string? finish_reason { get; set; }
    }
The possible values for finish_reason are:
• stop: The API returned a complete message, or the message was terminated by one of the stop sequences provided via the stop parameter.
• length: Incomplete model output resulting from the max_tokens parameter or token limit.
• function_call: The model decided to call a function.
• content_filter: Content was omitted due to a flag from our content filters.
• null: API response is still in progress or incomplete.
public class GptUsage
{
    public int prompt_tokens { get; set; }// Number of tokens in the prompt
    public int completion_tokens { get; set; }// Number of tokens in the generated completion
    public int total_tokens { get; set; }// Total number of tokens used in the request (prompt + completion)
}
Usage statistics are provided for the completion request.
Once we obtain a translation from GPT, we should send this text to the Eleven Labs service to retrieve the corresponding audio file.
public async Task<byte[]?> GetAudioFromText(string text)
    {
        using HttpClient client = new HttpClient();

        // Set request headers
        client.DefaultRequestHeaders.Add("accept", "audio/mpeg");
        client.DefaultRequestHeaders.Add("xi-api-key", _apiKey);

        // Build request body
        var requestBody = new
        {
            text = text,
            model_id = "eleven_multilingual_v1",
            voice_settings = new
            {
                stability = 0.5,
                similarity_boost = 0.5
            }
        };

        // Convert request body to JSON
        string jsonRequestBody = Newtonsoft.Json.JsonConvert.SerializeObject(requestBody);

        // Create HTTP POST request
        var httpContent = new StringContent(jsonRequestBody, System.Text.Encoding.UTF8, "application/json");
        HttpResponseMessage response = await client.PostAsync(elevenLabsurl, httpContent);

        if (response.IsSuccessStatusCode)
        {
            // Process successful response
            byte[] audioData = await response.Content.ReadAsByteArrayAsync();
            return audioData;
        }
        else
        {
            // Handle error response
            throw new Exception($"ElLabs API request failed with status code: {response.StatusCode}");
        }
    }
After completing these operations, we have the following data:
• Audio request from the user.
• Text transcription of the user's request.
• Text of the GPT answer.
• Audio of that answer.
To pass this data back to the frontend app we can create such a class:
public class ResponseData
{
    public string? TextFromUser { get; set; }
    public string? TextFromGpt { get; set; }
    public string? AudioDataFromUser { get; set; }//string base64
    public string? AudioDataFromGpt { get; set; }//string base64
}
Frontend
Now that our backend is set up, we can develop the frontend app. As mentioned earlier, we won't provide a comprehensive example of a React app.
For audio recording, I'm using "react-media-recorder." You can find it here.
Below is an example of how it can be incorporated into a React component:
import React from "react";
import { ReactMediaRecorder } from "react-media-recorder";
import RecordButton from "./RecordButton";

const Recorder = (props) => {
  //

    return (
      <ReactMediaRecorder
        audio
        onStart={props.recordStartHandler}
        onStop={props.recordStopHandler}
        render={({ status, startRecording, stopRecording }) => (
          <RecordButton
            status={status}
            startRecording={startRecording}
            stopRecording={stopRecording}
          />
        )}
      />
    );

};

export default Recorder;
The “RecordButton” component:
import React from "react";

const RecordButton = (props) => {

  return (
    <div className="flex flex-col items-center gap-1">
      <button
        className={
          "bg-slate-50 p-4 rounded-full shadow-recorder " +
          (props.status === "recording"
            ? " text-red-500 "
            : " text-sky-500 hover:text-sky-600 hover:transition-colors")
        }
        onMouseDown={props.startRecording}
        onMouseUp={props.stopRecording}
      >
        <svg
          xmlns="http://www.w3.org/2000/svg"
          fill="none"
          viewBox="0 0 24 24"
          strokeWidth={1.5}
          stroke="currentColor"
          className={"w-11 h-11 " + (props.status === "recording" ? "animate-pulse" : "")}
        >
          <path
            strokeLinecap="round"
            strokeLinejoin="round"
            d="M12 18.75a6 6 0 006-6v-1.5m-6 7.5a6 6 0 01-6-6v-1.5m6 7.5v3.75m-3.75 0h7.5M12 15.75a3 3 0 01-3-3V4.5a3 3 0 116 0v8.25a3 3 0 01-3 3z"
          />
        </svg>
      </button>
    </div>
  );
};

export default RecordButton;
recordStopHandler function:
const handleStop = (blobUrl) => {
    convertBlobUrlToBase64(blobUrl)
      .then((base64String) => {
        ProcessUserRequest({
          AudioData: base64String,
          Language: selectedLanguage,
        }).then((res) => {
          if (!res.data.ErrorMsg) {
            dispatch(chatMessagesActions.pushToMessages(res.data.responseData)); //redux
          } else {
            showError(res.data.ErrorMsg);
          }
        });
      })
      .catch((error) => {
        showError("Error converting Blob URL to Base64:" + error);
      });
  };
This function takes a blobUrl object from react-media-recorder and then converts this object into a base64 string.
export function convertBlobUrlToBase64(blobUrl) {
  return new Promise((resolve, reject) => {
    const xhr = new XMLHttpRequest();
    xhr.onload = function () {
      const reader = new FileReader();
      reader.onloadend = function () {
        resolve(reader.result);
      };
      reader.onerror = reject;
      reader.readAsDataURL(xhr.response);
    };
    xhr.onerror = reject;
    xhr.open("GET", blobUrl);
    xhr.responseType = "blob";
    xhr.send();
  });
}
Then, it sends this data to the Web API using “axios.”
export const ProcessUserRequest = async (data) => {
  return await axios.post(url + "/api/AI/ProcessUserRequest", data, {
    headers: {
      "Content-Type": "application/json",
    },
  });
};
I'm using the standard "audio" tag to play audio.
<audio src={blobUrl} className="appearance-none" autoPlay={autoPlay} controls />Here is the function that converts string base64 to blobUrl:
export async function getBlobUrl(base64) {
  const base64Response = await fetch(`data:audio/mp3;base64,${base64}`);
  const blob = await base64Response.blob();
  let reader = new FileReader();
  reader.readAsDataURL(blob);
  await new Promise(
    (resolve) =>
      (reader.onload = function () {
        resolve();
      })
  );
  return reader.result;
}
Here is the code that requests permission from the user to use the microphone.
const permissions = navigator.mediaDevices.getUserMedia({ audio: true, video: false });
          permissions
            .then((stream) => {
              //User has agreed to use microphone
            })
            .catch((err) => {
              console.log(`${err.name} : ${err.message}`);
              //User has not agreed to use microphone
            });
Conclusion
This article explains how to create a voice-powered AI app.
You now understand how to send and receive messages using OpenAI services, work with the Eleven Labs service, and convert text to audio and vice versa.
Additionally, you have practical React examples on recording user voices, converting blobUrls to base64 strings, and the reverse. You also learn how to send audio data to a web API and retrieve it.
Check out this sample app to see what such an application might look like: https://evka.app.
Important Note!
It is not a finalized product version of the app; it's merely a demo or a proof of concept. As such, the app may run slowly and may contain minor errors.
Stay tuned, and do not forget to contact us with any questions.

