
Introduction
The case considered in this article is highly demanded in the business environment, as it automates a widespread and time-consuming task: source document inputting and processing.
The primary task was to provide automatic input of invoices received by the organization from various customers and to assign correct ledger accounts in accordance with the chart of accounts for the goods and services specified in the invoice.
Before automation, data entry was done manually, such as the user opening a PDF form of an invoice sent to them, entering the data into the application, and assigning the appropriate ledger accounts to each invoice line. Since the organization received about two thousand invoices per month, about a hundred invoices had to be entered per day, which completely occupied the time of one or two employees and led to human errors.
Thus, the need for automation was obvious, while, at the same time, automation itself was associated with several difficulties:
1. The number of counterparties was quite large, up to several hundred, and each had its own unique type of invoice. Some invoices could also have handwritten fields.
2. The nomenclature of goods and services was quite extensive. Moreover, the names of the same goods and services could be significantly different for different counterparties, respectively. There was no possibility to take accounting accounts from a simple directory of pairs “Good/Service = Account Number”. It was necessary either to create and maintain a complex directory of mutual correspondence of goods and services for all counterparties (which would also constantly require checking and replenishment in connection with the addition of new counterparties) or to come up with a general universal solution.
Therefore, as a possible solution, it was proposed to develop AI tools for recognizing incoming PDF documents and their input into the system and to use the AI assistant mechanism to select the appropriate ledger account for invoice lines.
The Initial Solution Architecture
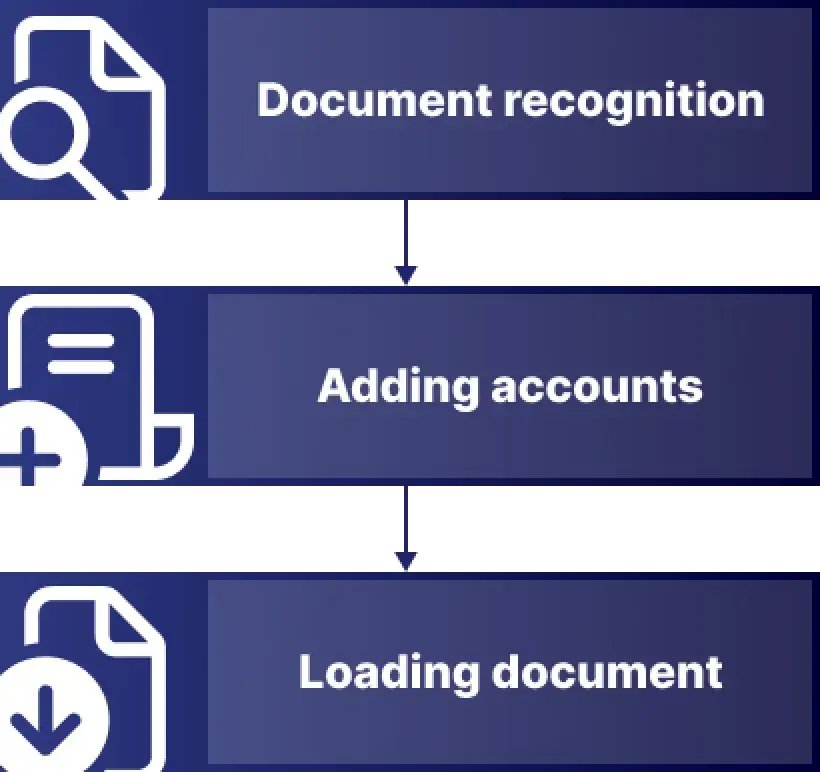
The initial architecture seemed obvious: to create a three-step invoice processing process:
1. Recognizing invoices using the OCR toolkit and obtaining the JSON model with document field contents as an output
2. Assigning accounting account values using the AI assistant for each document and adding the resulting invoice to the JSON model
3. Loading the JSON model into the accounting system
However, in the implementation process, new difficulties were discovered: the structure of invoices was quite different, so it was impossible to train one model to recognize them all. Accordingly, a few changes had to be made to the architecture.
The Final Solution Architecture
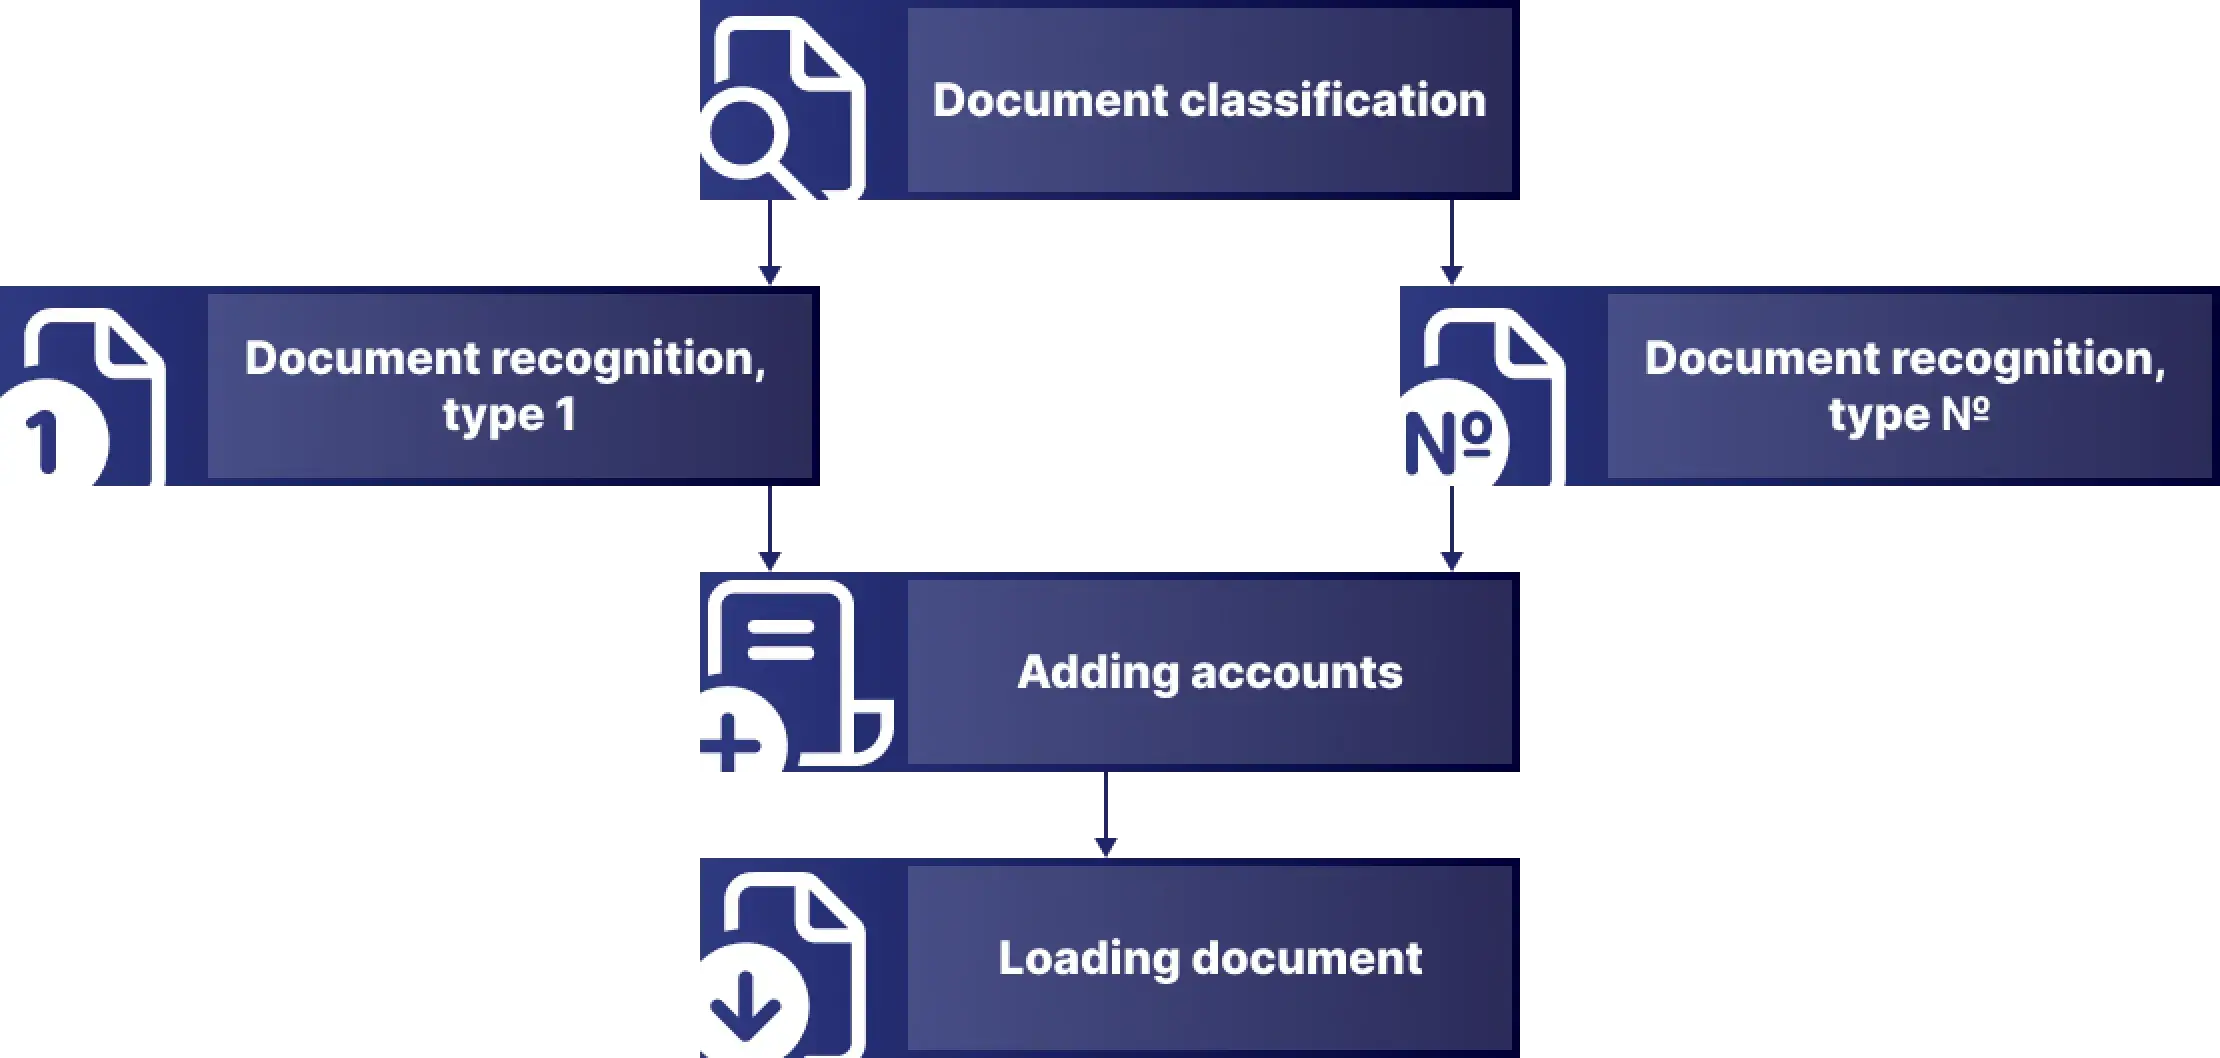
Eventually, to improve the recognition of complex invoices, it was necessary to configure several models trained to recognize specific types. Also, a classification of invoices was required to select a specific model. Accordingly, the final architecture of the solution was as follows:
1. Creating a classification of invoices and identifying their types using an AI document classification model
2. Selecting a model to recognize based on the type defined in the previous step
3. Recognizing invoices using the selected AI-model and obtaining a JSON model of the document with field contents as an output
4. For each document, assigning ledger account values using the AI assistant, and adding the resulting invoice to the JSON model
5. Loading the JSON model of the document into the accounting system
Solution Implementation
Now, it is time to look at the stages of solution implementation in detail.
Invoice Classification
You can use the Custom Classification Model in the Document Intelligence Studio to classify an invoice:

! Note. The Document Intelligence Studio uses Azure Blob Storage to store projects and data. Therefore, before you start working in the Document Intelligence Studio, make sure you have a Storage Account dedicated to these projects. It makes sense to create containers for all your projects as well.
Another important point is that you need to prepare a Document Intelligence resource, an API for Azure services that implements functions to recognize and extract data from documents.
Now that all the prerequisites have been prepared, you need to create a new project under the Custom classification model: select a project name and, optionally, a description.
Next, on the second page, select the Azure subscription under which you will run the document analysis, the resource group that contains your Document Intelligence resource, and the API version.
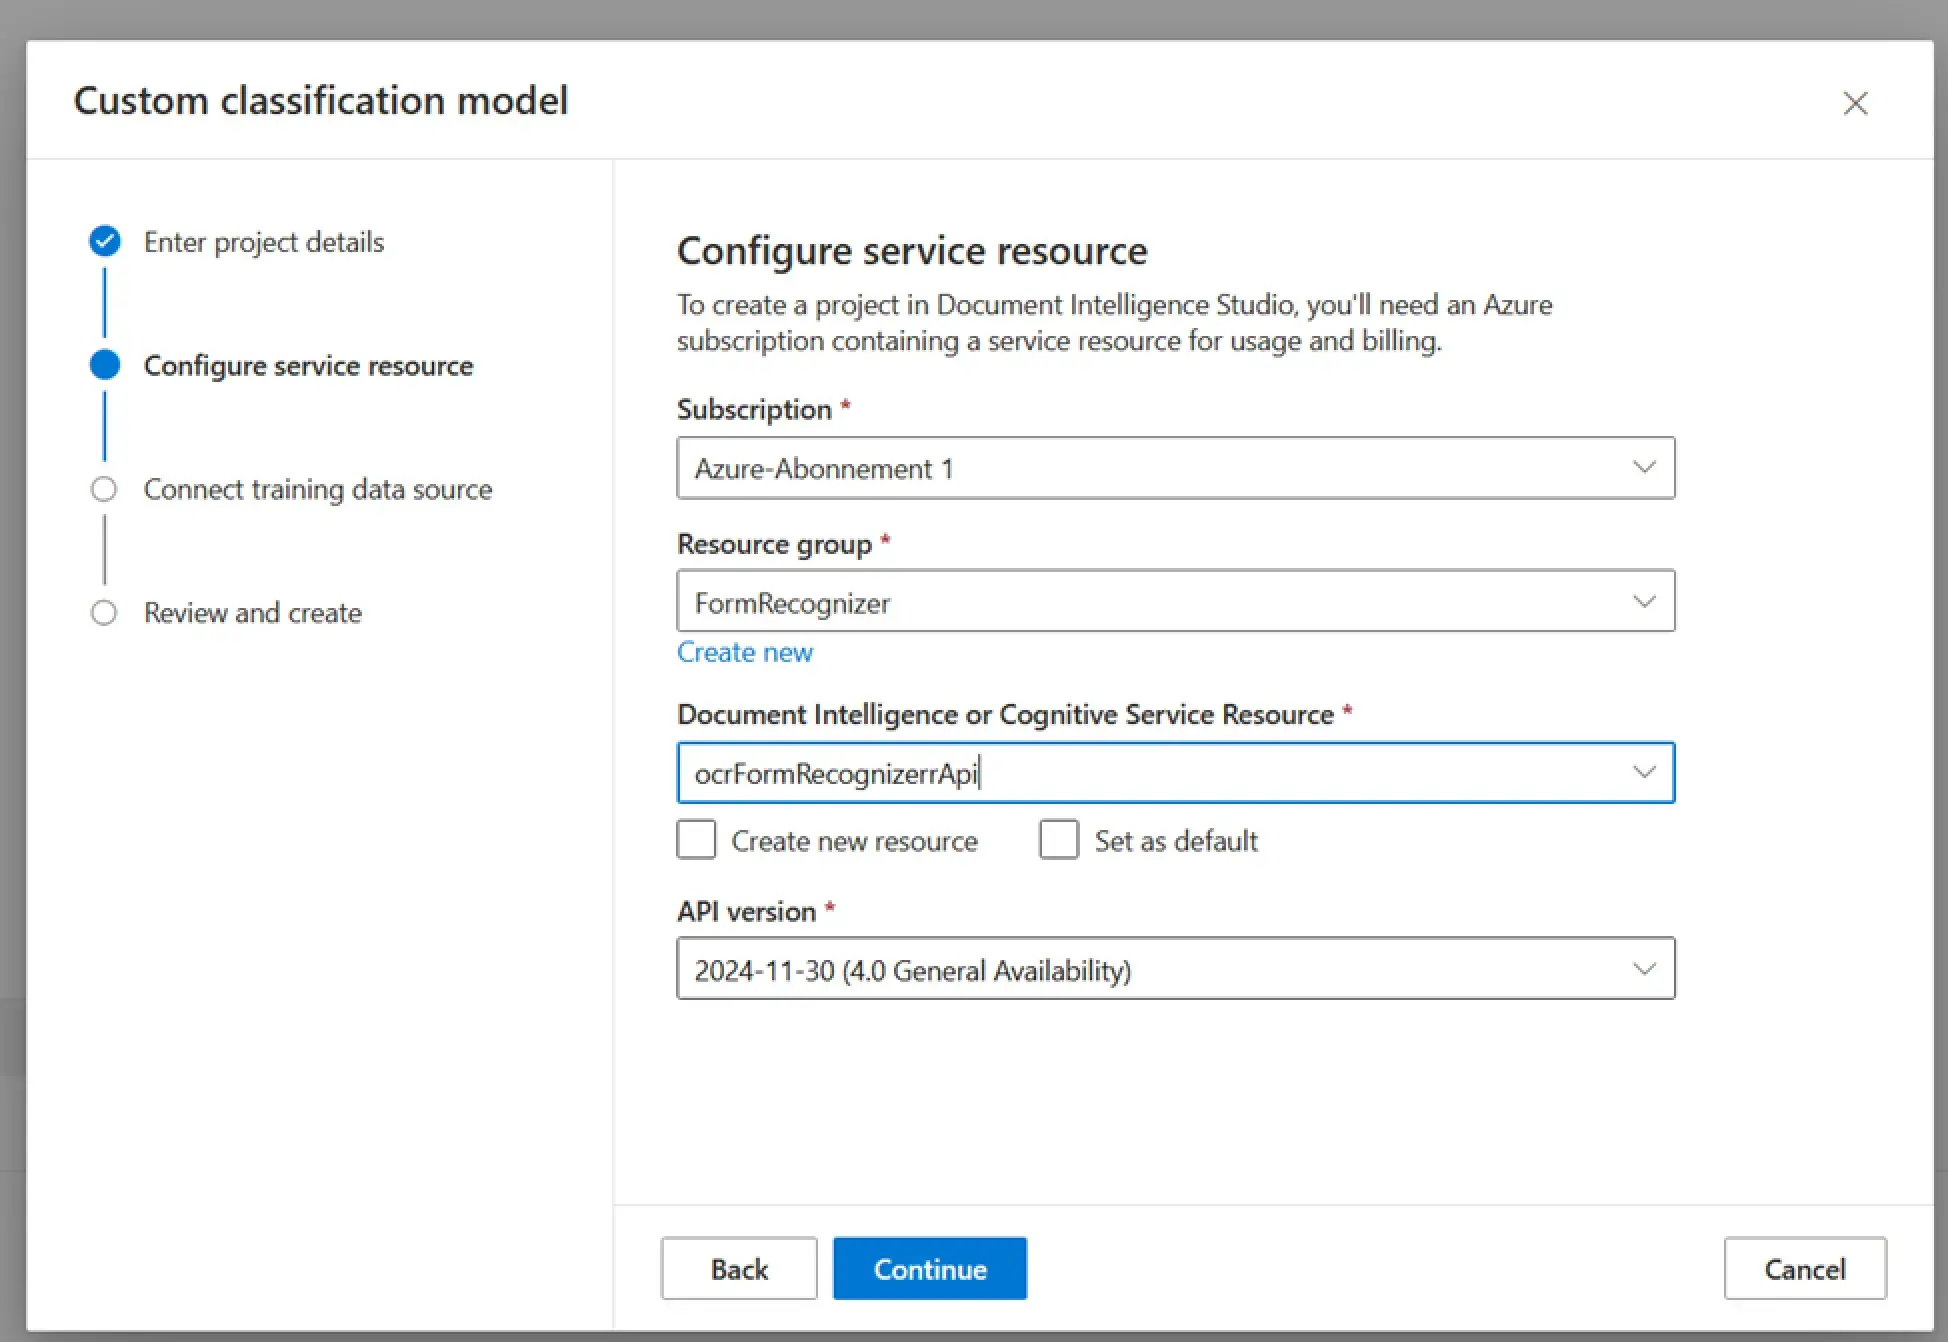
! Note. There is no reason to choose any previous version of the API. It is reasonable to always use the latest one unless you need to support legacy solutions that cannot be migrated to the latest version. Nevertheless, the recognition features improve from version to version, and the latest version of the API will perform better than the previous versions anyway.
Also, if your Document Intelligence resource was created a long time ago, it may not be compatible with the latest API versions. In this case, it is recommended that you simply create a new resource and select the current version.
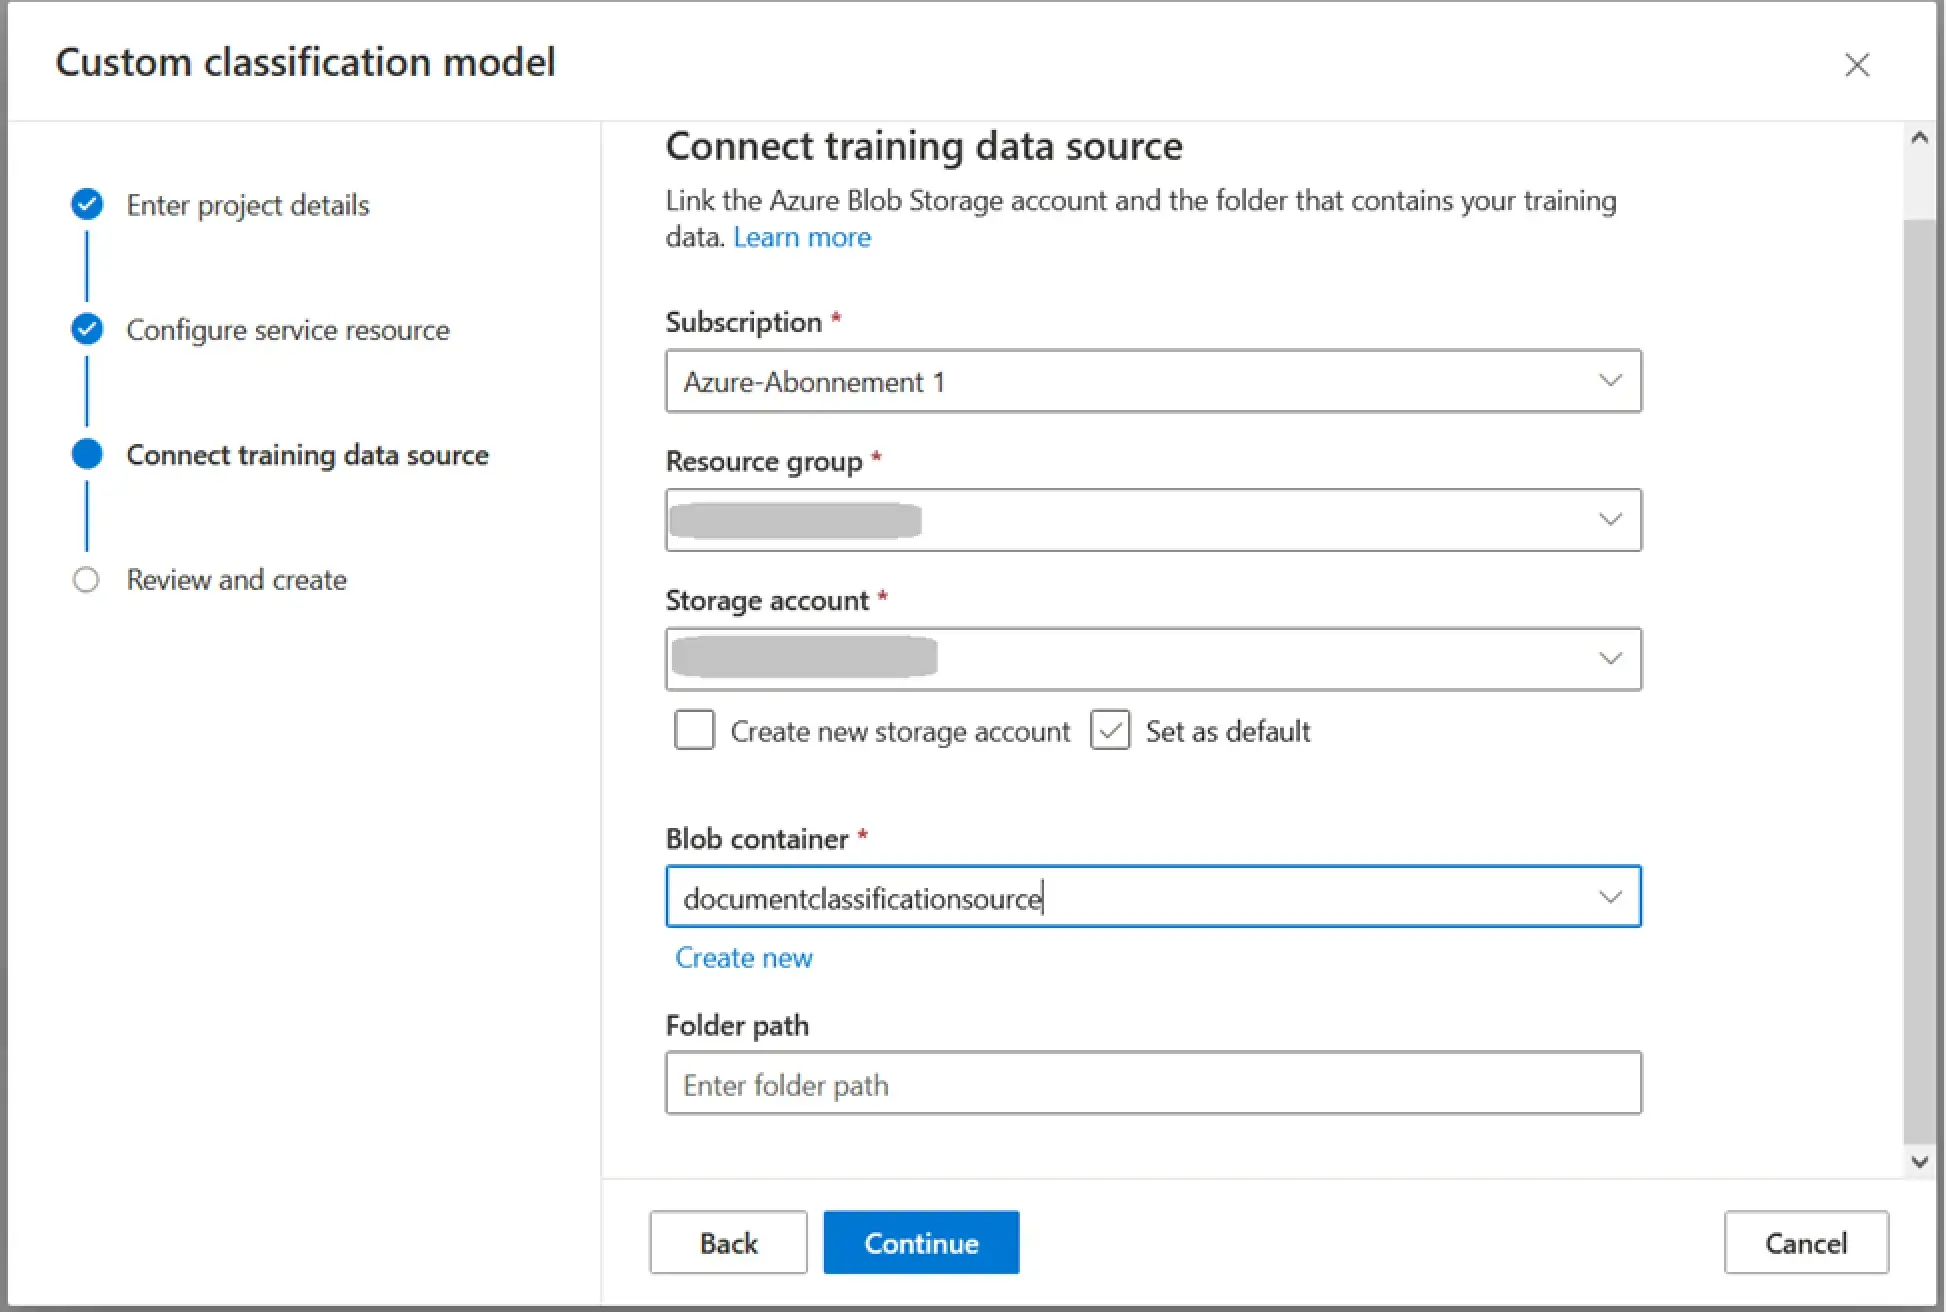
Finally, on the next page, specify the subscription and the resource group that contains your repository (they may be different from those where the Document Intelligence resource is located), select the repository and the container, and finish creating the project by opening it and proceeding to "Configure the dataset" for classification recognition.
Setting up a Dataset for Document Classification
To set up a document classification dataset, you need to decide what types of documents you will have. Prepare at least five samples for each type. If the differences between the types are minor, increasing the number of samples is recommended, which will increase the recognition accuracy.
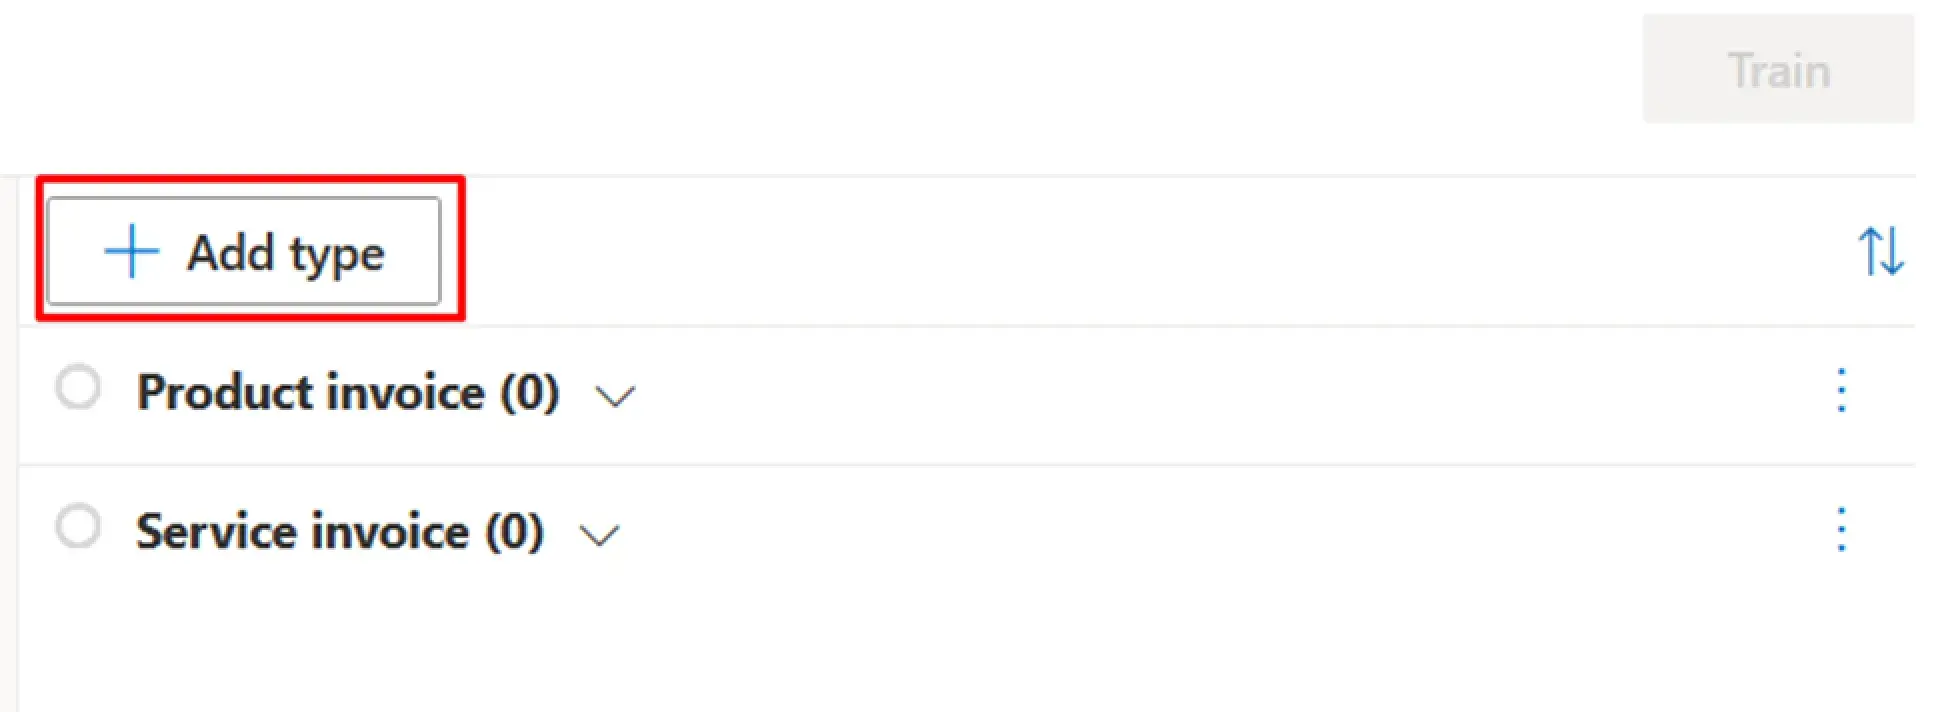
! Note. You can add types in the project window in different ways. You can enter them in the right panel using the “Add type” button beforehand and add them by type, or you can add them as you go along when classifying each document.
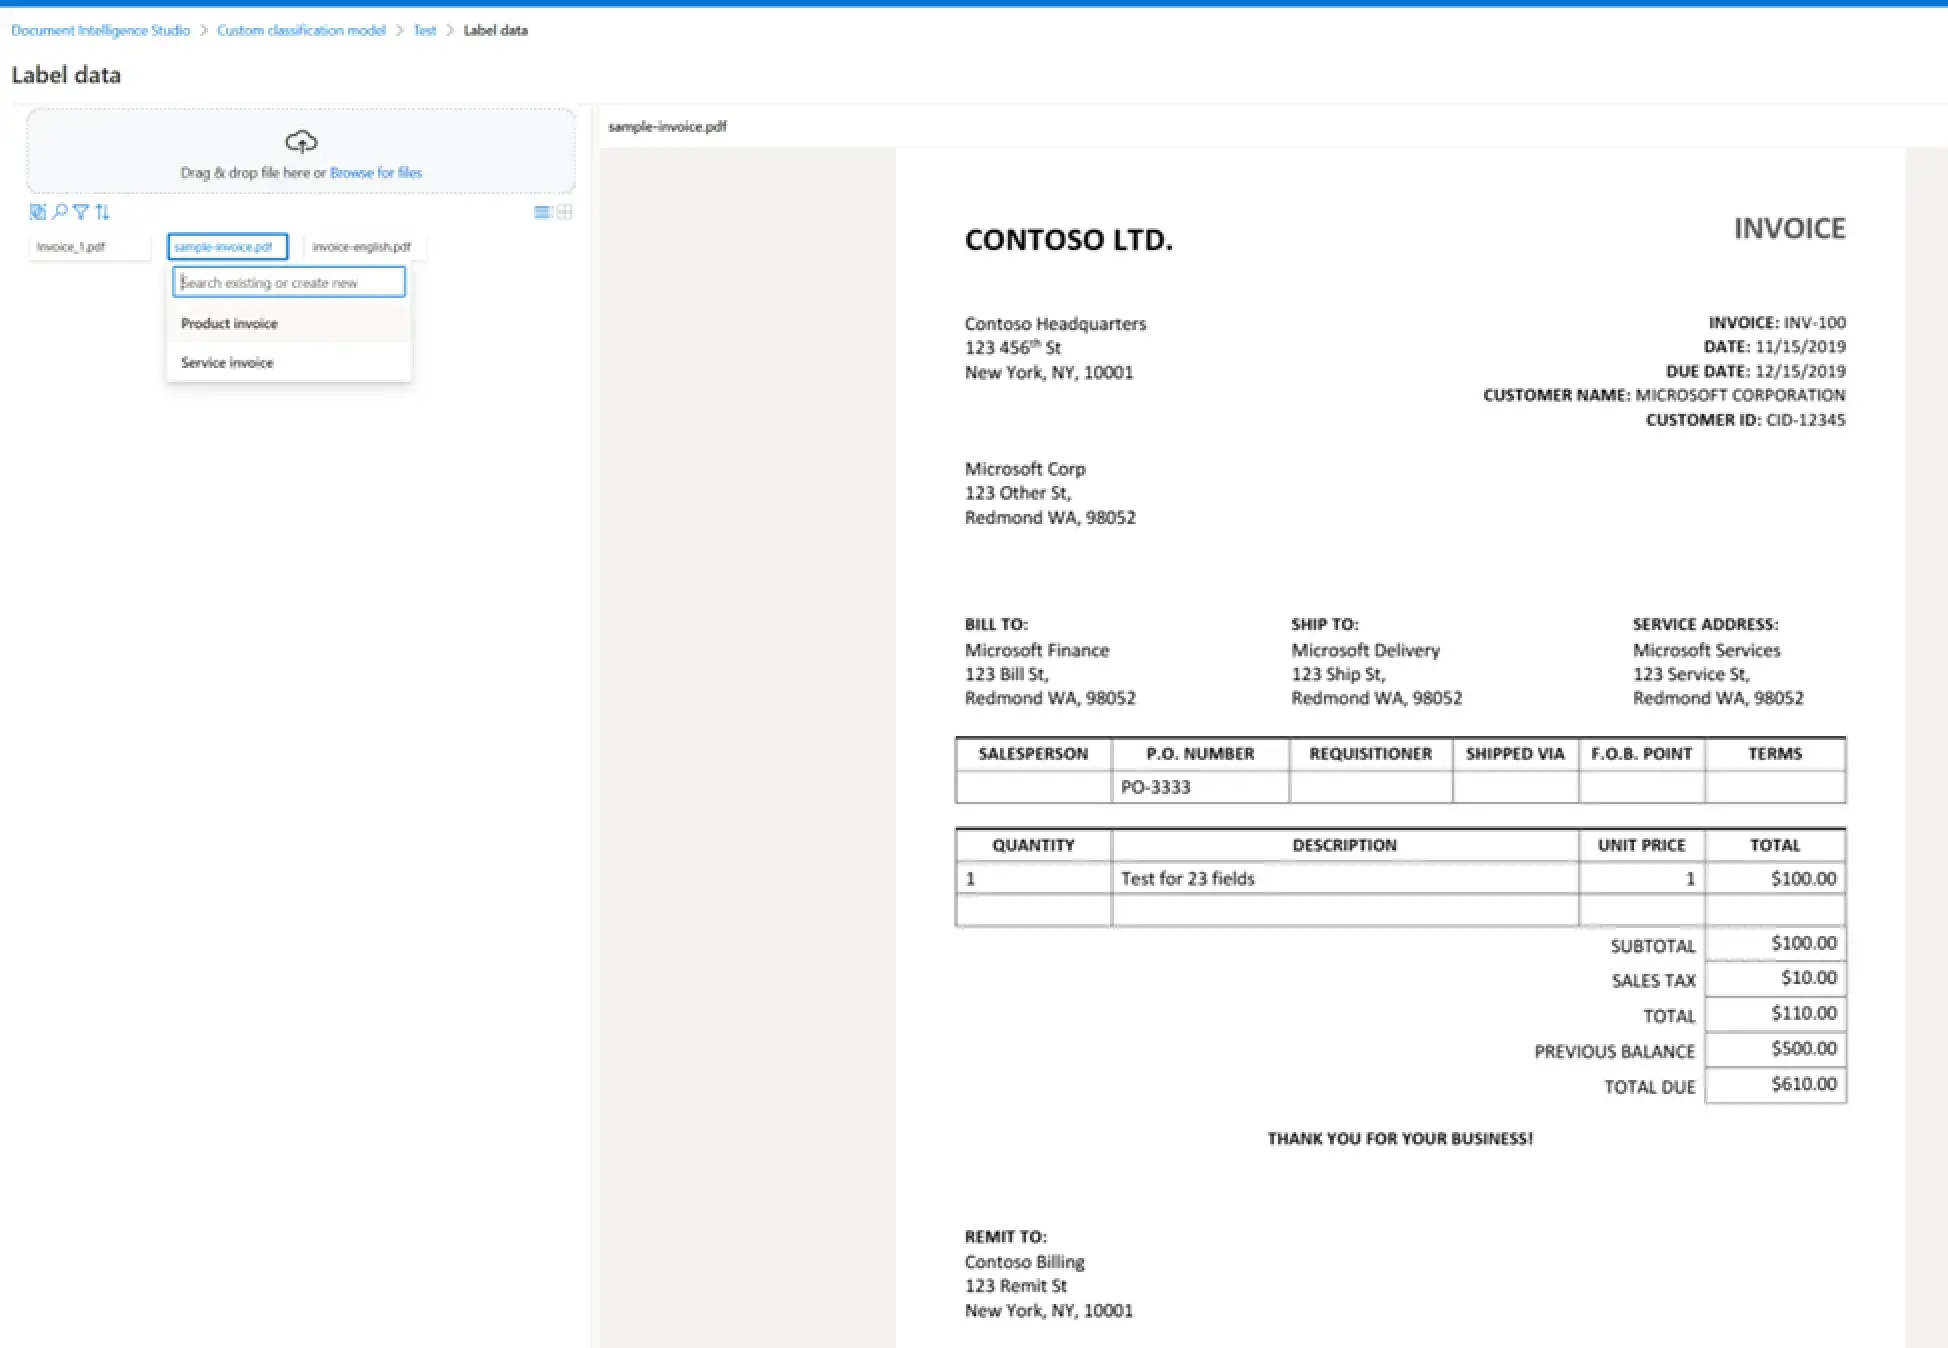
Now, you need to load the files into the Document Intelligence Studio and assign each document the appropriate type.
After setting types for all documents in the training dataset, you have to press the “Train” button, give the model a name, and wait for the training to end.
! Note. Training the classification model takes a relatively short time, about 15 minutes, after which the model is ready for use. You can test its performance in the “Test” section by offering different files and getting the classification result. You ought to expand the sample and repeat the training if errors appear.
Now that you have a working classification model, you can move on to the next stage: training the recognition models.
Invoice Recognition
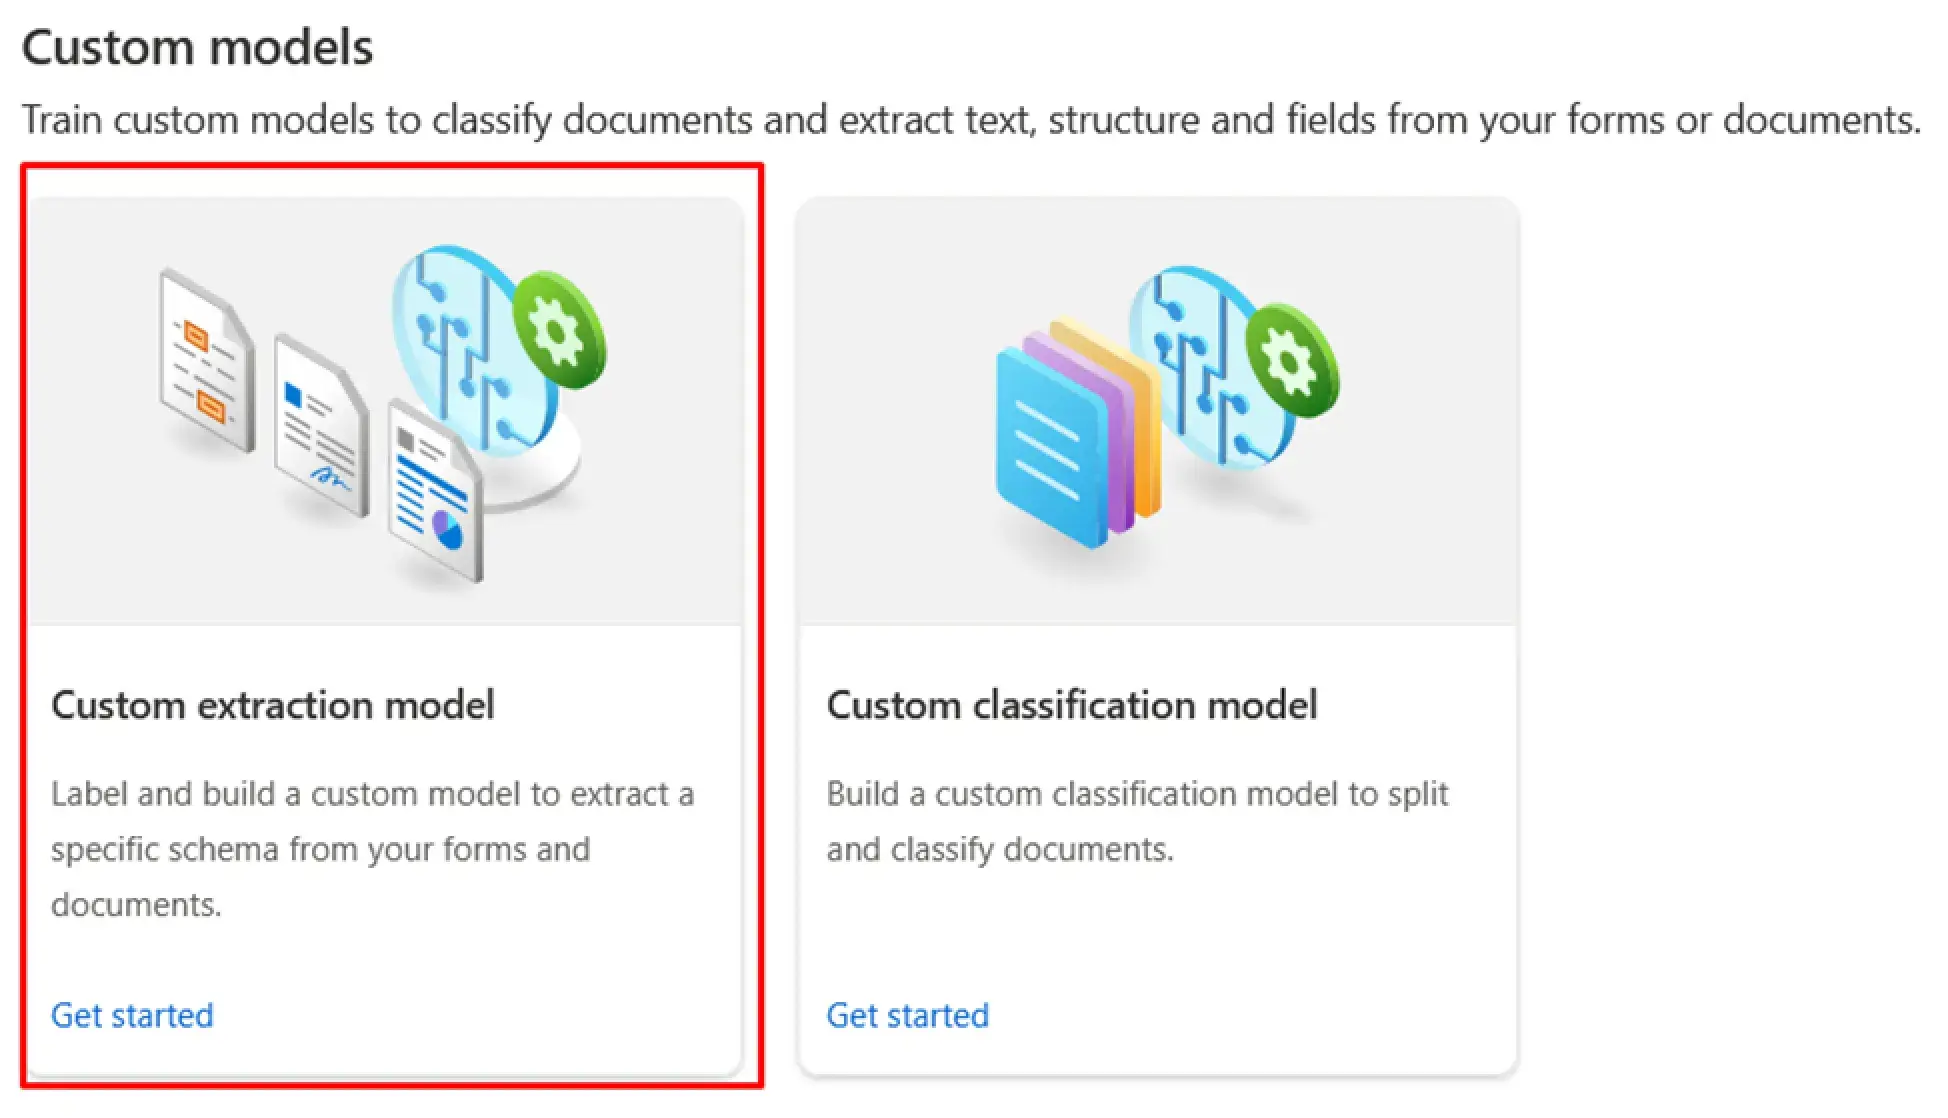
Setting up an invoice recognition project is done in the same way. The Document Intelligence Studio offers a few already prepared models for recognizing documents, including invoices. However, in this case, as described above, their accuracy was insufficient to correctly recognize all the various forms from the counterparties.
Therefore, the Document Intelligence Studio offers a Custom Extraction Model for such complex cases, allowing you to train the model for a specific document type or a combination of types.
Similarly, prepare the Azure Blob Storage and a dedicated container before creating the project. It makes sense to use the same storage for the classification task. You can use the same Document Intelligence resource for all recognition tasks.
So, click on “Create a project,” enter a project name, and, on the next page, specify the subscription and the resources to be used for recognition.
! Note. This screen is not different from the same settings in the classification project.
Now, go to the next page with the training dataset settings. Here, you also have to select the Azure Blob Storage resource and the container to store the training dataset files.
Next, click on “Create Project” to create a project and open it in the Document Intelligence Studio to mark the fields.
! Note. Although the training dataset preparation form looks similar to the one, you saw in the previous step, there are some essential differences: the document recognition training dataset requires manual markup of fields in the document, so you will need to specify which fields are located where in the document after uploading the sample documents. Fortunately, the process is partially automated thanks to the already-mentioned pre-trained recognition models.
So, select sample invoices for training and add them to the project by dragging them to the “Drag & n drop file here” area. A few words about which invoices to take for training: we divide documents with very different shapes into groups corresponding to the types we classified in the previous step.
! Note. It is important to keep in mind that you should not create a separate type for each document form. One model will be able to recognize many different forms correctly, and you will only need another model and, therefore, a type if you need to acknowledge a highly different form. For example, an invoice that does not have a tabular part and the name of the product/service must be extracted from the text description. Such a situation happened in our case study as well.
! Note. If your model has to work with many similar forms of documents, you will need to select at least five to seven sample documents of various forms for the training dataset. You needn’t add all the forms. The model will be able to catch general trends, but it is highly desirable to provide diversity to species.
So, add the samples to the dataset and start automatic labeling by clicking on the “Auto Label” button.

Here, the editor will prompt you to select one of the preconfigured models for recognizing documents. In this case, choose prebuild-invoice, which already contains a set of fields optimally suited for recognizing invoices. By clicking the "Auto Label" button in the dialog box, you will start recognizing the documents using the preconfigured model and setting fields.
After the recognition is completed, your next step is to select each document on the left side. Check if the fields are correctly arranged, and, if necessary, correct their positioning. To do this, select the wrong field in the right pane, use the "Del" button to clear the wrong arrangement, then opt for the correct one in the document in the workspace and click on the field in the right pane to save it.

After you have finished marking, you need to press the "Train" button to start training the model.
There are two options to pay attention to here:
- Build Mode
This is the type of model that is used for training. There is a classic OCR model here. It is called Template, and there is a neural model called Neural. The classical model is trained quickly, but it will work correctly only if the set of documents in the dataset is exclusive. When trying to recognize documents different from those in the dataset, the OCR model will give errors. The neural model takes longer to train but works much more efficiently with documents of different shapes and types, capturing common patterns in the arrangement of data.
- Maximum training hours
These are the maximum number of hours allocated for training the model. The actual number of hours depends on the size of the dataset, and for a dataset of a hundred invoices, you will need two or three hours for full training. You can choose the option not to specify this value, either. In this case, the model will be trained for half an hour, but the recognition accuracy will be lower than for a longer training session.

Now, click on "Train" in the dialog box to start the model training.
! Note. It may take much longer than in the previous step.
Once the training is finished, go to the "Test" section and verify how your model invoices are recognized. If the results for some invoice types are not satisfactory (especially those not included in the dataset), you should add them to the training dataset, fine-tune them and repeat the training.
You should now repeat this operation for all the invoice types for which you customized the classification in the previous step.
! Note. The same project can be used to train different models, but you should keep in mind that the dataset will need to be cleaned and re-mapped each time, so it is highly recommended to create new projects and store the datasets for each model type in a separate storage container.
Also, you can move files/settings from project to project by copying them between repositories. Due to this action, it may be easier for you to customize fields for new models. To migrate settings, open a container in the repository through Azure Portal:
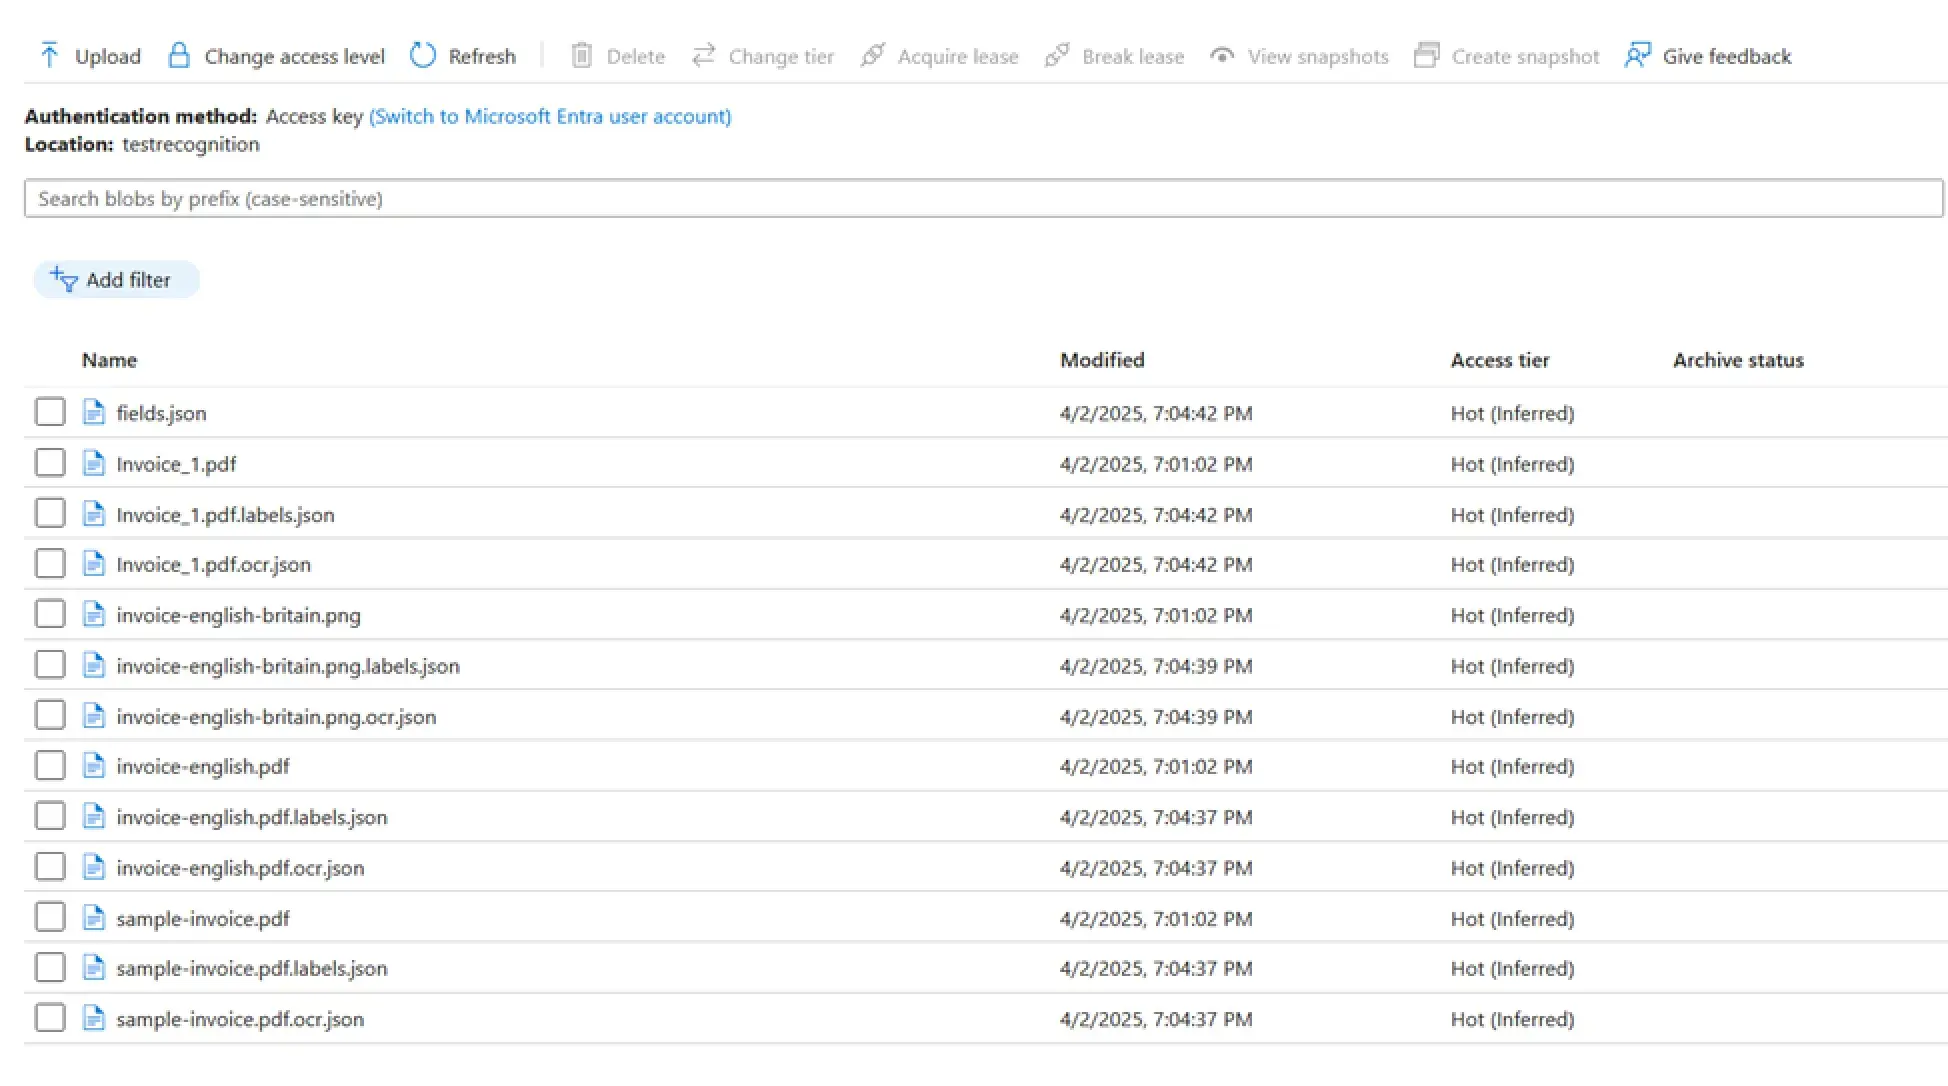
In the container you will find the fields.json file, which contains a general list of fields for your model, the sample document files themselves, and for each document, two files with the extension .labels.json and ocr.json. These files contain your markup data and recognition results for the corresponding documents. This way, you can transfer settings and documents between projects by simply copying them from one project container to another.
Then, when all the recognition models are ready, you can move on to the next step: preparing the model for assigning an accounting account.
Assignment of a Ledger Account
You will have to use a different mechanism to assign a ledger account. You need a language model available through the Assistant API to do this. This API is a relatively standard set of functions supported by Microsoft, Open AI, and other vendors. It can be used to create AI assistants specialized for specific tasks.
You will need to apply the Azure AI Foundry tool to create an AI assistant. To use the Azure AI Foundry, create an Azure OpenAI resource on the portal, an API shell for AI models. When creating resources, pay attention to the regional zone.
! Note. The API for assistants is not available in all zones, so pre-determine which zone is more suitable for you out of those that support this API. At the time of writing the article, you can choose from the following regional zones:
- australiaeast
- eastus
- eastus2
- francecentral
- japaneast
- norwayeast
- southindia
- swedencentral
- uksouth
- westus
- westus3
After creating an Azure OpenAI resource, click on “Go to Azure AI Foundry portal” to open the Azure AI Foundry toolkit.
In Azure AI Foundry, click on the “Model Catalog” tab and select from the available models the one that will be used to generate responses.
! Note. The list of models is quite large, but you need a model with the Chat Completion functionality for our assistant, so you can filter by that:
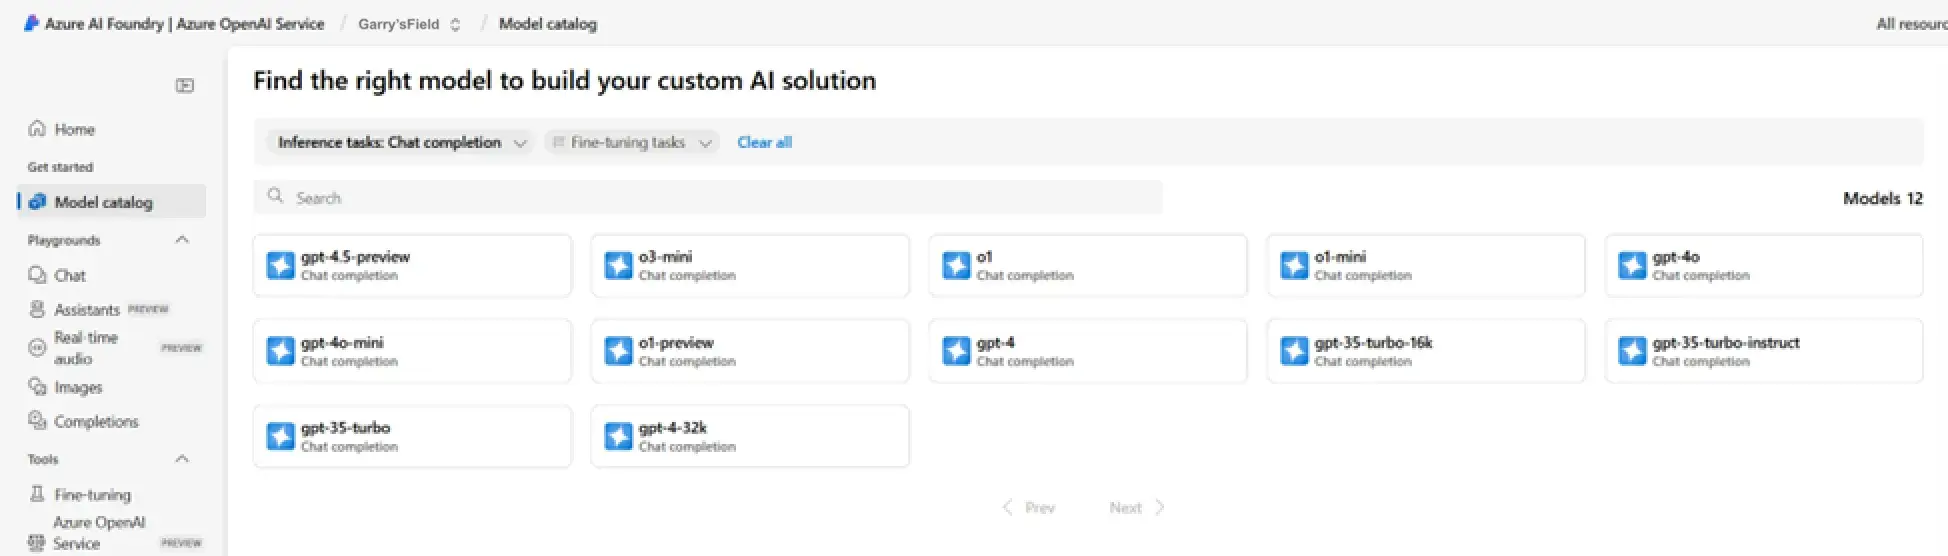
Which model to choose from the available ones? The answer to this depends on the kind of task at hand, but we can roughly divide the models into two groups:
1. models with a full dataset
2. models with a reduced dataset, usually with the suffix “-mini” in the name
If you need a model with an extensive knowledge base on general issues, you should choose from the models with a full dataset. If you need a model that will perform some tasks in a given pattern while being as fast and inexpensive as possible, a model with a reduced dataset will suffice.
! Note. There is also some specialization among the models. For example, some models do better with scientific tasks, and other models do better with questions in the field of science. You should familiarize yourself with the currently available models and choose the one that best fits your task in terms of capabilities and price.
! Note. For this particular task, the inexpensive and fast model GPT-4o-mini will do. Find this model on the list and press the “Deploy” button.
It is high time to begin creating the assistant. To do this, open the “Assistants” tab and click on the “New assistant” button to create a new assistant.
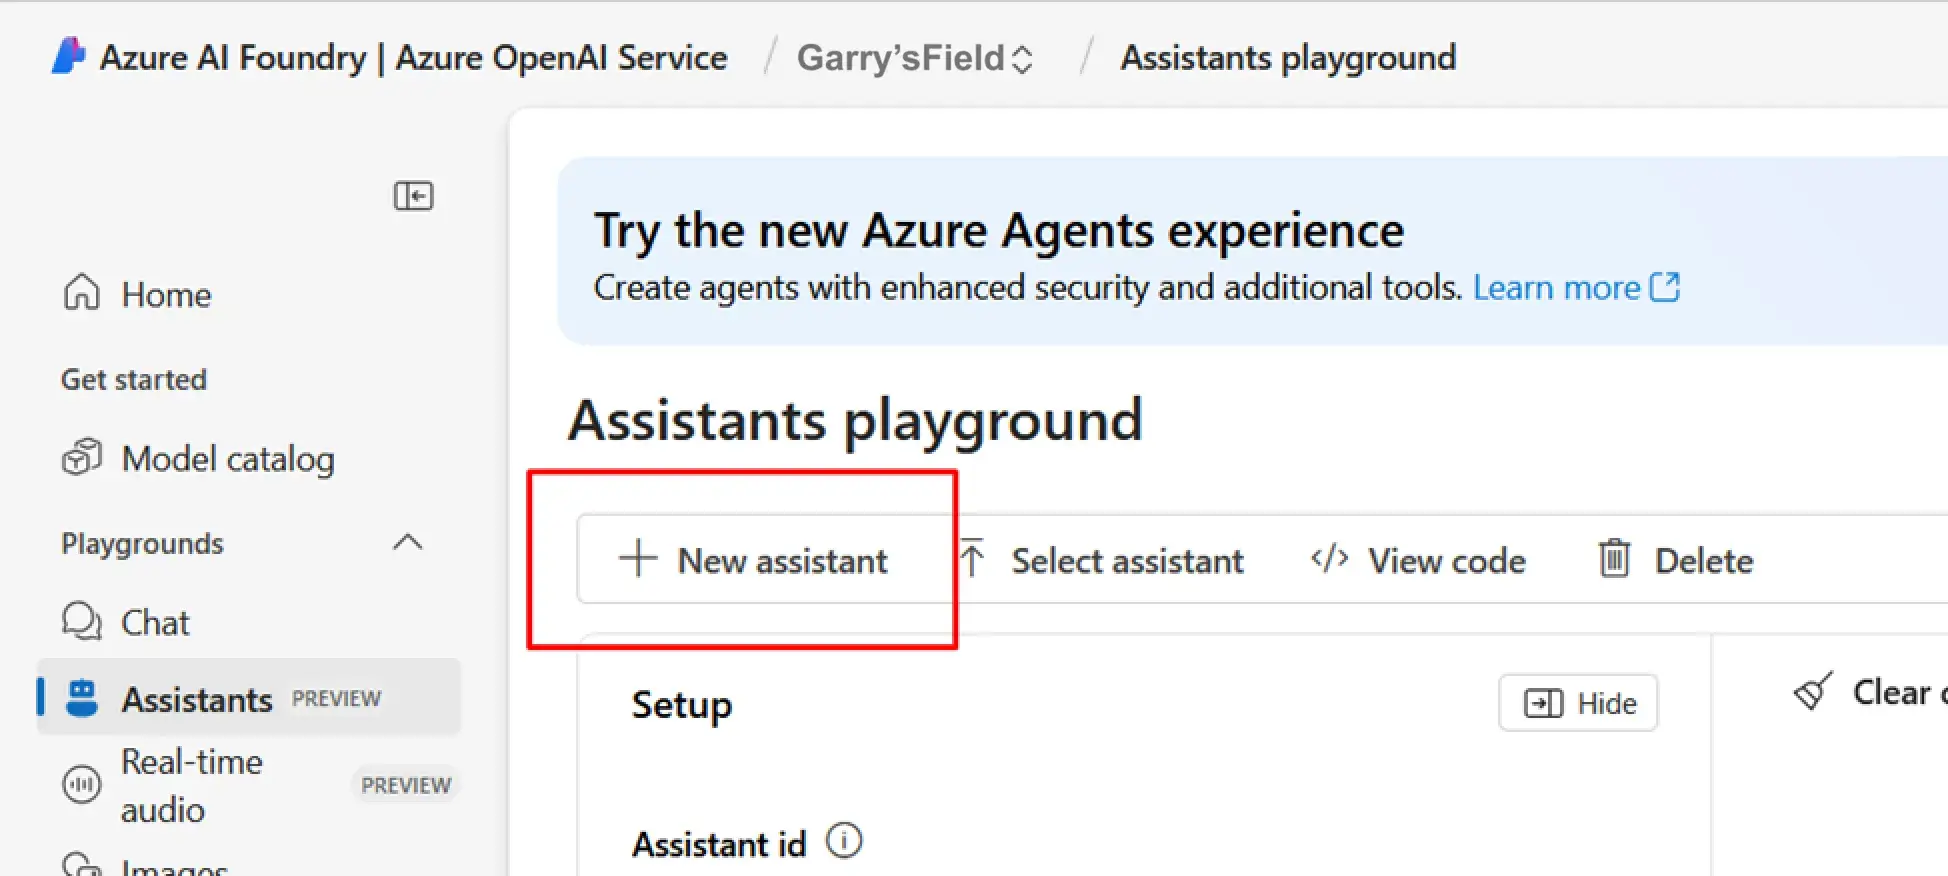
A window will open where you can enter a name for your assistant, opt for your model from the given, or add and select another one, and enter instructions for the assistant.
! Note. Instructions are system prompts to the assistant about what answers it must give. In our case, we provide it with information about the current task, the chart of accounts, or, more precisely, the part of it that concerns invoices, describe the format of the output data, and give possible additional instructions if necessary.
! Note. Specifying the “JSON response” option is also compulsory in order to receive responses from the assistant in JSON format.

Now, all the AI components for invoice processing are ready, and you need to combine them into a single pipeline. To do this, move on to the program code.
Creating a Pipeline for Document Processing
To process documents, you have to create a program pipeline that calls the AI services you configured in the previous steps.
You can omit the basic steps of creating a new project and limit yourself to code examples specific to your project.
The first block of the pipeline is calling the classification service. To do this, create a new service in your project and add to it the clients you need to connect to AI services:
public class PdfRecognitionService
    {
        private readonly DocumentAnalysisClient _client;
        private readonly OpenAIClient _OpenAIClient;
        public PdfRecognitionService(IOptions<AzureFormRecognizerOptions> options, OpenAIClient openAIClient)
        {
            var endpoint = new Uri(options.Value.Endpoint);
            var azureCredential = new AzureKeyCredential(options.Value.ApiKey);
            _client = new DocumentAnalysisClient(endpoint, azureCredential);
            _OpenAIClient = openAIClient;
        }
     }
! Note. DocumentAnalysisClient is a client to connect to the Document Intelligence resource. It is available in the Azure.AI.FormRecognizer package. To connect, it needs an endpoint URL and API key, which you can see in the resource parameters in the Azure portal.
OpenAIClient is, respectively, a client to connect to the Assistant API.
Now, make a method for document classification:
public async Task<AnalyzeResult> ClassifyPdfAsync(Stream pdfStream)
{
            var operation = await _client.ClassifyDocumentAsync(WaitUntil.Started, "Class_Model", pdfStream);
            var result = await operation.WaitForCompletionAsync();
            return result.Value;
        }
The method sends the document for classification and waits for the result. In this example, the method runs synchronously waiting for the operation to be completed. In a workable application, it is recommended to make it asynchronous.
Similarly, create a method for recognizing documents:
public async Task<AnalyzeResult> RecognizePdfAsync(Stream pdfStream, string ModelName)
        {
            var operation = await _client.AnalyzeDocumentAsync(WaitUntil.Started, ModelName, pdfStream);
            var result = await operation.WaitForCompletionAsync();
            return result.Value;
        }
It works the same way but has an additional parameter: the model's name since the choice of model will depend on the recognition results.
Now, you need to convert the recognition results from a set of dynamic fields with metadata into an object that can be used directly as a document model.
To do this, make a function that performs the conversion for all the fields of the document:
public RecognizedInvoice ConvertToRecognizedInvoiceAsync(dynamic fields)
{
    var recognizedInvoice = new RecognizedInvoice
    {
        InvoiceId = fields["InvoiceId"]?.Content,
        CustomerId = fields["CustomerId"]?.Content,
        CustomerAddress = fields["CustomerName"]?.Content,
        CustomerName = fields["CustomerName"]?.Content,
        CustomerTaxId = fields["CustomerTaxId"]?.Content,
        VendorAddress = fields["VendorAddress"]?.Content,
        VendorName = fields["VendorName"]?.Content,
        VendorTaxId = fields["VendorTaxId"]?.Content,
        BillingAddress = fields["BillingAddress"]?.Content,
        Items = new List<InvoiceLine>(),
        PaymentDetails = fields["PaymentDetails"]?.Content,
        PaymentTerm = fields["PaymentTerm"]?.Content,
        PurchaseOrder = fields["PurchaseOrder"]?.Content
    };

    if (fields["SubTotal"]?.Content != null)
        recognizedInvoice.SubTotal = ConvertToDecimalWithUnknownSeparators(fields["SubTotal"]?.Content);
    if (fields["TotalTax"]?.Content != null)
        recognizedInvoice.TotalTax = ConvertToDecimalWithUnknownSeparators(fields["TotalTax"]?.Content);
    if (fields["InvoiceTotal"]?.Content != null)
        recognizedInvoice.InvoiceTotal = ConvertToDecimalWithUnknownSeparators(fields["InvoiceTotal"]?.Content);
    if (fields["AmountDue"]?.Content != null)
        recognizedInvoice.AmountDue = ConvertToDecimalWithUnknownSeparators(fields["AmountDue"]?.Content);

    if (fields["Items"].FieldType == DocumentFieldType.List)
    {
        var ItemsList = fields["Items"].Value.AsList();

        foreach (var itemsListItem in ItemsList)
        {
            var itemValue = itemsListItem.Value.AsDictionary();
            var invoiceLine = new InvoiceLine();

            if (itemValue["ProductCode"]?.Content != null)
                invoiceLine.ProductCode = itemValue["ProductCode"]?.Content;
            if (itemValue["Description"]?.Content != null)
                invoiceLine.Description = itemValue["Description"]?.Content;
            if (itemValue["Unit"]?.Content != null)
                invoiceLine.Unit = itemValue["Unit"]?.Content;
            if (itemValue["UnitPrice"]?.Content != null)
                invoiceLine.UnitPrice = ConvertToDecimalWithUnknownSeparators(itemValue["UnitPrice"]?.Content);
            if (itemValue["Quantity"]?.Content != null)
                invoiceLine.Quantity = ConvertToDecimalWithUnknownSeparators(itemValue["Quantity"]?.Content);
            if (itemValue["TaxRate"]?.Content != null)
                invoiceLine.TaxRate = ConvertToDecimalWithUnknownSeparators(itemValue["TaxRate"]?.Content.TrimEnd('%'));
            if (itemValue["Tax"]?.Content != null)
                invoiceLine.Tax = ConvertToDecimalWithUnknownSeparators(itemValue["Tax"]?.Content);
            if (itemValue["Amount"]?.Content != null)
                invoiceLine.Amount = ConvertToDecimalWithUnknownSeparators(itemValue["Amount"]?.Content);

            recognizedInvoice.Items.Add(invoiceLine);
        }
    }

    return recognizedInvoice;
}
! Note the auxiliary function ConvertToDecimalWithUnknownSeparators. After recognizing the fields of the document, you will get their text content. Still, you do not know what format of decimal separator, thousands separator, and service characters, (currency, and percentages) may be used there. Therefore, you will need a custom converter function that performs the conversions.
Now, implement the assistant call for the last step:
public async Task<RecognizedInvoice> AddAccountsToInvoiceAsync(RecognizedInvoice recognizedInvoice)
        {
            foreach (var line in recognizedInvoice.Items)
            {
                if (!string.IsNullOrEmpty(line.Description))
                {
                    var run = await _OpenAIClient.CreateThreadAndRunAsync("asst_OYXnR8x3rtpkG9xh9KHkhed4", $"Product Name: {line.Description}, Company: {recognizedInvoice.VendorName}");
                    if (run != null)
                    {
                        var completedRun = await _OpenAIClient.PollRunUntilCompletedAsync(run.ThreadId, run.Id, null);
                        if (completedRun.Status == "completed")
                        {
                            var messages = await _OpenAIClient.RetrieveThreadMessagesAsync(completedRun.ThreadId);
                            foreach (var message in messages.Data)
                            {
                                if (message.Role == "assistant")
                                {
                                    try
                                    {
                                        var account = JsonConvert.DeserializeObject<InvoiceAccount>(message.Content[0].Text.Value);
                                        line.AccountCode = account.AccountNumber;
                                        line.AccountName = account.AccountName;
                                    }
                                    catch { }
                                    break;
                                }
                            }
                        }
                    }
                }
            }

            return recognizedInvoice;
        }
Here, in this case, you have to invoke a dialog with the assistant, getting a response from it in the form of JSON, which you convert to a data model in your code, and add that to the recognized invoice.
Finally, combine all the components together into one pipeline:
[HttpPost("upload")]
 public async Task<IActionResult> UploadPdf(IFormFile file)
 {
     try
     {
         if (file == null || file.Length == 0)
         {
             return BadRequest("No file to upload.");
         }

         using (var stream = file.OpenReadStream())
         {
             var classifiedDocument = await _pdfRecognitionService.ClassifyPdfAsync(stream);
             if (classifiedDocument.Documents.Count == 0)
                 throw new Exception("No documents in classification was found");

             var document = classifiedDocument.Documents[0];

             string ModelName = "Common model";

             if (document.DocumentType == "Service Invoice")
                 ModelName = "Service model";

             var result = await _pdfRecognitionService.RecognizePdfAsync(stream, ModelName);

             if (result.Documents.Count > 0)
             {
                 document = result.Documents[0];

                 var recognizedInvoice = _pdfRecognitionService.ConvertToRecognizedInvoiceAsync(document.Fields);
                 recognizedInvoice = await _pdfRecognitionService.AddAccountsToInvoiceAsync(recognizedInvoice);

                 return new JsonResult(recognizedInvoice);
             }

             return Ok(new { });
         }
     }
     catch (Exception ex)
     {
         return StatusCode(500, ex.Message);
     }
 }
In this example, the controller method takes a PDF file as input. It returns the already recognized JSON with invoices added to it, which are ready to be loaded into the accounting system.
Summary
The resulting solution saves a lot of man-hours for manual document processing and reduces the number of errors when entering primary documentation. Given that the solution is universal and suitable for various document types, it can be applied to many cases at multiple enterprises.