
Introduction
Few things are developing as fast as IT technologies today. In particular, the scope of artificial intelligence is expanding. UDS specialists keep up with the development of the industry, using, adapting, and improving the latest developments. Thus, as part of one of the projects, a group of developers set up a Chat GPT for Teams and successfully tested the new version of GPT-4o. The team's task was to integrate the new model into the Azure DevOps so that users could ask questions about tasks in the Azure DevOps in the chatbot.
This article provides a detailed step-by-step description of this process.
Some Theory
There are two common approaches to integrate LLM with external knowledge source:
1. Retriever Augmented Generation (RAG)
This approach means that the user’s query will be executed by the search engine (“retriever”), and LLM will serve as a final-stage tool that wraps search results into human-friendly communication.
2. Direct connection using Assistant API
This approach relies on the Assistant API, which is implemented for most LLMs and allows them to call external tools. Thus, it is possible to call the DevOps API directly from LLM to find and filter the data required for LLM’s answer.
Both approaches have advantages and disadvantages. For instance, for the RAG approach, the developer has to set up a knowledge base and a search engine and provide regular content updates for that knowledge base. The developer is to set up various connections for direct connections and write explanations for LLM on how to use them.

We will build our DevOps assistant using the RAG approach because Microsoft Azure provides all required components out of the box, and we can get a working solution with minimal effort.
Thus, we will use the following set of components:
1. Azure Blob Storage, as the location where the Knowledge base will be kept. The knowledge base itself will be a set of text files containing task details obtained from Azure DevOps
2. Azure AI Search as Retriever, a smart search engine that can search data across various sources, including Azure Blob Storage
3. Azure Open AI Service as LLM deployment
4. Some custom code to load data from Azure DevOps to our Knowledge base.
Step-by-step Integration Process Description
To achieve the goal, it is necessary to perform the following settings:
1. Create a personal token to access the Azure DevOps.
2. Produce an Azure OpenAI resource in the Azure.
3. Produce a Search service resource in the Azure.
4. Build a chat using the GPT-4o model with the help of the Azure AI Studio.
5. Make an Azure Blob Storage in the Azure to save files with task descriptions.
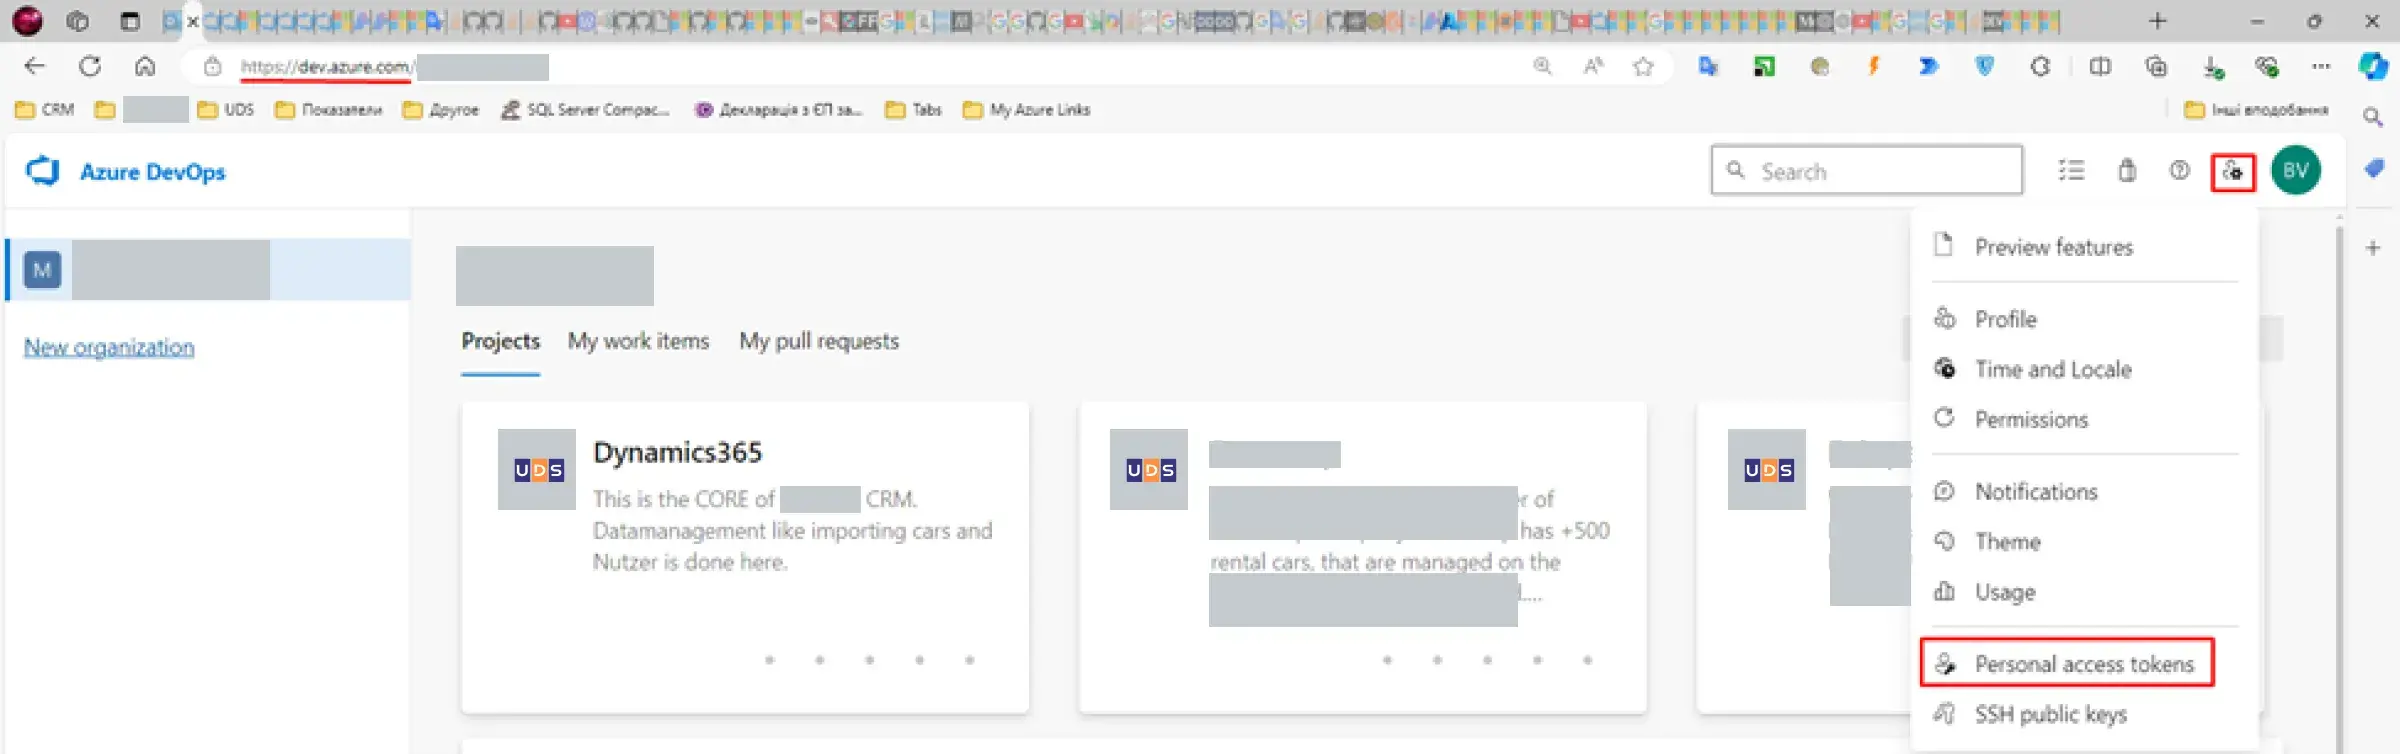
To form a token in the Azure DevOps, you have to do these actions:
1. Move to the User Settings -> Personal access tokens :
2. Click on the New Token and set up the access:
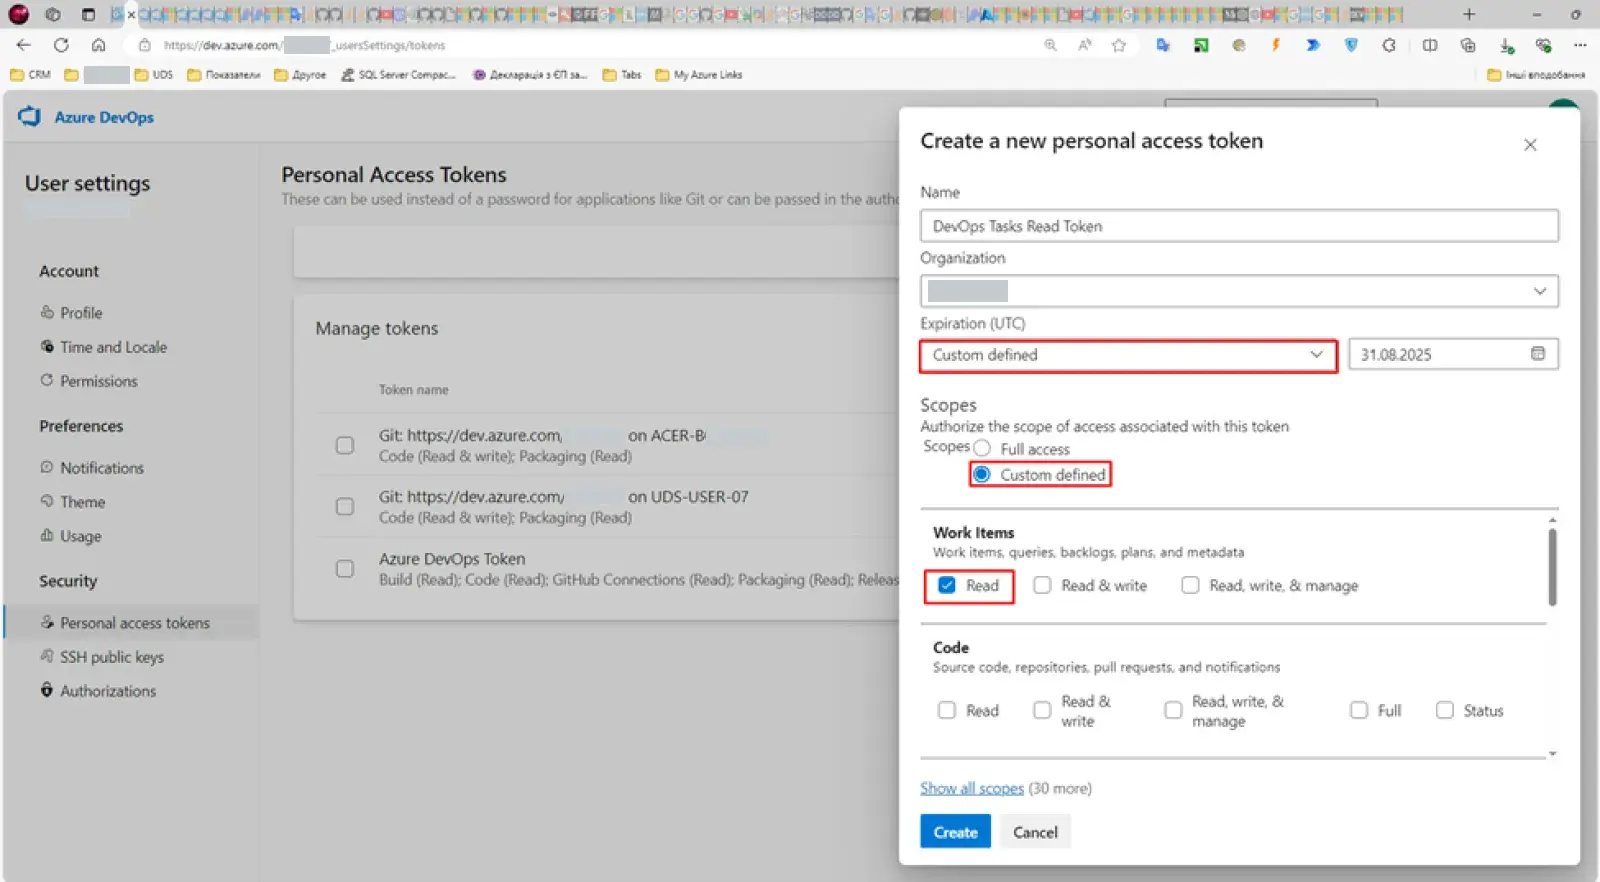
3. Choose the following parameters:
· Name – DevOps Tasks Read Token.
· Expiration (UTC) – Custom (in this case, you will be able to set up the token validity for a whole year).
· Work Items – Read (so that the token has access to read information in tasks).
4. Press the button Create.
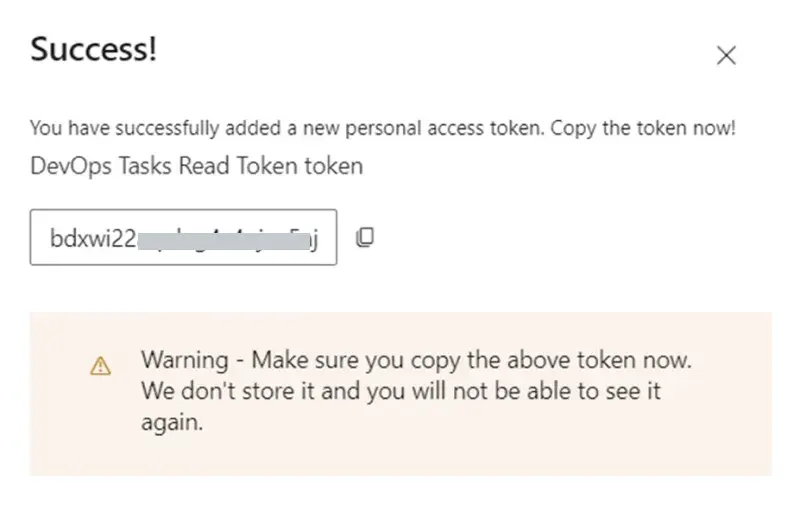
! Note. After that, do not forget to copy the token, as this is the only way to save it. After clicking on the button Close, you will no longer be able to see it. Other settings can be viewed after creation, unlike the token. If necessary, the settings can be changed, but the token will have to be recreated.
After creating the token, you can proceed to the next step, which is forming an Azure OpenAI resource.
For this, perform the following actions:
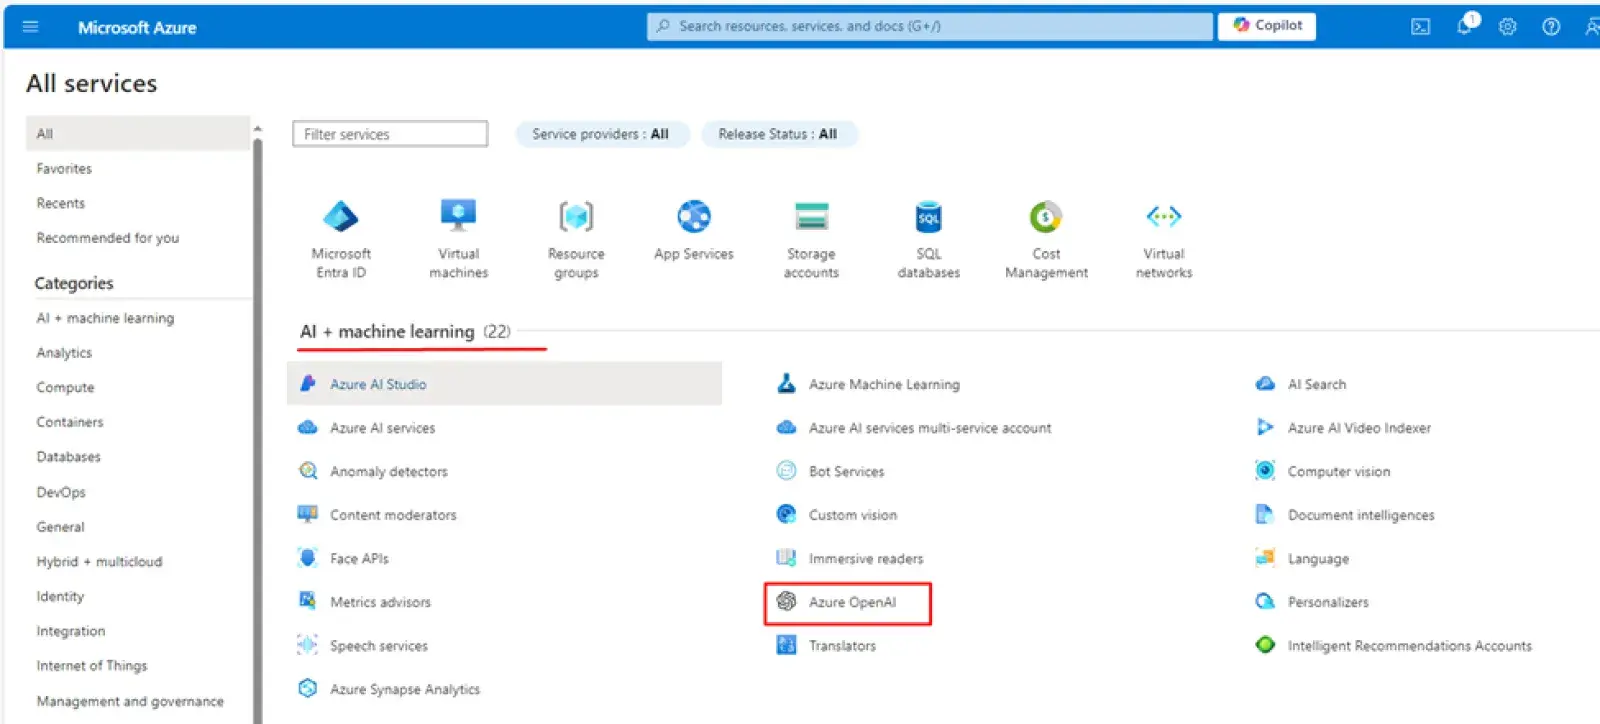
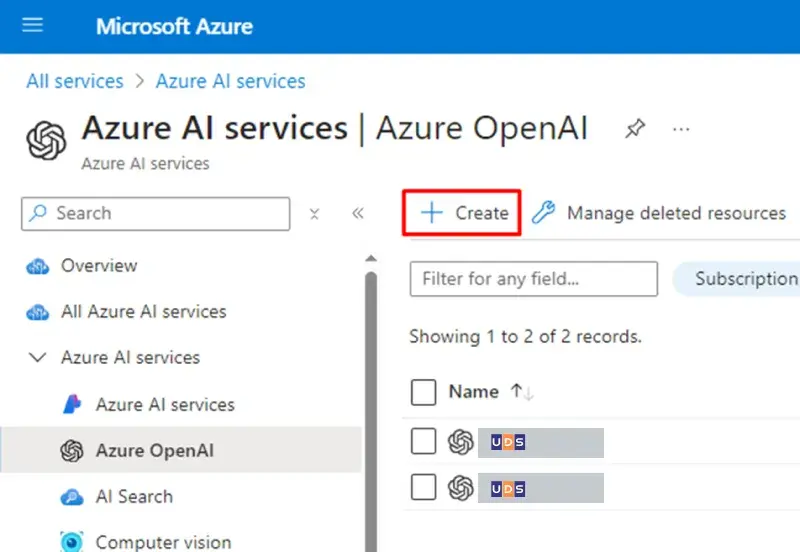
1. Go to the Azure and opt for the More Services:

2. Find the group AI + Machine Learning and choose the Azure OpenAI:
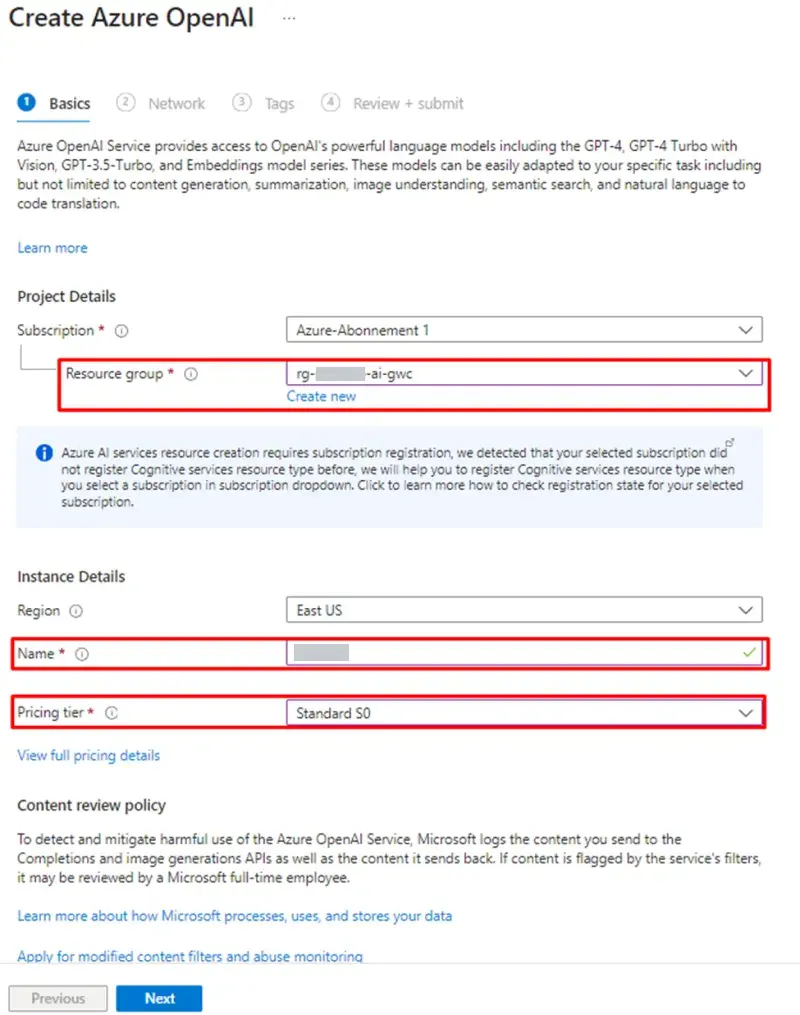
3. Click on the button Create and produce a resource with these parameters:
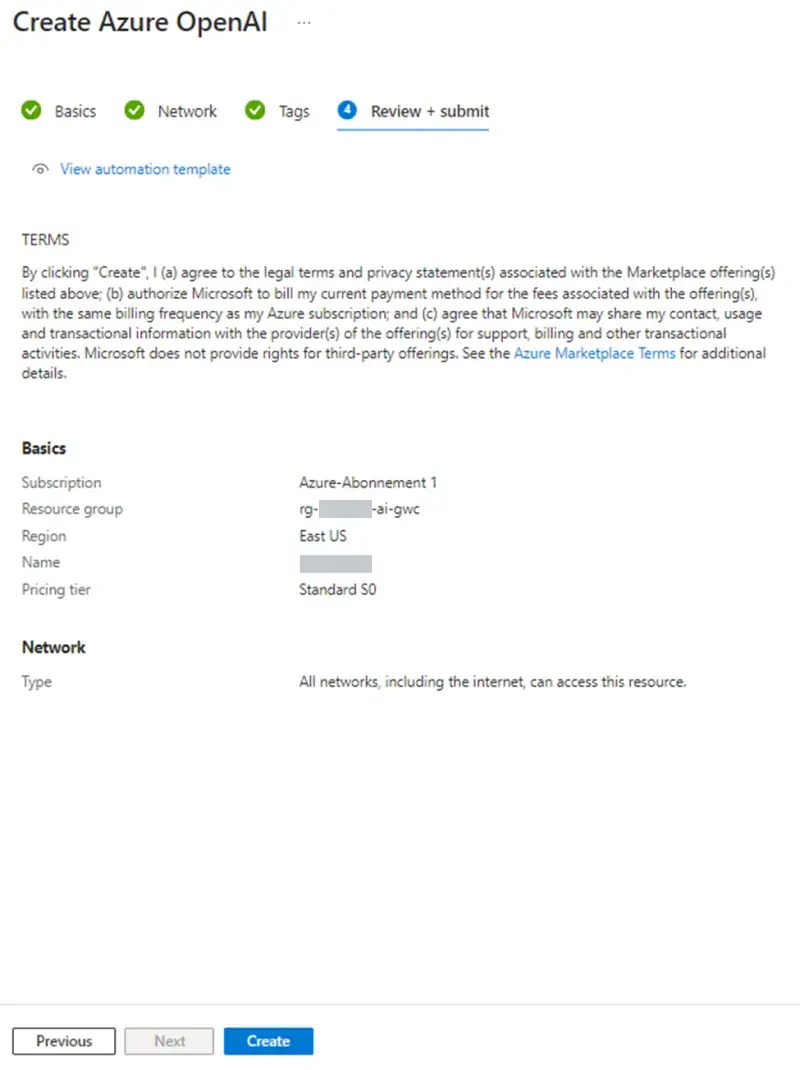
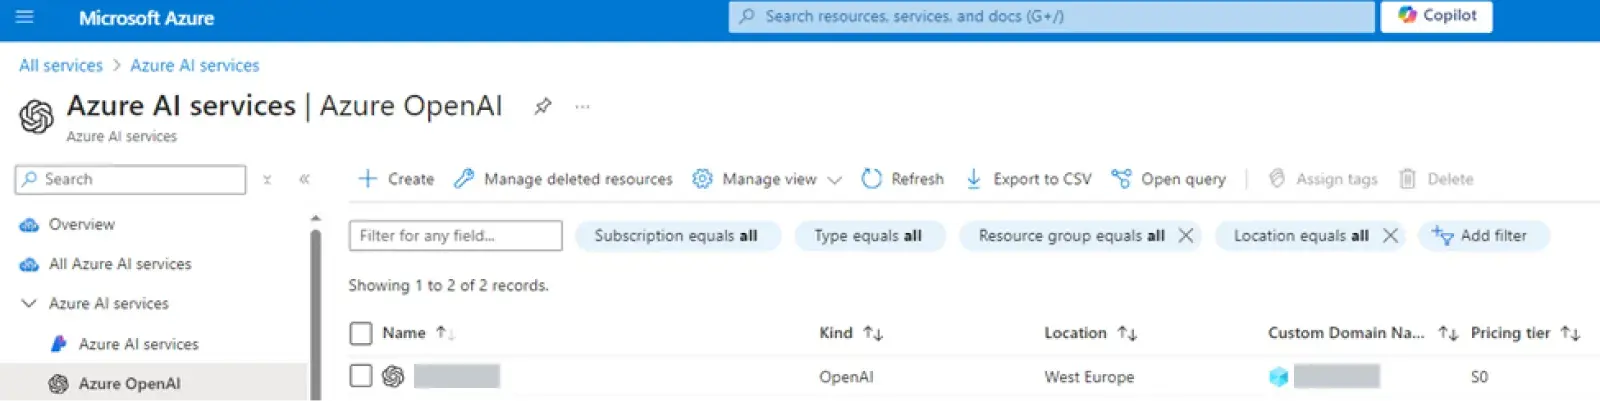
Therefore, following all the above instructions, you have created a resource:
Now, before you start using the resource in the Azure OpenAI Studio, create an AI Search. To do this, go through the following stages:
1. Proceed to the Azure AI Services.
2. Go to the AI Search.
3. Click on the button Create and form a resource with the parameters given below:
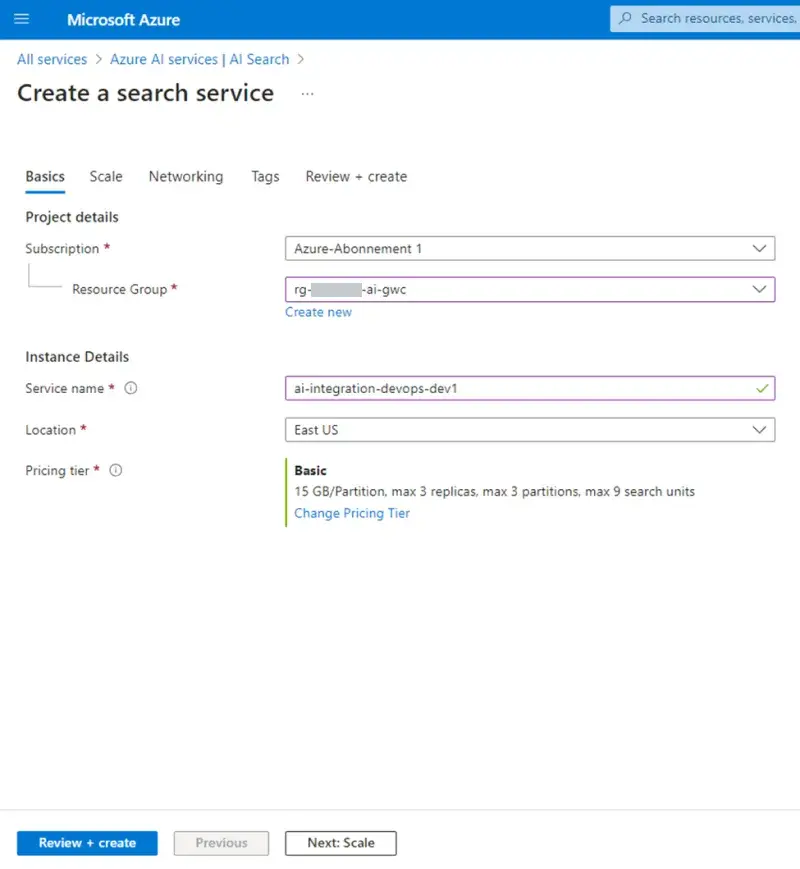
Thus, you have created an ai-integration-devops-dev:

Now, you can start setting up a chat. For this, follow these instructions:
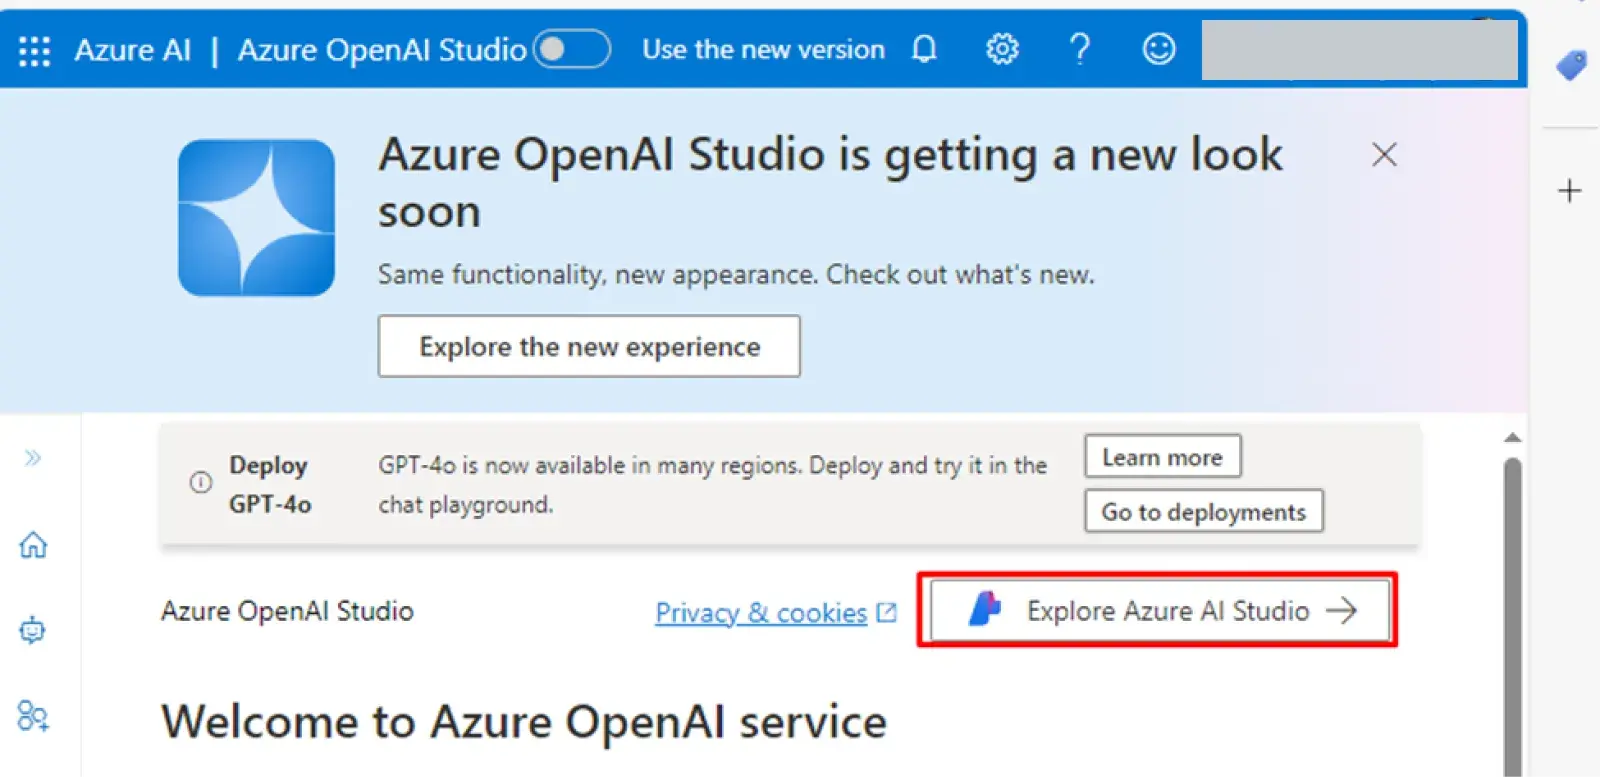
1. Open the Azure OpenAI -> the client’s name.
2. Click on the Go to Azure OpenAI Studio.

3. Click on the Explore Azure AI Studio.
! Note. If you do not see your streaming resource, do the following:
1. Pick the Azure OpenAI:

2. Opt for the appropriate resource (in our case, it was the client’s name):

3. Click on the Deployments -> Deploy model -> Deploy base model.
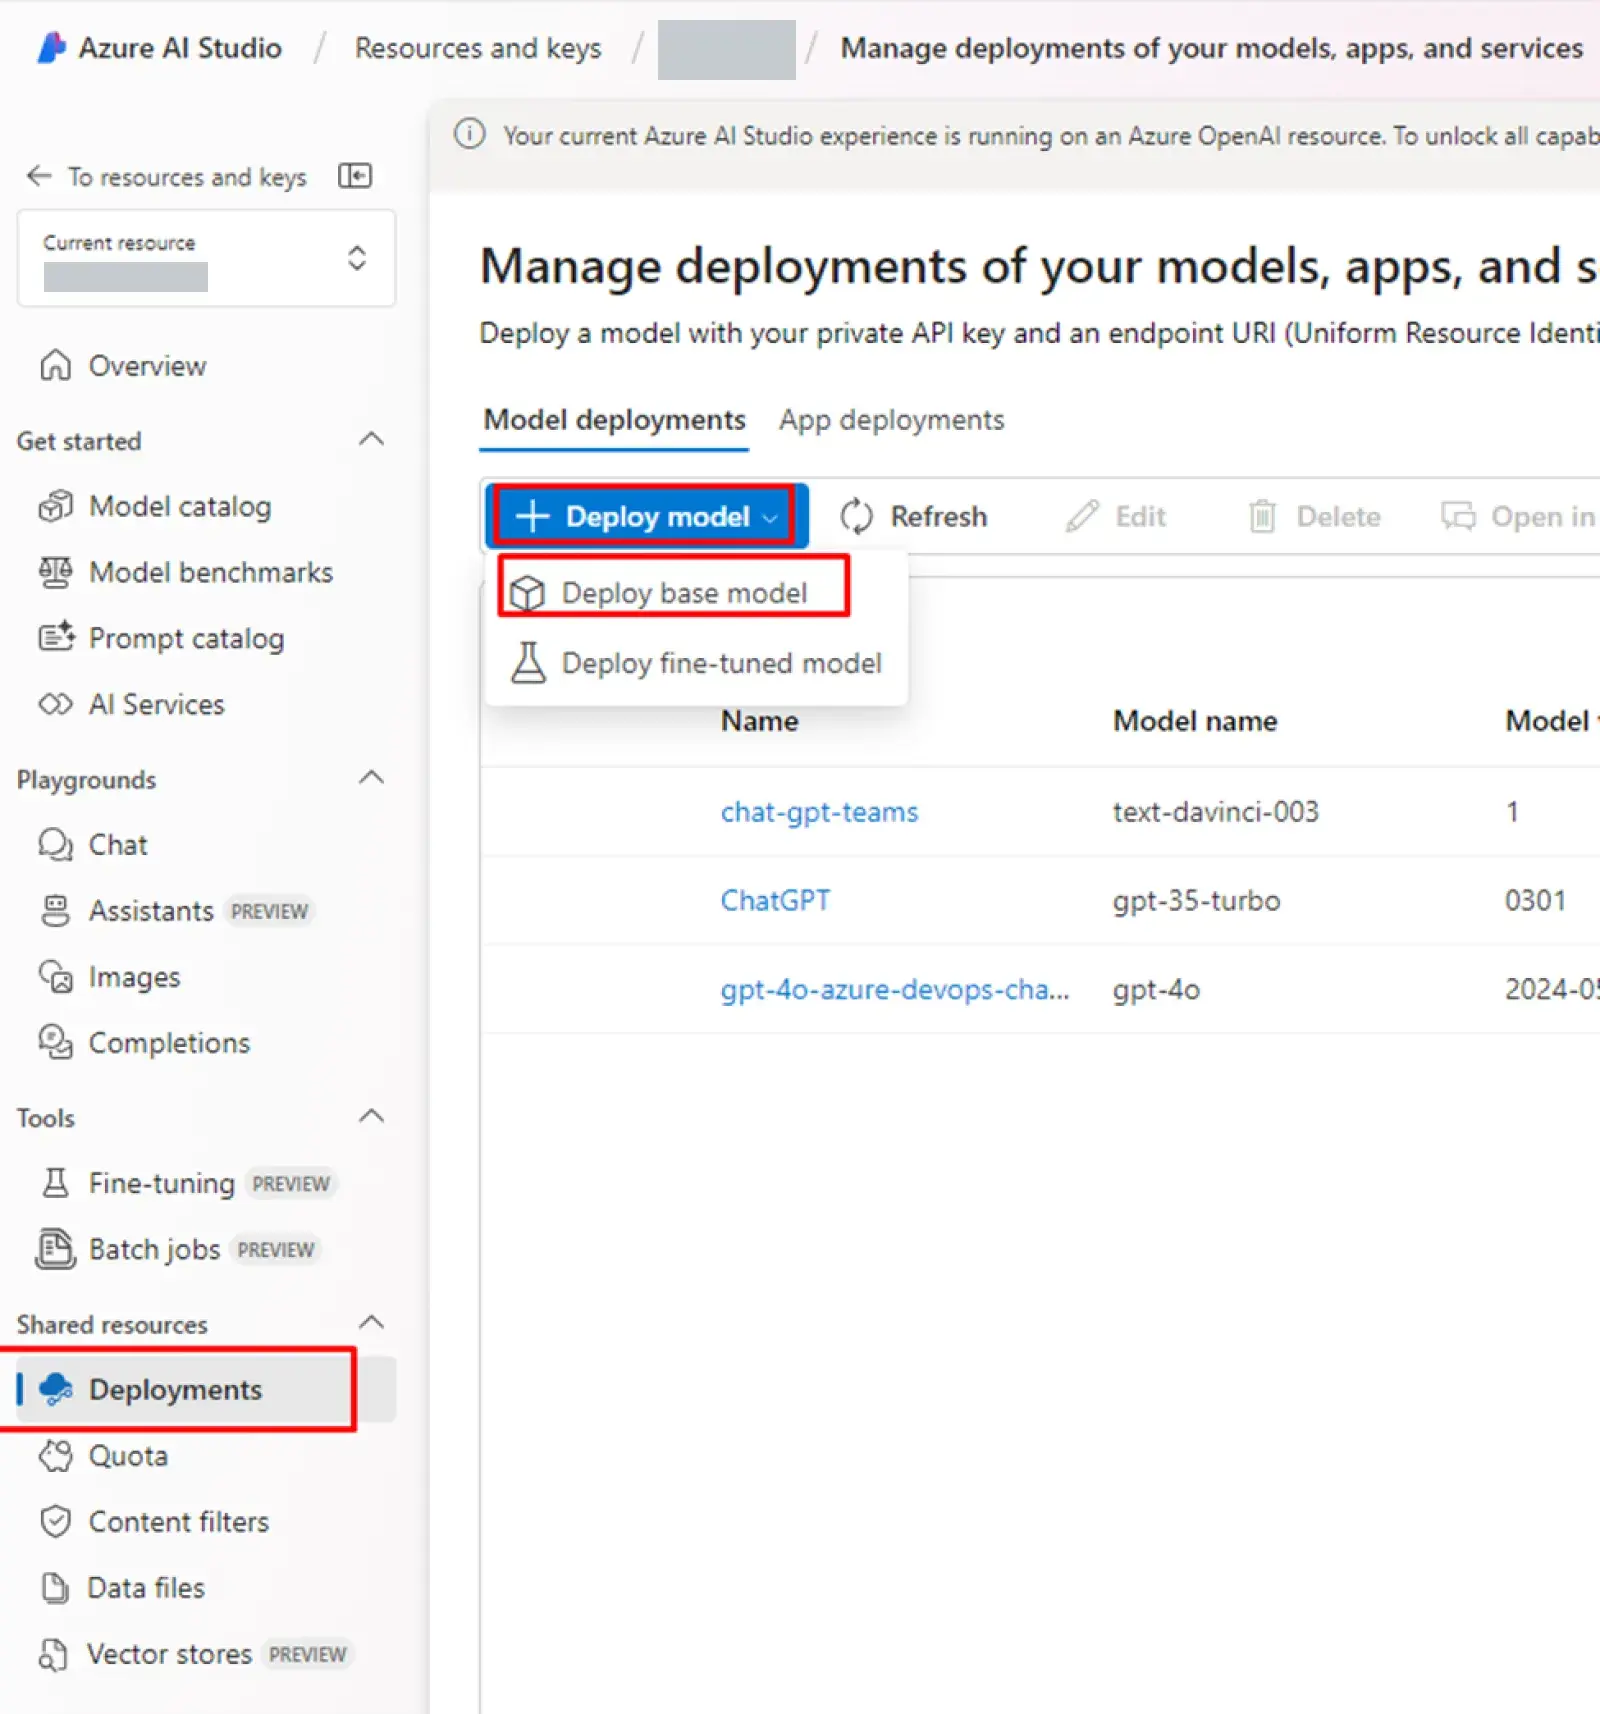
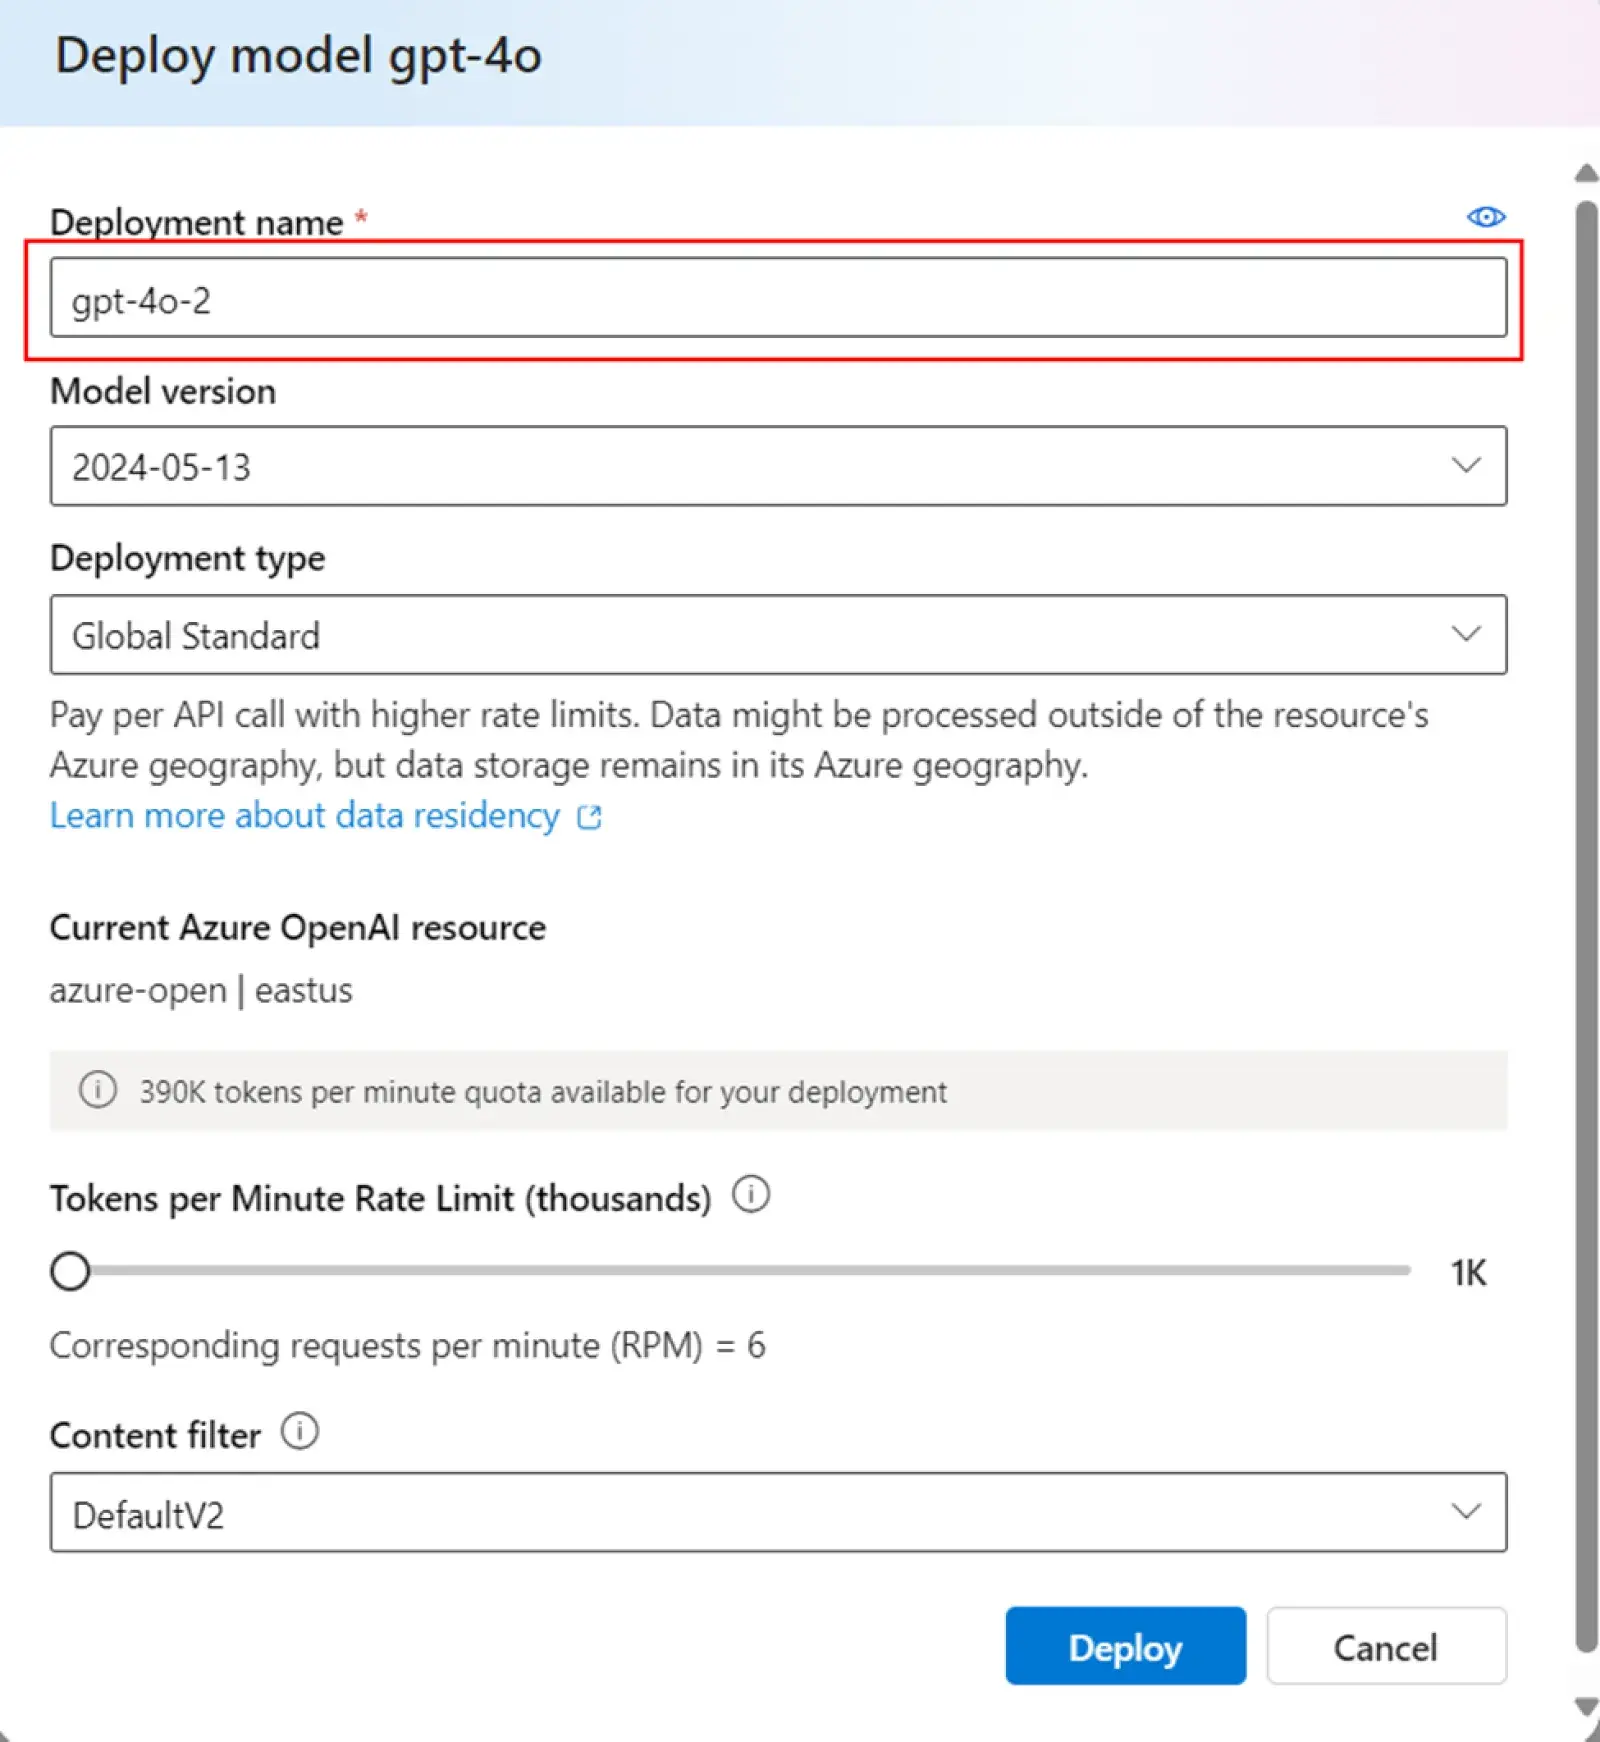
4. Choose the GPT-4o and press Confirm.
5. Type in a name and click on Deploy.
In this way, you have created a new gpt-4o-azure-devops-chatbot model and will be able to use it in your chat. But if you want to apply this model with the data provided in the Azure DevOps tasks, you have to perform some more actions:
1. Create an Azure Blob Storage:
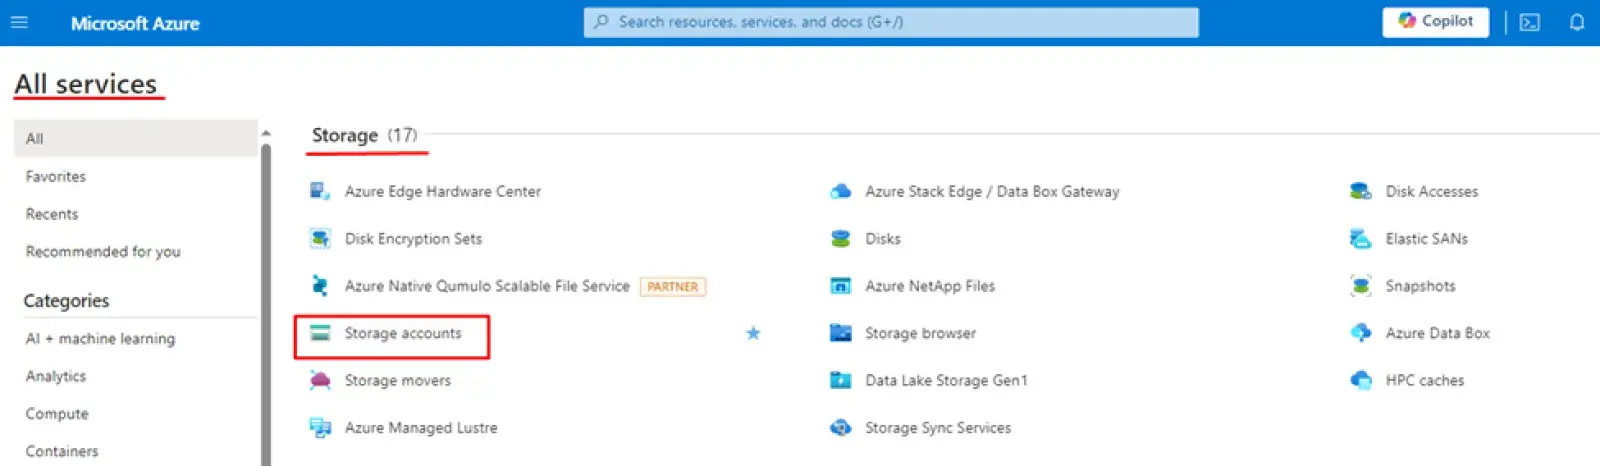
• Go to the Azure -> All Services.
• Find the group Storage.
• Choose the Storage Accounts.
• Click on the button Create and make a storage with these parameters:
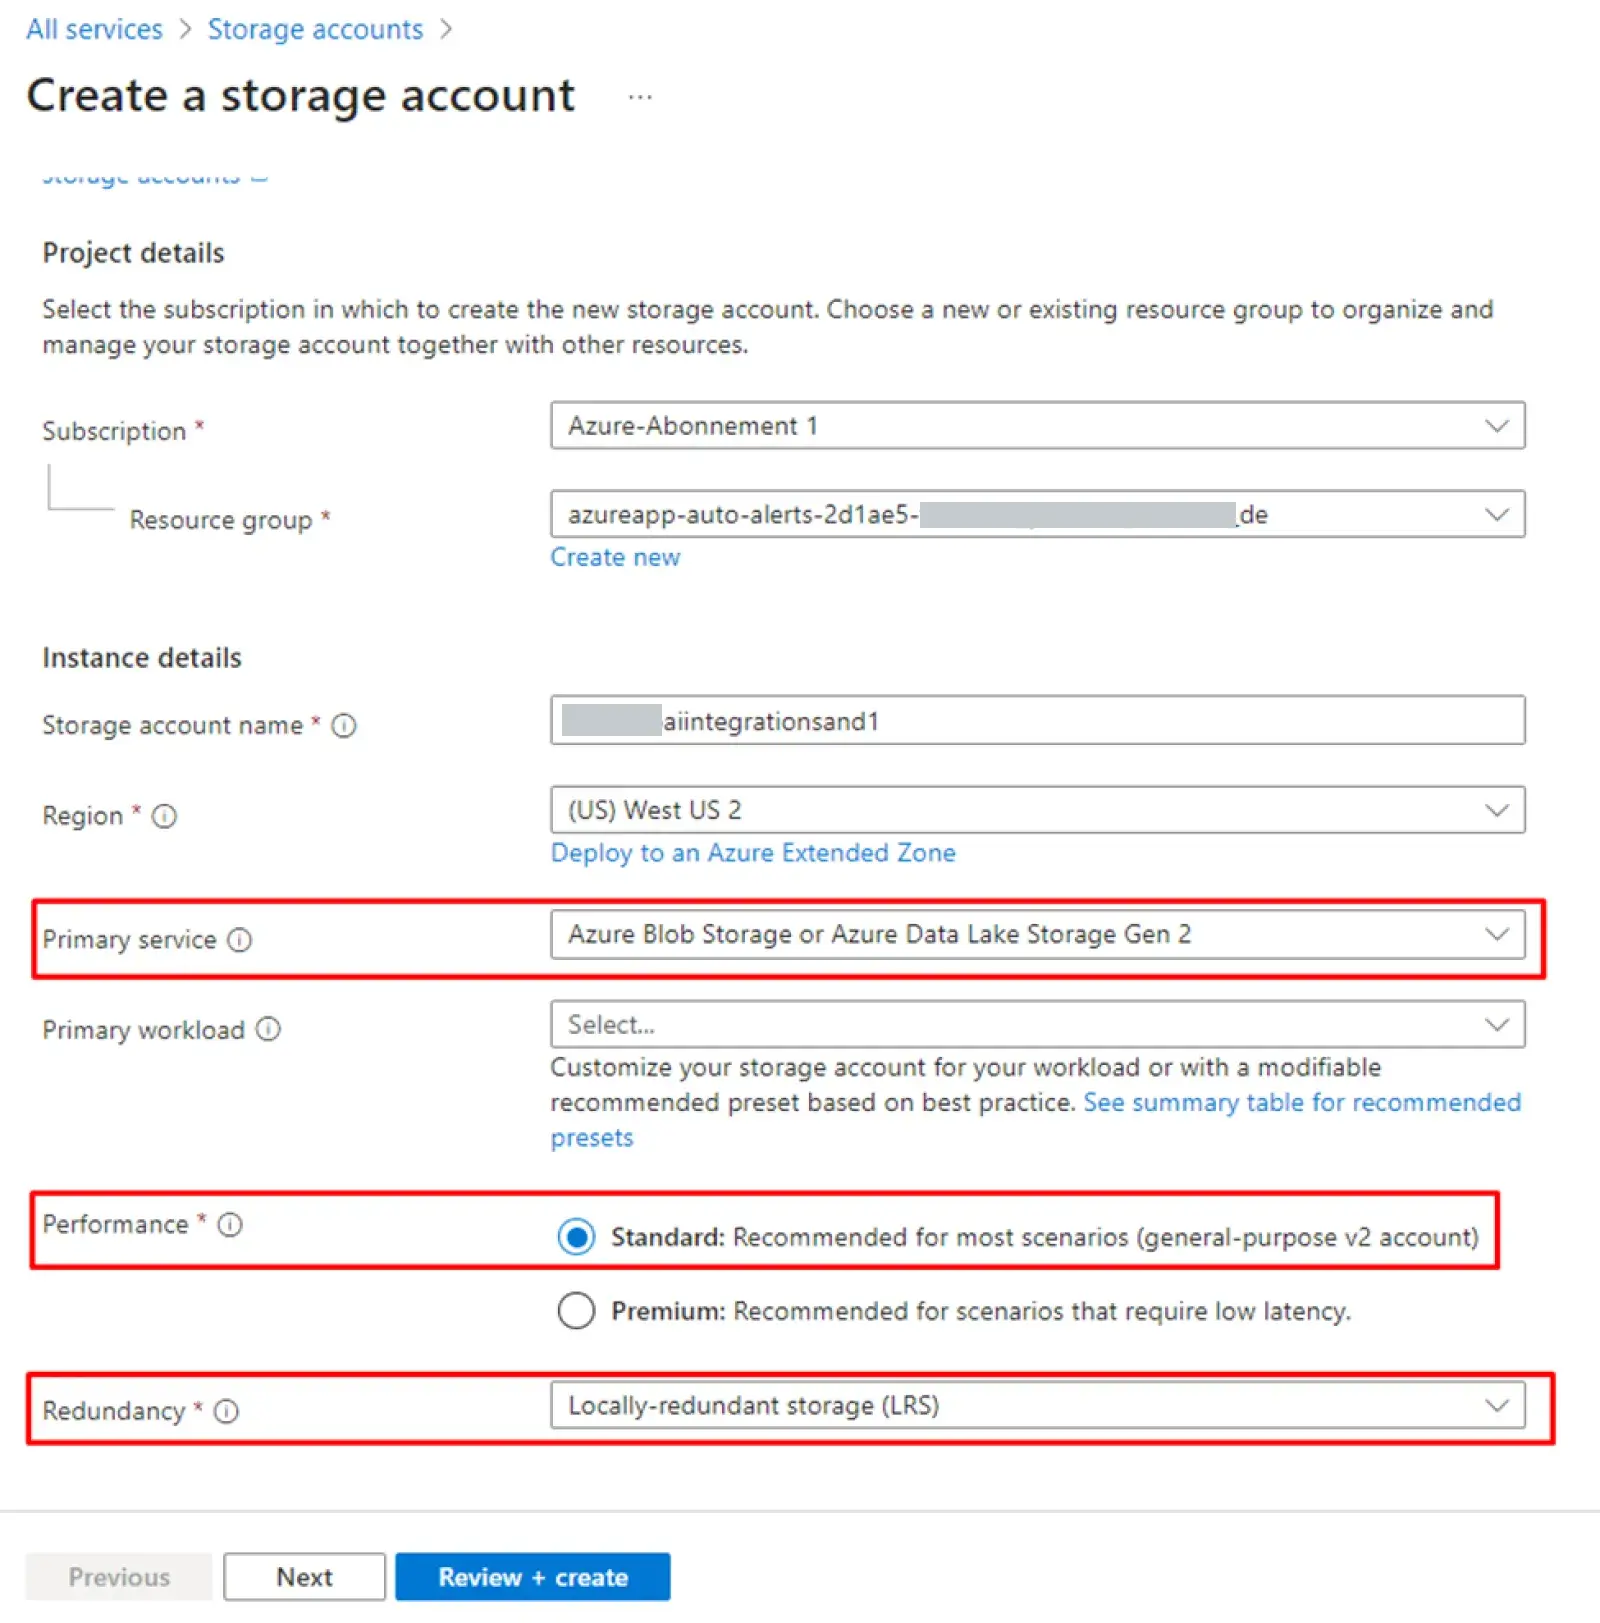
In this way, we built a client’snameaiintegrationsand (Here and further, the “client’s name” replaces the name of our client’s company, for example, mercedesaiintegrationsand, in order to maintain the data confidentiality. You can utilize it as an example).
2. Open the Blob storage.
3. Open the group Data storage.
4. Choose the Containers.
5. Click on the Create button and create a new container.
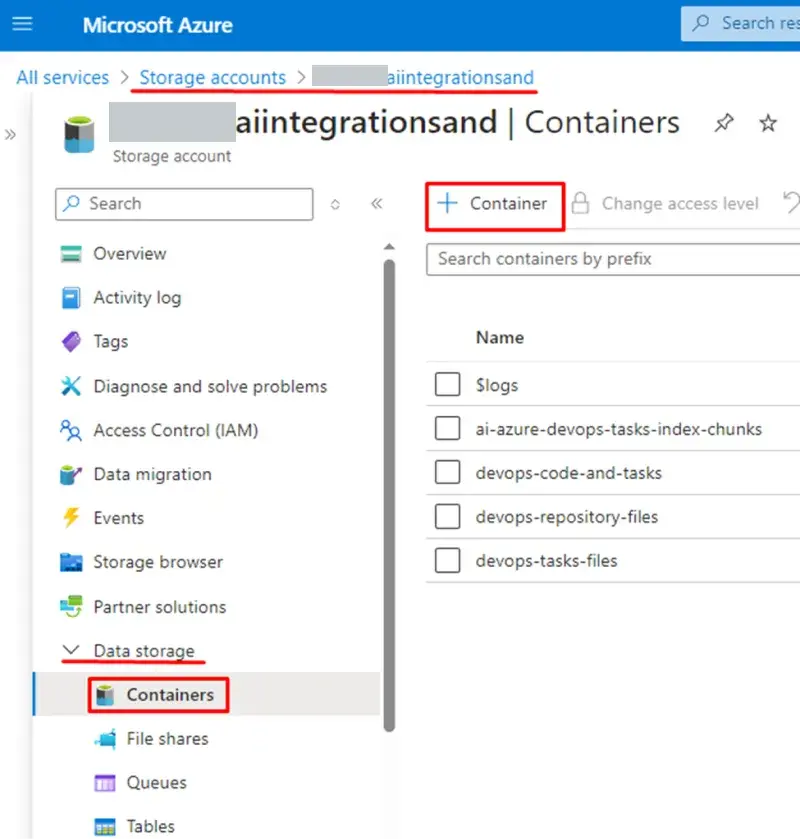
6. Type in a name and click on the Create button again.
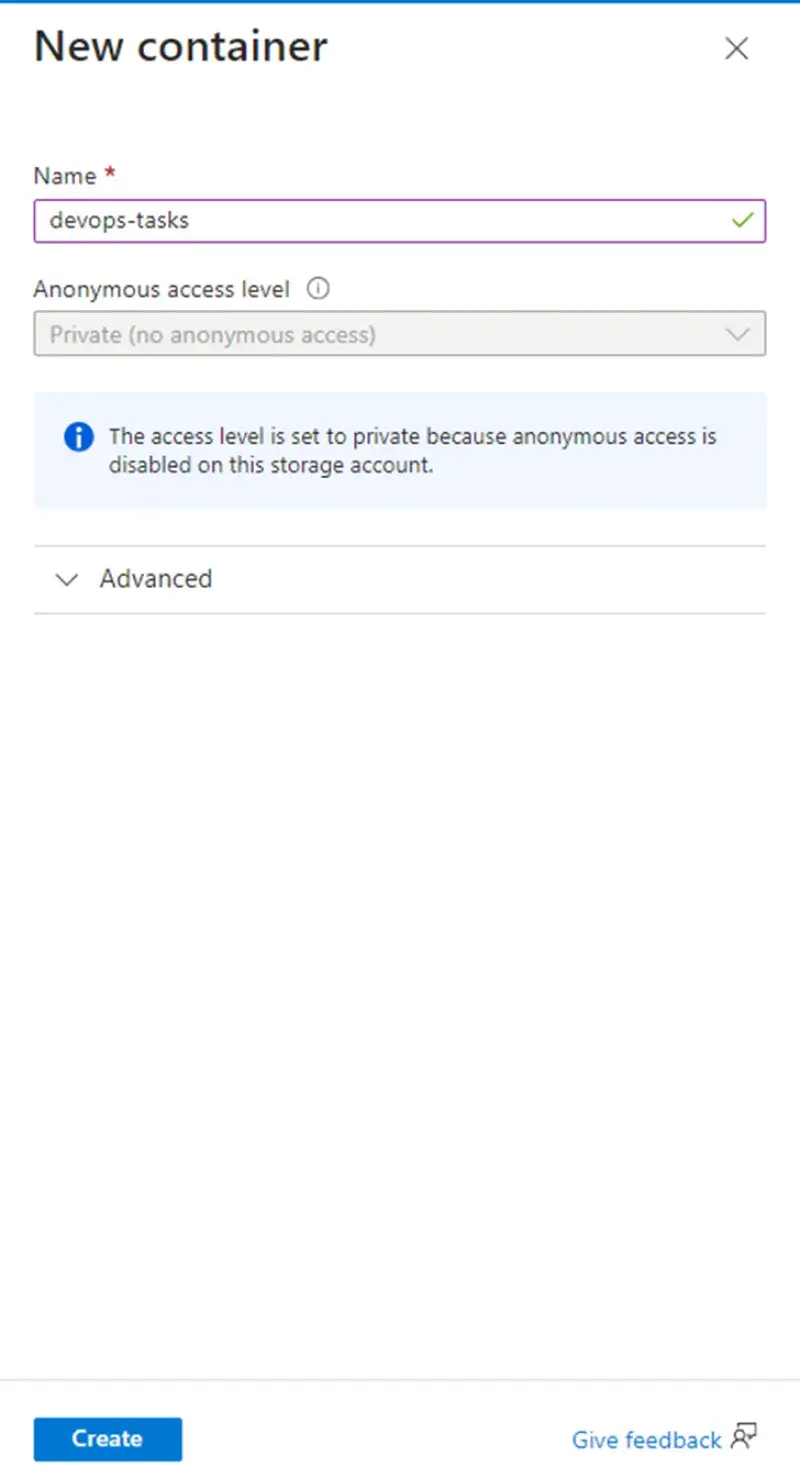
In our case, we created the devops-tasks-files container. Then, we used the newly created container to store information from the Azure DevOps. To complete the given task, we applied the programming language C#.
Our team created several classes and methods that helped to extract the necessary information from the tasks in one go and save it as text files in our container. Here are their implementations:
public class RelatedWorkItem

{

public int Id { get; set; }

public string Title { get; set; }

public string State { get; set; }

public string Link { get; set; }

public long? ParentWorkItem { get; set; }

}


public class DevOpsTasksModel

{

public int? TaskNumber { get; set; }

public string Title { get; set; }

public string Description { get; set; }

public string Link { get; set; }

public string State { get; set; }

public DateTime CreatedOn { get; set; }

public string AssignTo { get; set; }

public string Type { get; set; }

public long? ParentWorkItem { get; set; }

public string Severity { get; set; }

public List<string> Comments { get; set; } = new List<string>();

public List<RelatedWorkItem> RelatedWorkItems { get; set; } = new List<RelatedWorkItem>();

}


   public class CopilotIntegrationService

   {

       private readonly VssConnection _connection;

       private readonly BlobServiceClient _blobServiceClient;

       public CopilotIntegrationService()

       {

           const string collectionUri = "https://dev.azure.com/mobexo/";

           const string pat = "[devops_token]";

           const string connectionString = "[azure_blob_storage_connection_string]";


           var basicCredential = new VssBasicCredential(string.Empty, pat);


           _connection = new VssConnection(new Uri(collectionUri), basicCredential);

           _blobServiceClient = new BlobServiceClient(connectionString);

       }

       private string ReplaceValue(WorkItem workItem, string fieldName)

       {

           return workItem.Fields.ContainsKey(fieldName) ?

                          Regex.Replace((workItem.Fields[fieldName] as string)?.Replace("<br>", "\n"), @"<.*?>", string.Empty) : "";

       }

       public List<DevOpsTasksModel> RetrieveTasksWithCommentsFromDevOps()

       {


           List<DevOpsTasksModel> tasks = new List<DevOpsTasksModel>();


           using (var witClient = _connection.GetClient<WorkItemTrackingHttpClient>())

           {

               var wiql = new Wiql()

               {

                   Query = "SELECT [System.Id], [System.Title], [System.State] FROM WorkItems WHERE [System.TeamProject] = 'Dynamics365'"

               };


               var queryByWiqlResult = witClient.QueryByWiqlAsync(wiql).Result;

               var workItemLists = queryByWiqlResult.WorkItems

                   .Select((x, i) => new { Index = i, Value = x.Id })

                   .GroupBy(x => x.Index / 200)

                   .Select(g => g.Select(x => x.Value).ToList())

                   .ToList();


               foreach (var workItemList in workItemLists)

               {

                   var workItems = witClient.GetWorkItemsAsync(workItemList, expand: WorkItemExpand.All).Result;

                   foreach (var workItem in workItems)

                   {

                       var devOpsTasksModel = new DevOpsTasksModel()

                       {

                           Title = workItem.Fields.ContainsKey("System.Title") ? workItem.Fields["System.Title"] as string : "",

                           Description = $"{ReplaceValue(workItem, "System.Description")}\n" +

                           $"{ReplaceValue(workItem, "Custom.UserStory")}\n" +

                           $"{ReplaceValue(workItem, "Microsoft.VSTS.Common.AcceptanceCriteria")}",

                           TaskNumber = workItem.Id,

                           Link = $@"https://dev.azure.com/mobexo/Dynamics365/_workitems/edit/{workItem.Id}",


                           AssignTo = workItem.Fields.ContainsKey("System.AssignedTo") ? (workItem.Fields["System.AssignedTo"] as IdentityRef).DisplayName : "",

                           CreatedOn = workItem.Fields.ContainsKey("System.CreatedDate") ? (DateTime)workItem.Fields["System.CreatedDate"] : DateTime.MinValue,

                           State = workItem.Fields.ContainsKey("System.State") ? workItem.Fields["System.State"] as string : "",

                           Type = workItem.Fields.ContainsKey("System.WorkItemType") ? workItem.Fields["System.WorkItemType"] as string : "",

                           ParentWorkItem = workItem.Fields.ContainsKey("System.Parent") ? workItem.Fields["System.Parent"] as long? : null,

                           Severity = workItem.Fields.ContainsKey("Microsoft.VSTS.Common.Severity") ? workItem.Fields["Microsoft.VSTS.Common.Severity"] as string : "",

                       };


                       var comments = witClient.GetCommentsAsync(workItem.Id.Value).Result;

                       devOpsTasksModel.Comments.AddRange(comments.Comments.Select((comment, i) => $"{i}. " +

                       $"{comment.RevisedBy.DisplayName}: " +

                       $"{Regex.Replace(comment.Text?.Replace("<br>", "\n"), @"<.*?>", string.Empty)}"));


                       List<RelatedWorkItem> relatedWorkItems = new List<RelatedWorkItem>();

                       if (workItem.Relations != null)

                       {

                           foreach (var relation in workItem.Relations)

                           {

                               if (int.TryParse(relation.Url.Split('/').LastOrDefault(), out int relatedId))

                               {

                                   var relationWorkItems = witClient.GetWorkItemsAsync(new List<int>() { relatedId }, expand: WorkItemExpand.All).Result.FirstOrDefault();

                                   relatedWorkItems.Add(new RelatedWorkItem()

                                   {

                                       Id = relationWorkItems.Id.Value,

                                       Title = relationWorkItems.Fields.ContainsKey("System.Title") ? relationWorkItems.Fields["System.Title"] as string : "",

                                       State = relationWorkItems.Fields.ContainsKey("System.State") ? relationWorkItems.Fields["System.State"] as string : "",

                                       Link = $@"https://dev.azure.com/mobexo/Dynamics365/_workitems/edit/{relationWorkItems.Id.Value}",

                                       ParentWorkItem = relationWorkItems.Fields.ContainsKey("System.Parent") ? relationWorkItems.Fields["System.Parent"] as long? : null,

                                   });

                               }

                           }

                       }

                       devOpsTasksModel.RelatedWorkItems = relatedWorkItems;

                       tasks.Add(devOpsTasksModel);

                   }

               }

           }


           return tasks;

       }

       public void SaveDevOpsTasks(List<DevOpsTasksModel> tasks)

       {

           foreach (var task in tasks)

           {

               string jsonTask = JsonConvert.SerializeObject(task, Formatting.Indented);


               var fileName = $"{task.TaskNumber}.txt";

               using (var stream = new MemoryStream(Encoding.UTF8.GetBytes(jsonTask)))

               {

                   SaveInAzureBlobStorage(fileName, "devops-tasks-files", stream);

               }

           }

       }


       private void SaveInAzureBlobStorage(string blobName, string containerName, Stream fileStream)

       {

           var containerClient = _blobServiceClient.GetBlobContainerClient(containerName);

           var blobClient = containerClient.GetBlobClient(blobName);

           blobClient.Upload(fileStream, overwrite: true);

       }

   }
In our project, we used the classes DevOpsTasksModel and RelatedWorkItem to save information. The class CopilotIntegrationService contained methods for extracting and saving data in cloud storage. We also used a constructor to create the necessary connections to the Azure DevOps and Azure.
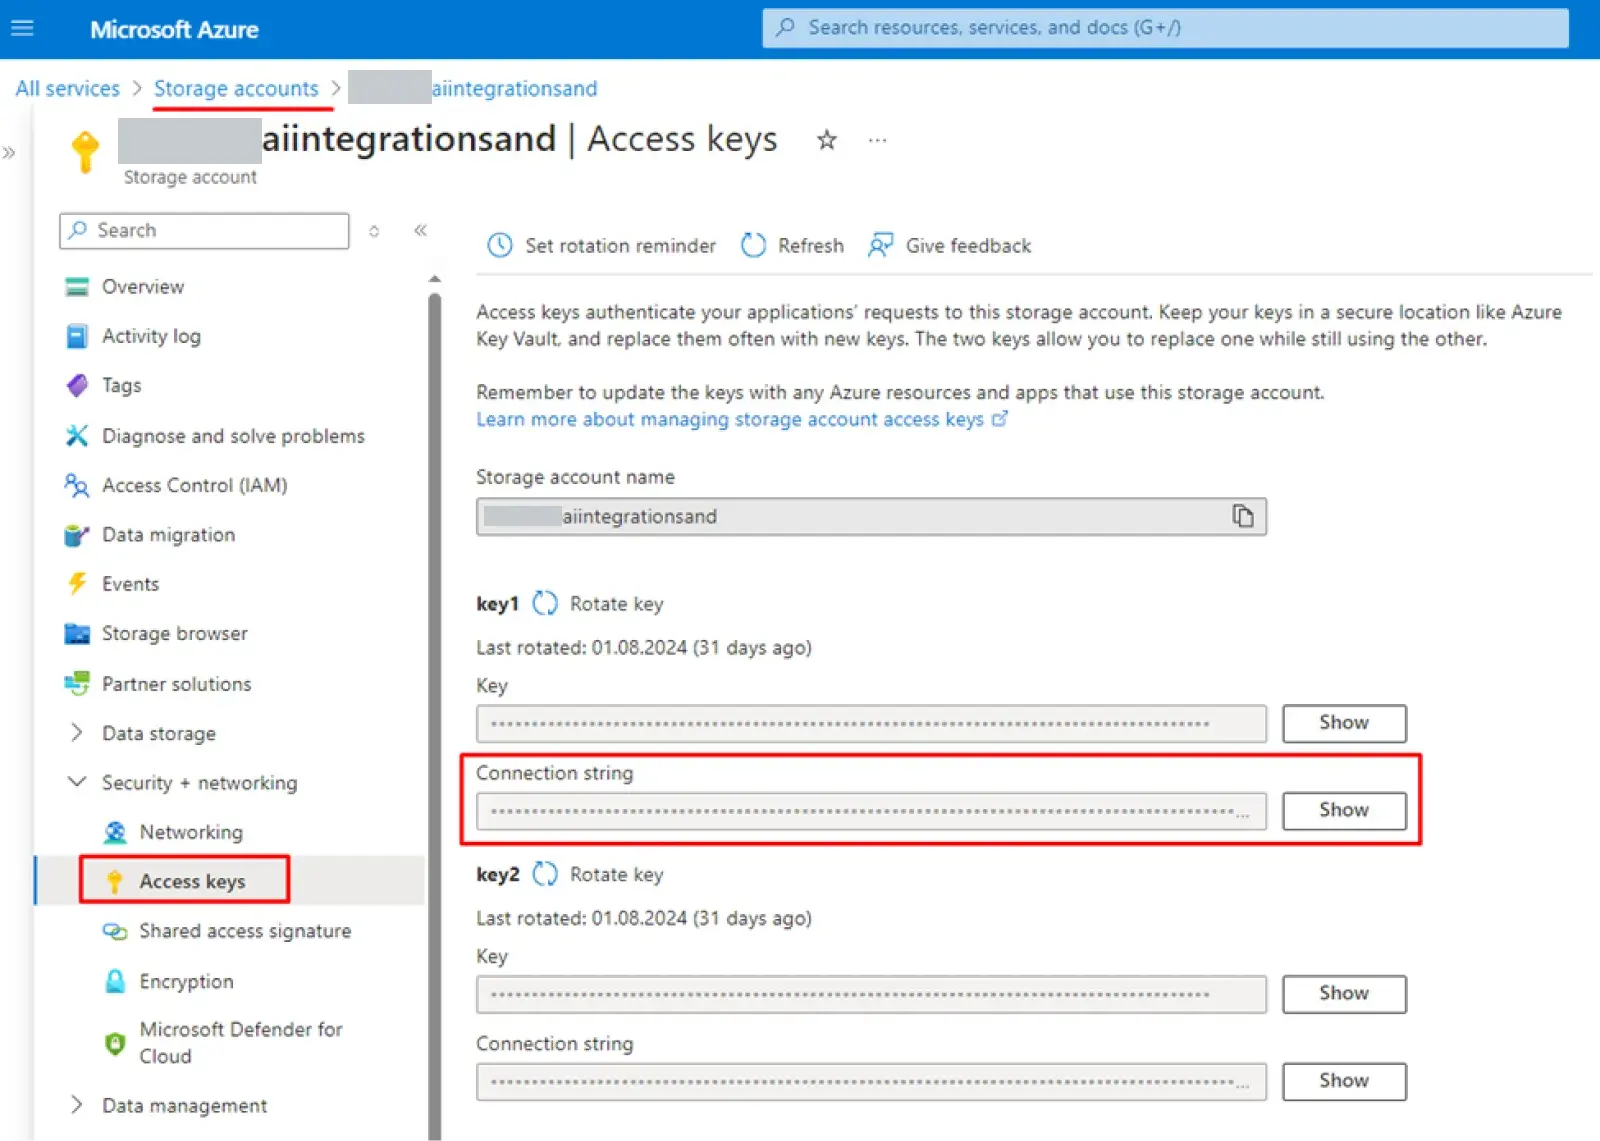
Now, you need to replace "[devops_token]" with the token you have generated in the Azure DevOps at the first stage. You also need to replace "[azure_blob_storage_connection_string]" with a row that has a connection to the Azure Blob Storage.
You can do it this way:
Azure -> All services ->Storage accounts-> client’snameaiintegrationsand (in your case, a blob storage will be created, which is described above).
In the chosen Storage account, you have to perform the following actions:
1. Open the group Security + networking.
2. Choose the Access keys.
3. Next to the key1->Connection string, press the Show button and copy the row with the connection.
Now, after all the settings have been done, you can run first the method RetrieveTasksWithCommentsFromDevOps and then the method SaveDevOpsTasks, to which you will pass the data from the first method.
The method RetrieveTasksWithCommentsFromDevOps will get the following information:
• The task number
• The task title
• The task description
• The link to the task
• The task status
• The date of the task creation
• The executor
• The task type
• The task parent number
• The task priority
• Comments
• Connected tasks (the number, the title, the link, the status, and the parent number of the task)
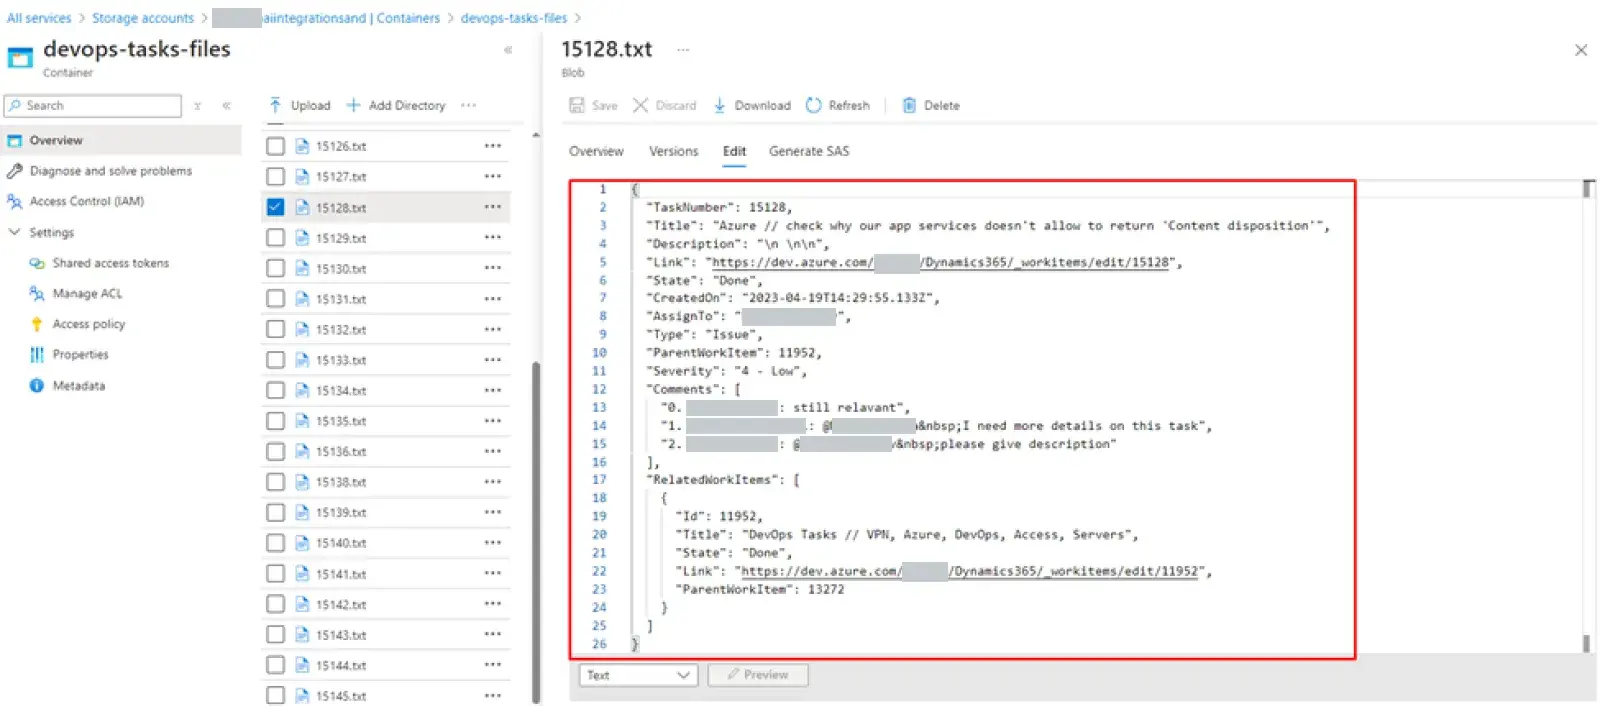
The method SaveDevOpsTasks will save the information in the cloud storage. As a final result, you will see the files in the Azure Blob Storage in the appropriate container:
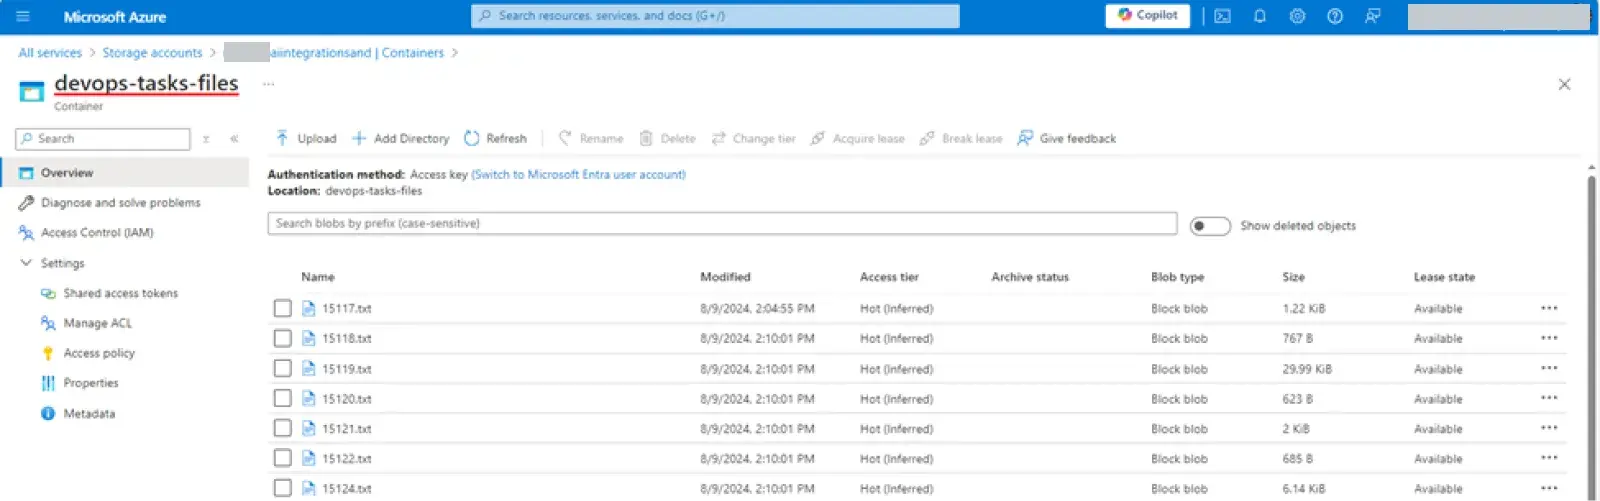
Each file inside looks like the following:
Now, since your data is ready, you can move on to setting up a chat that will use the information from your container in the Azure Blob Storage.
For this, you have to fulfill these actions:
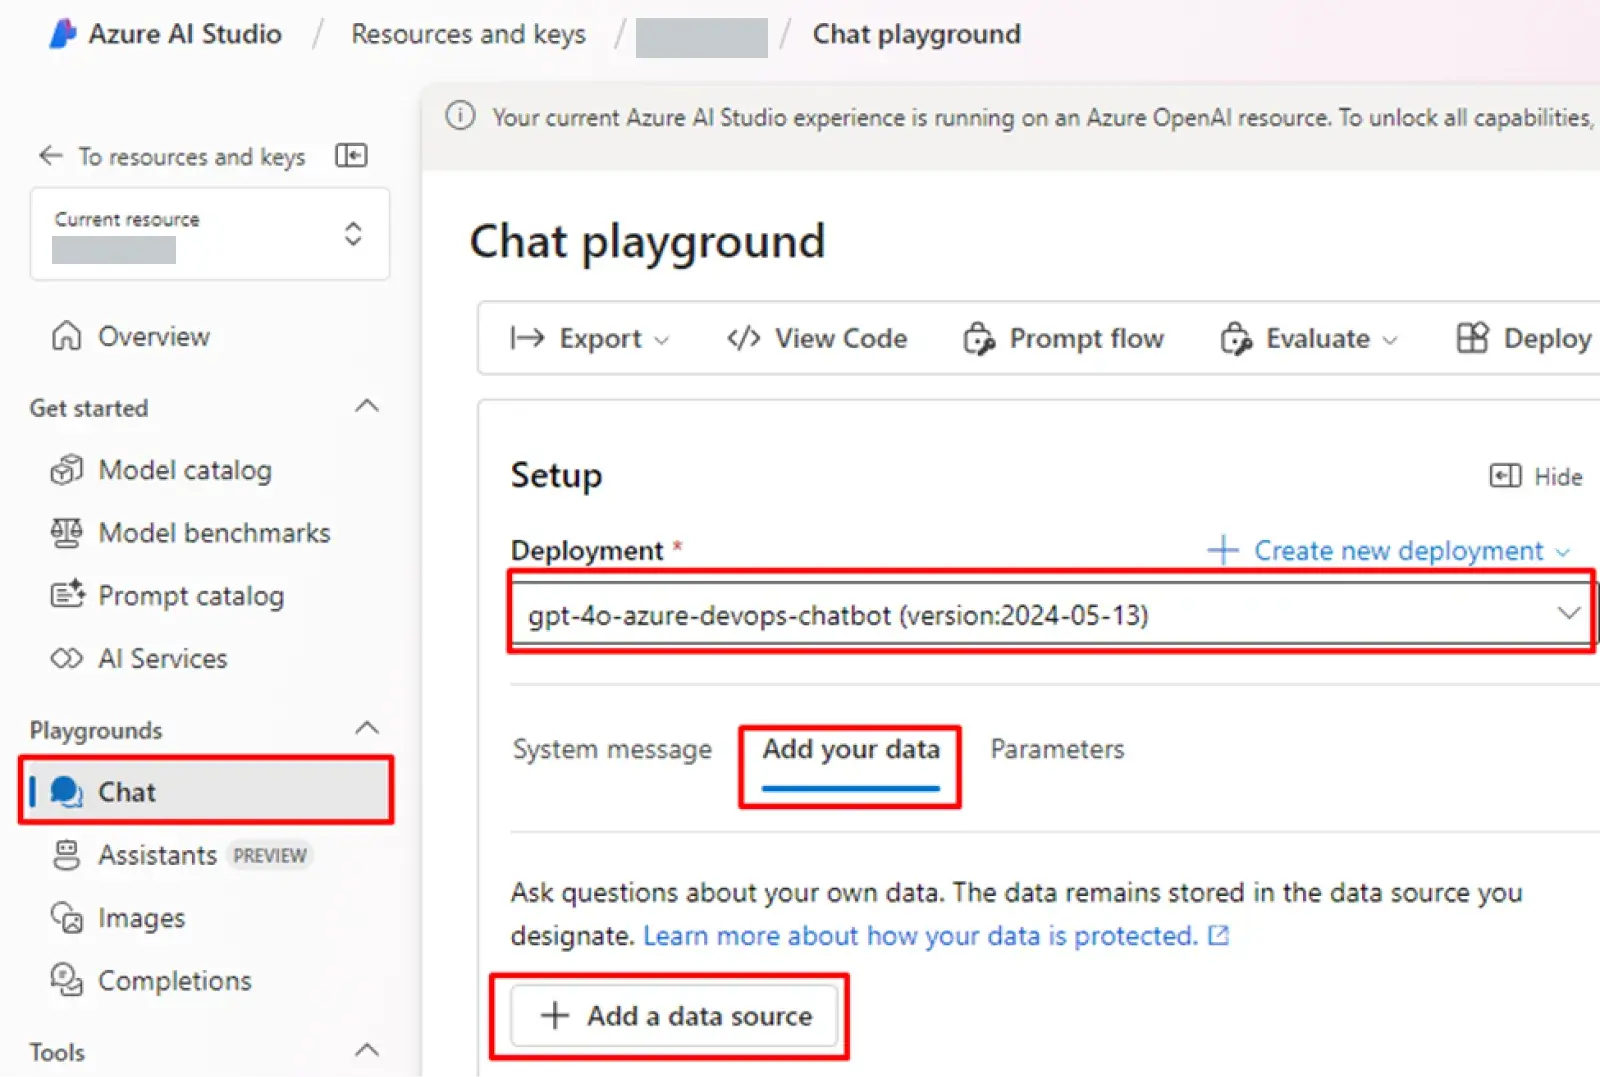
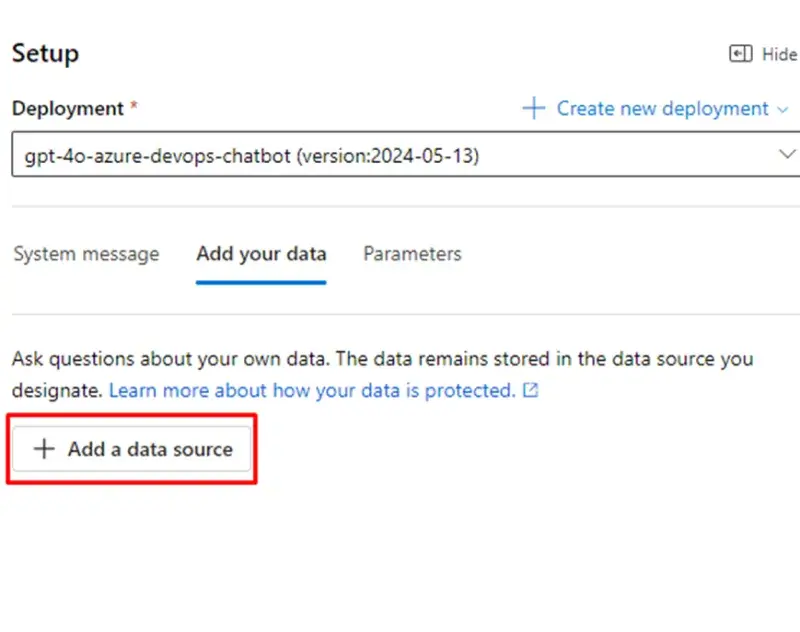
1. Return to the Azure AI Studio.
2. There, go to the Chat.
3. Pick the earlier created Deployment model. (In our case, it was the gpt-4o-azure-devops-chatbot.)
4. Proceed to the Add your data and click on the Add data source.
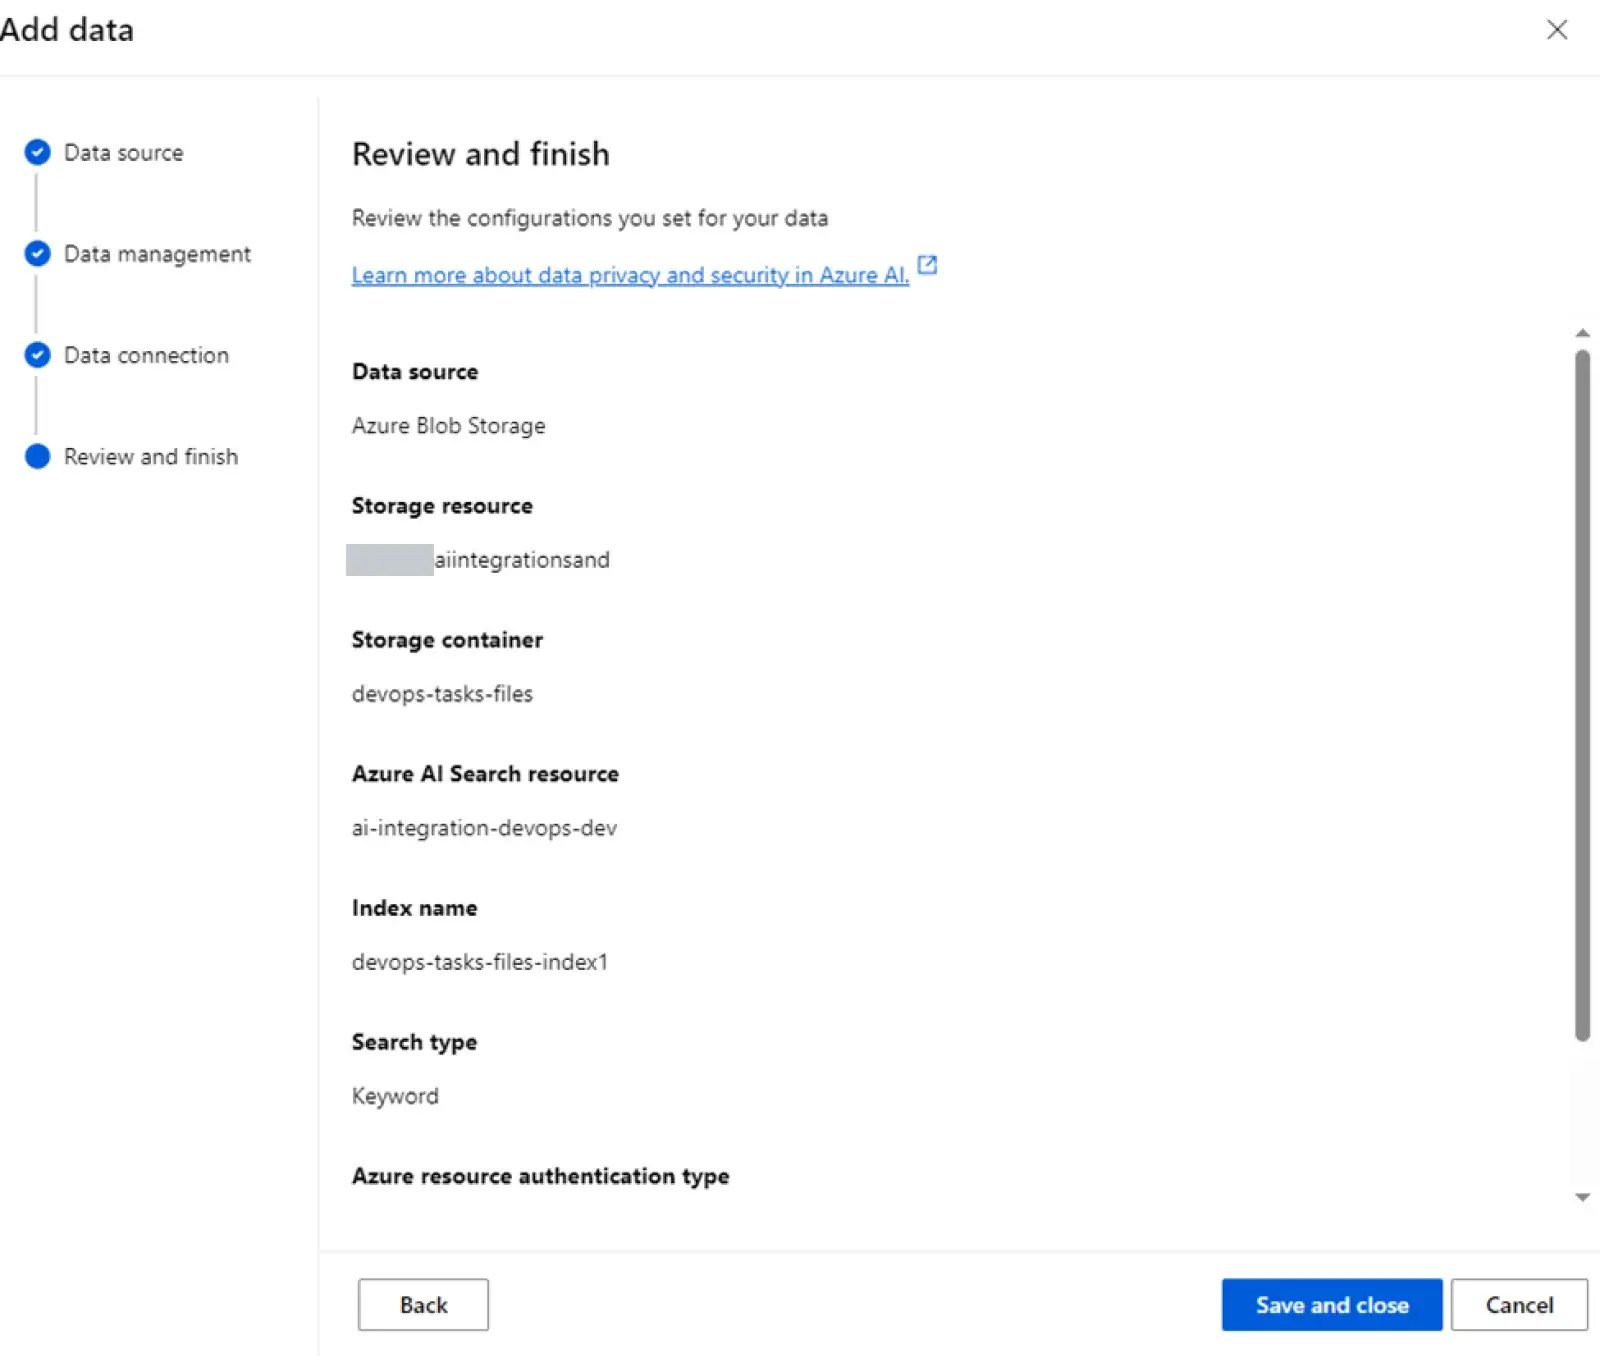
5. Fill in the bot parameters:
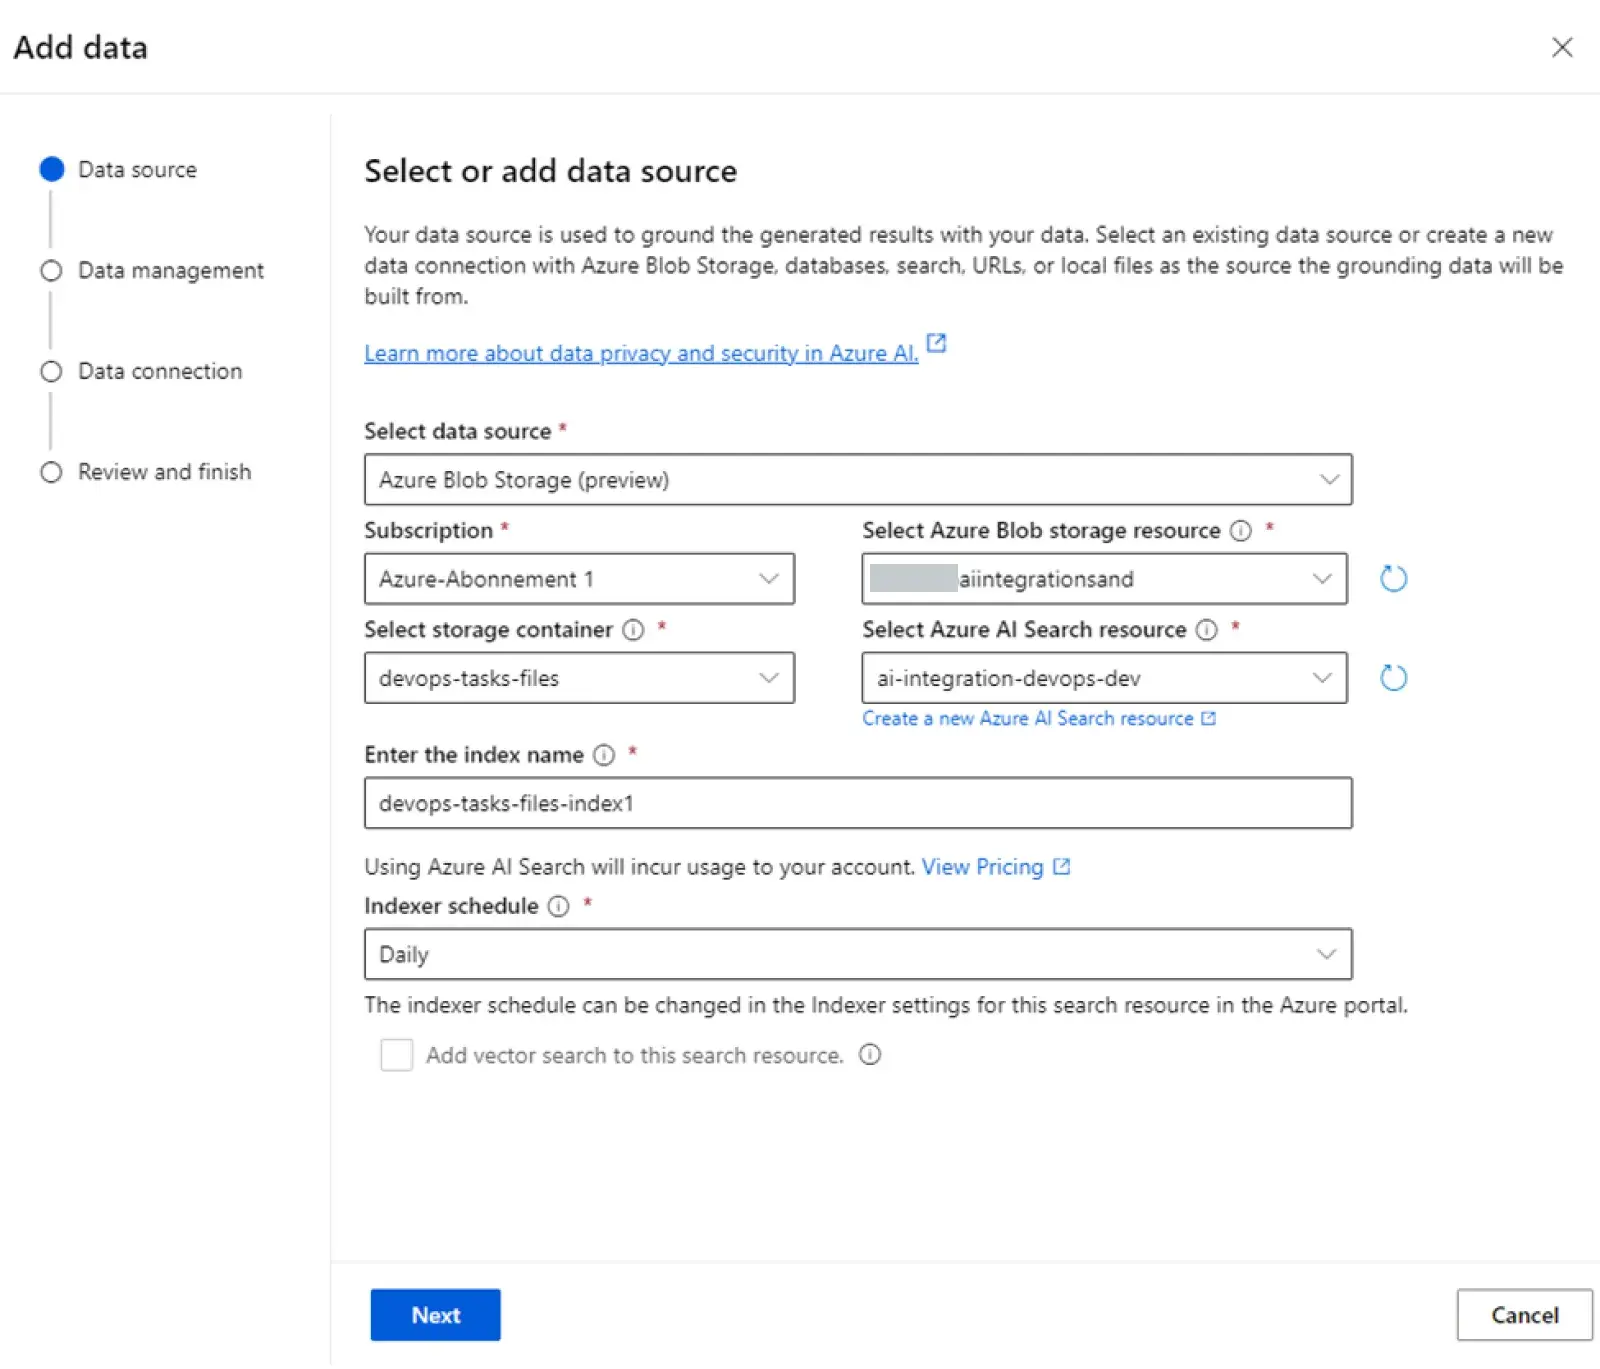
• client’snameaiintegrationsand is the title of the Azure Blob Storage created by our team (you can utilize it as an example).
• devops-tasks-files is the container where you will store your text files with the task information.
• ai-integration-devops-dev is the title of the Azure AI Search created by our team (you can utilize it as an example).
! Note. Also, you need to give a name to the Index and Indexer schedule. The last parameter is responsible for how often the bot will index new files in the container devops-tasks-files.
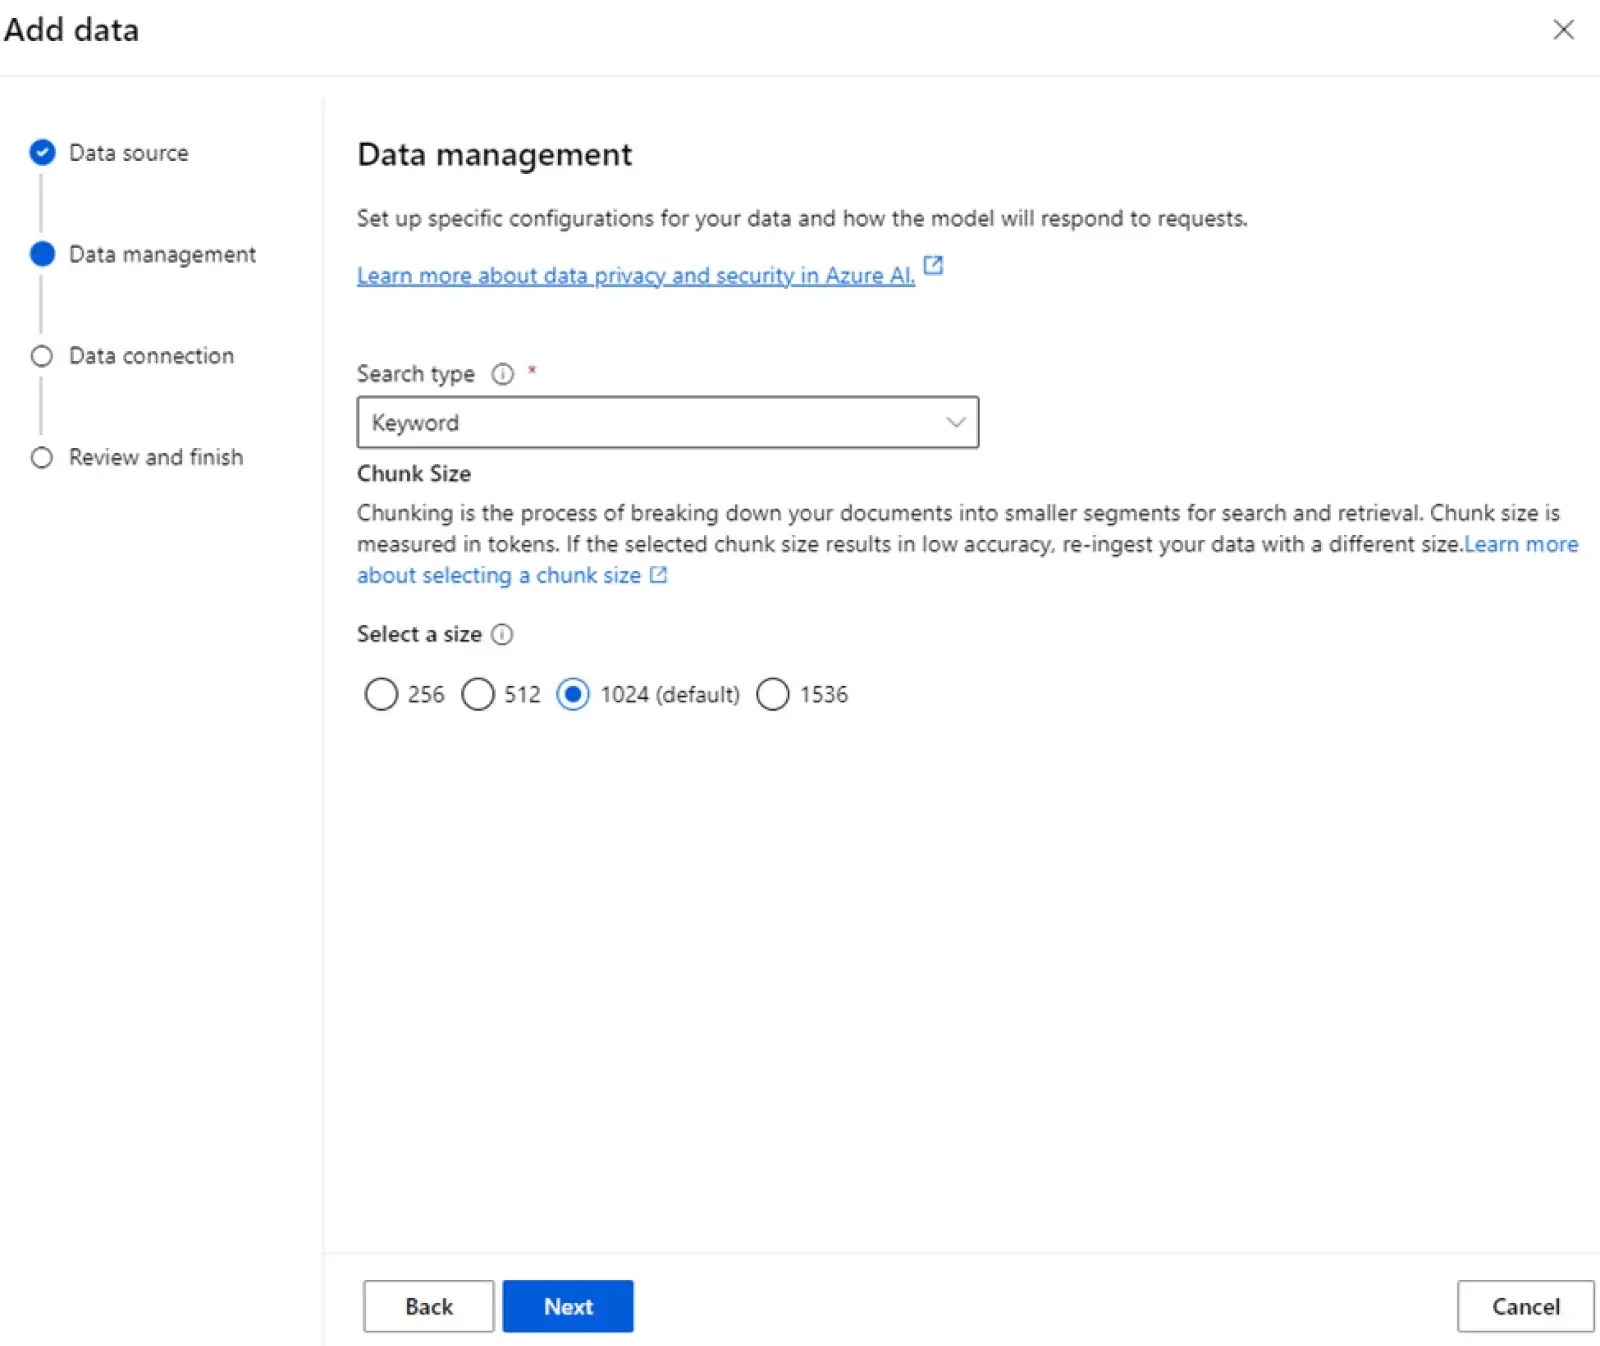
6. After entering the required data, click on the button Next.
7. Choose the API key and click on Next.
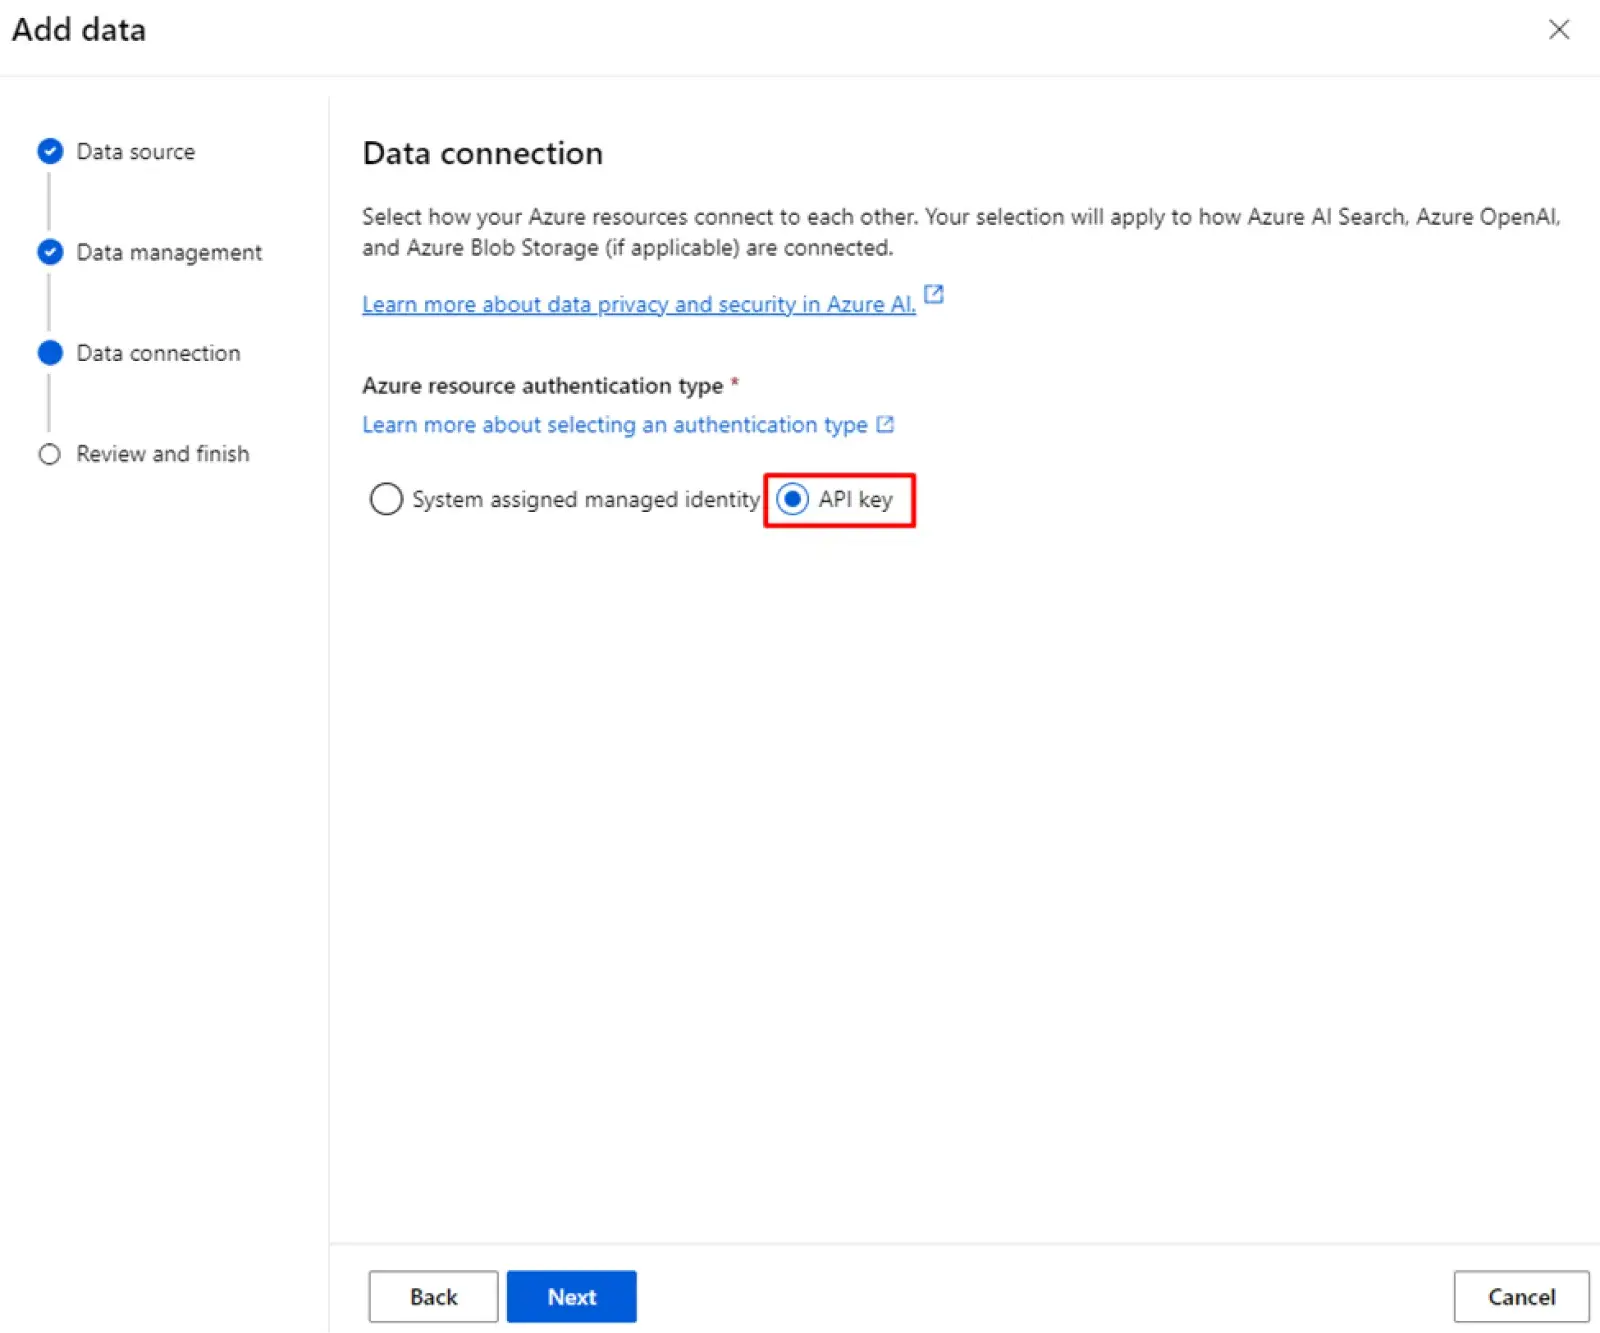
8. Click on Save and close the tab.
Now, wait until your files have been indexed. After that, you can use your data for the GPT-4o model.
! Note. If, after setting up, you still see the button Add a data source,
then do the following:
1. Click on the button Add a data source and fill in the data:
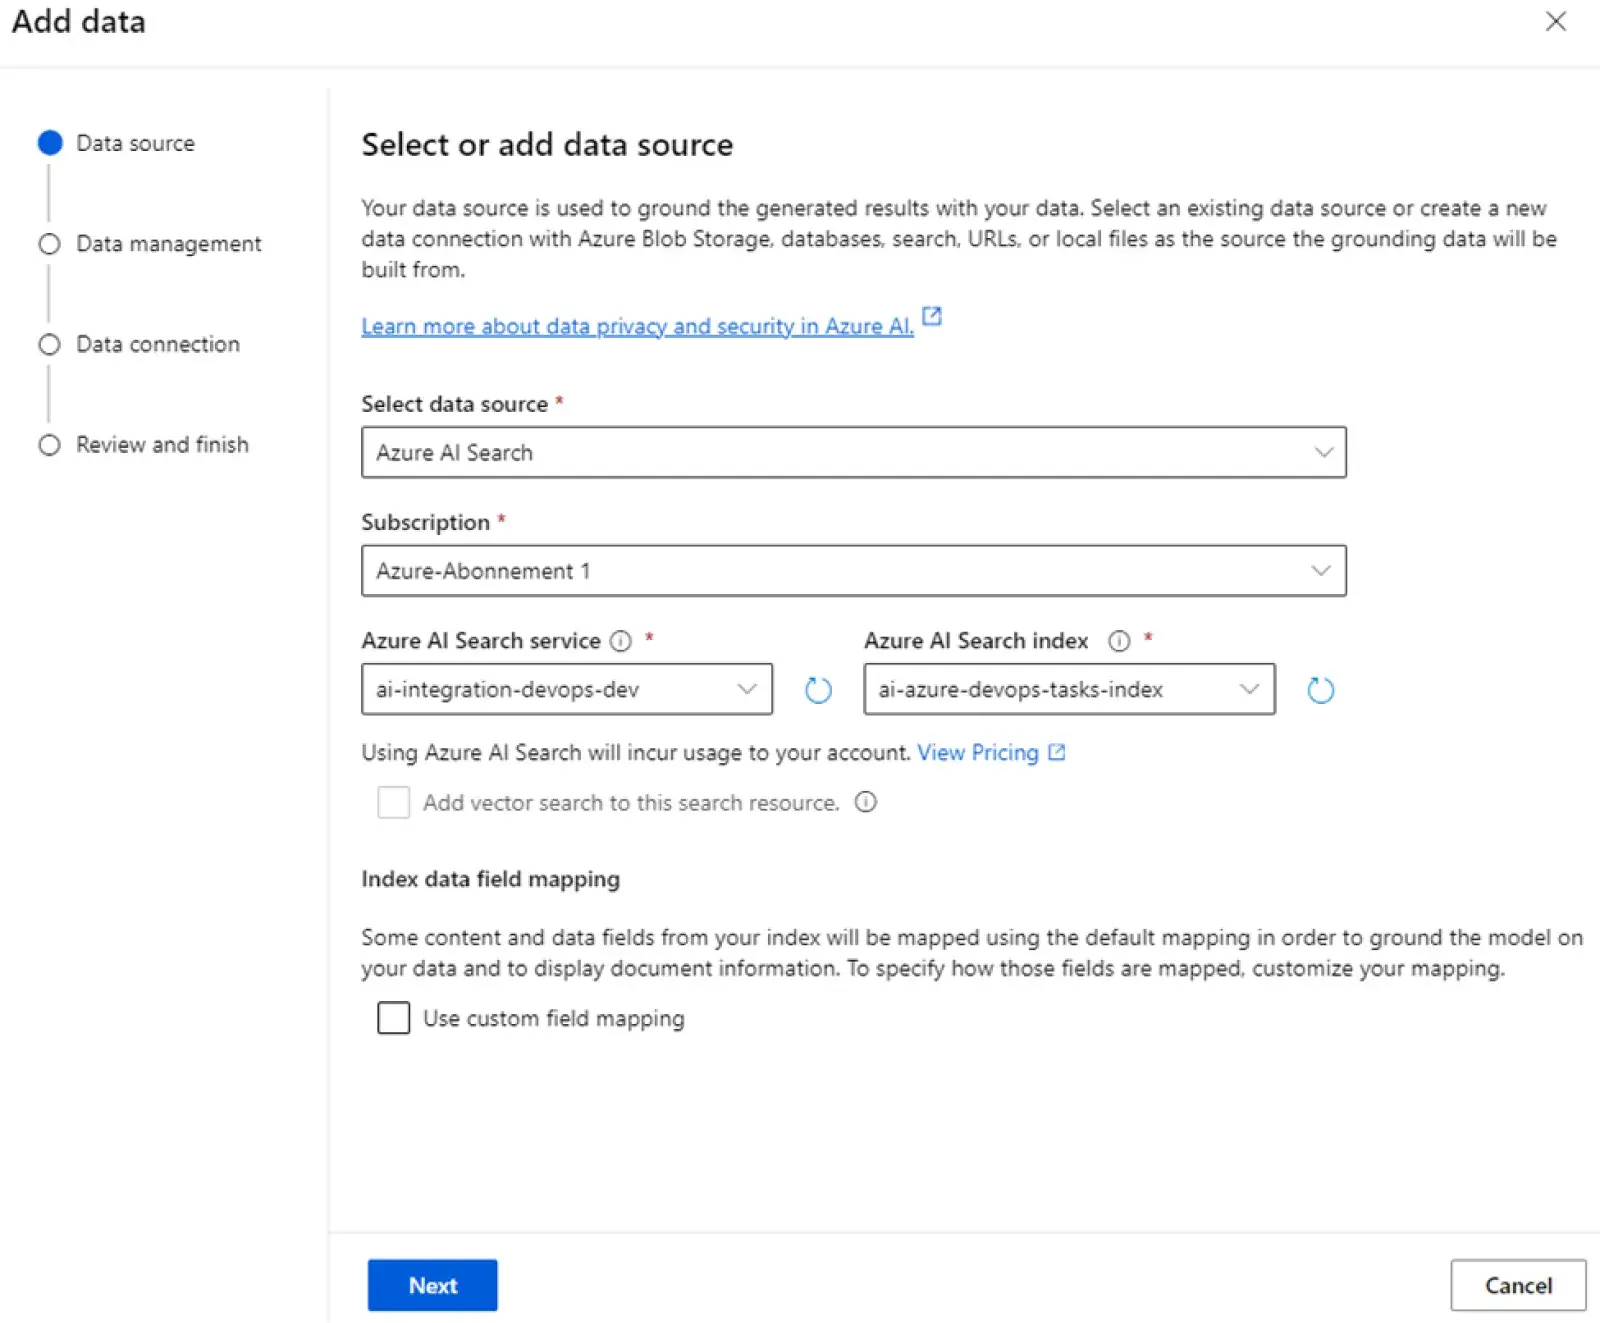
• ai-integration-devops-dev – the created by you Azure AI Search
• ai-azure-devops-tasks-index – the created by you Index
2. Press the button Next.
3. Choose the API key and click on the button Next again.
4. Click on Save and close the tab.
As a result, you will see this window:
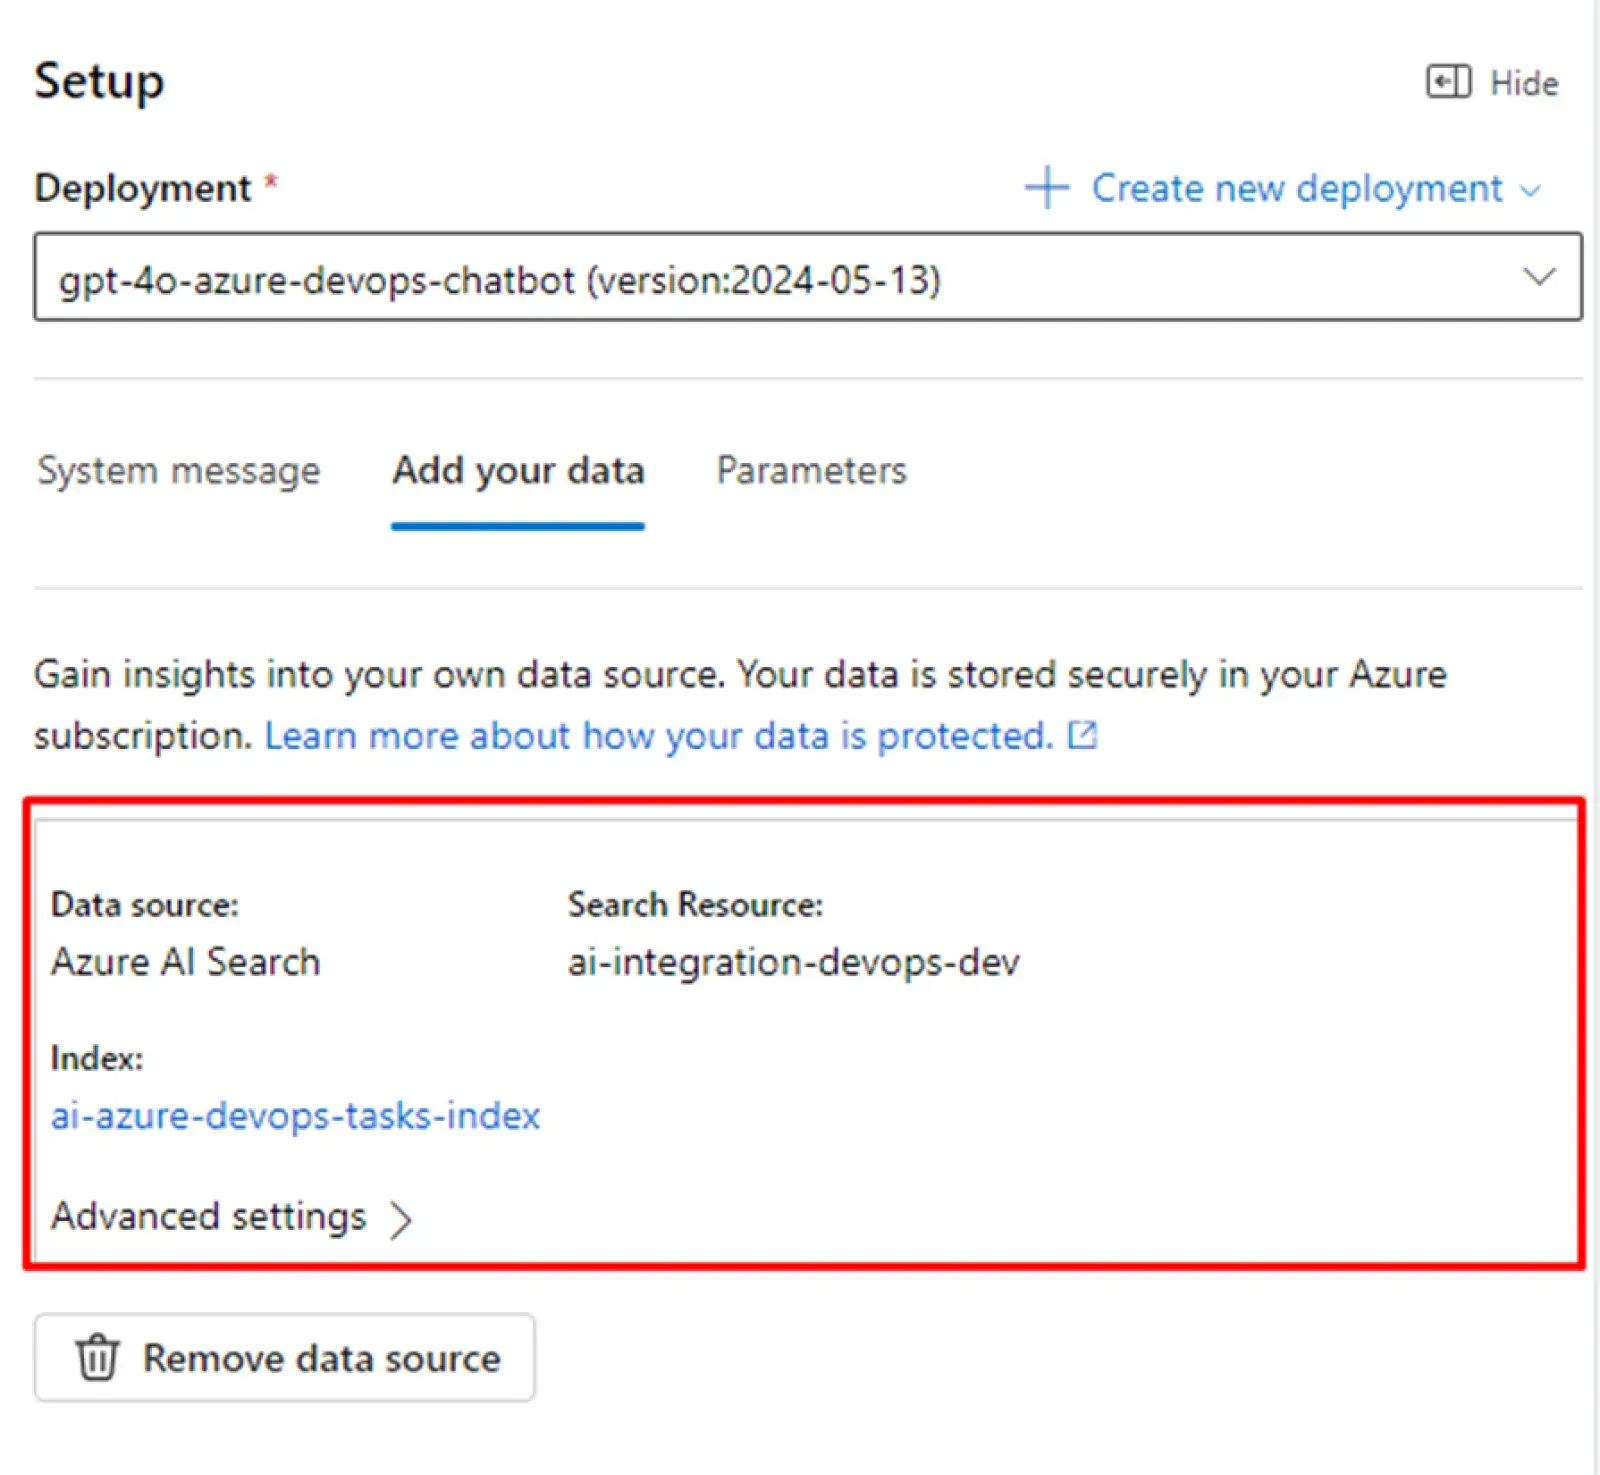
Now, you can use your chatbot.
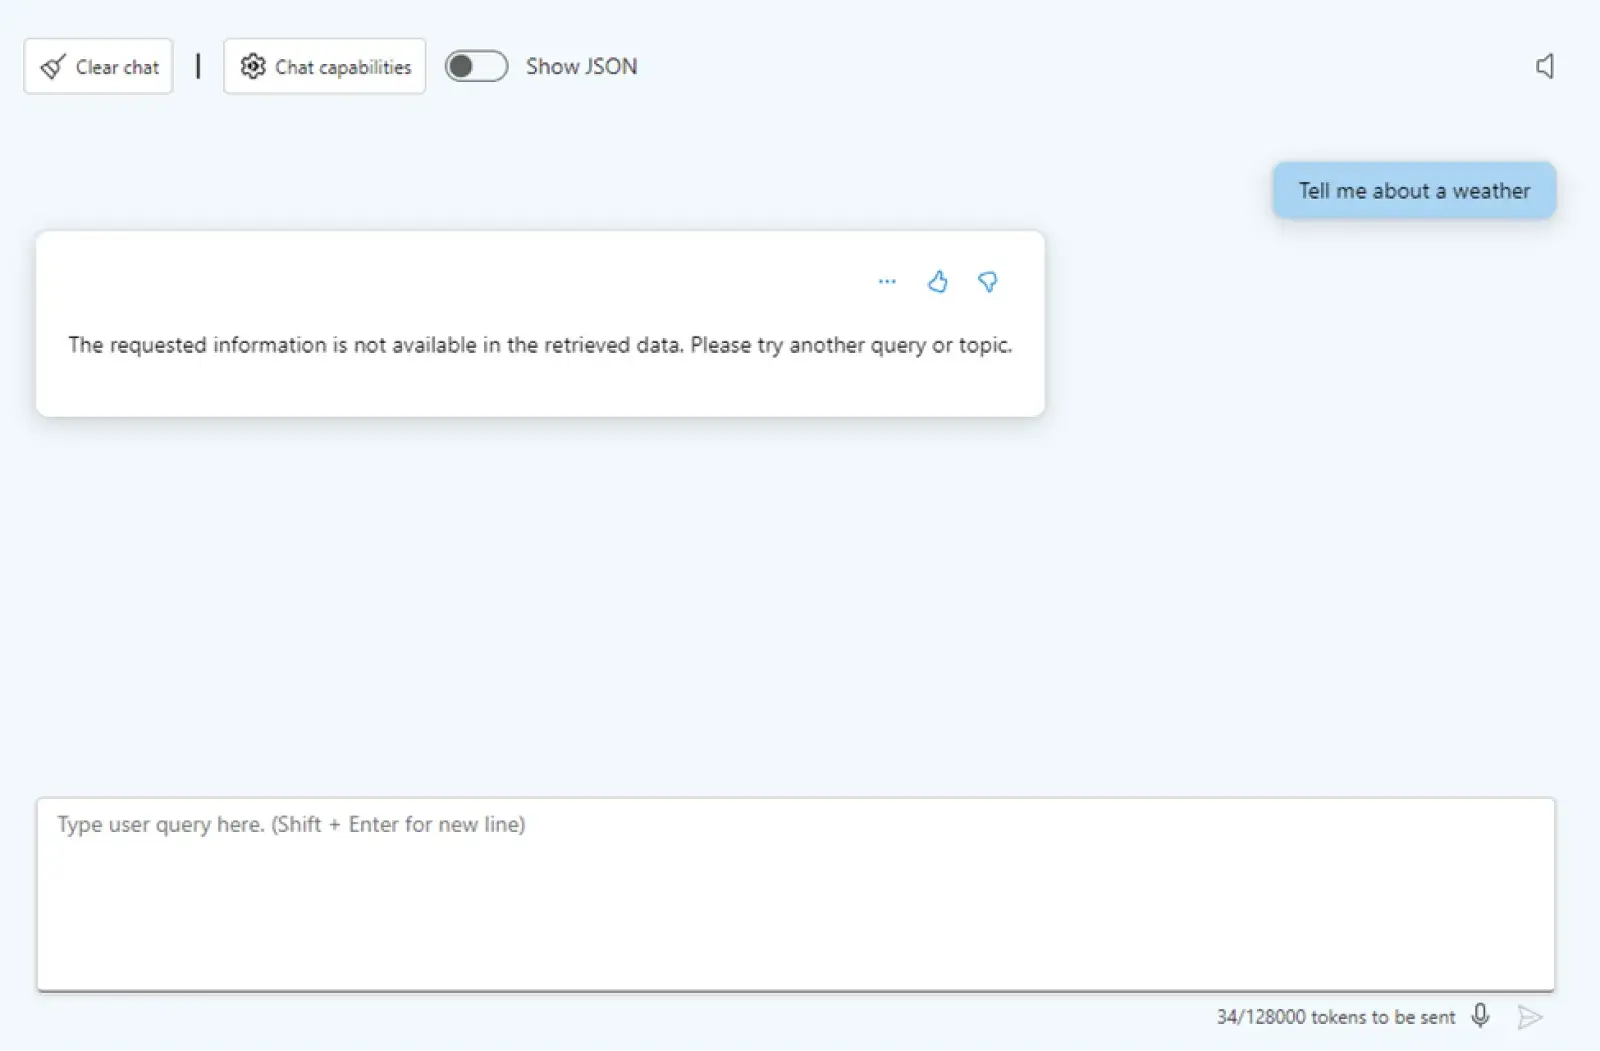
! Note. If you request information that you do not have in your database, for instance, about the weather, you will get a response that such data is not available:
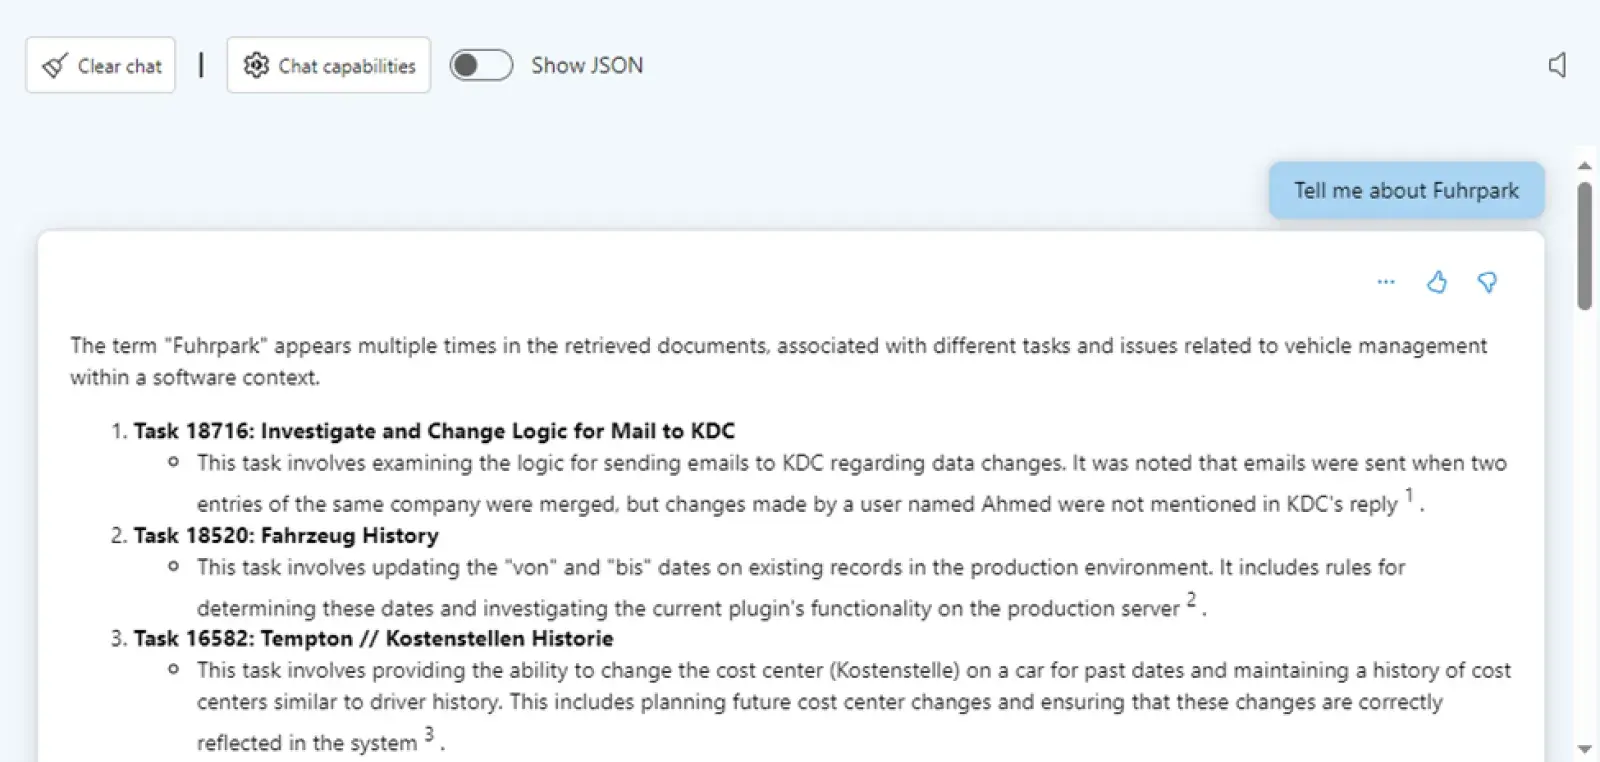
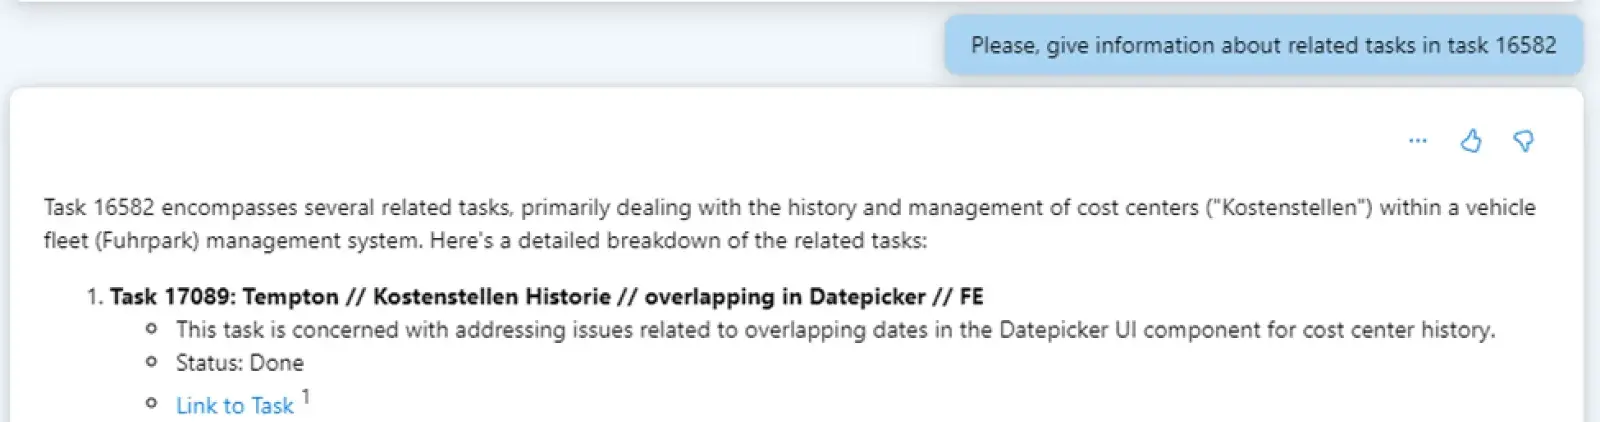
If you request some relevant information, you will get a particular answer:
Summary
So, by following the above instructions step by step, you will achieve your goal by creating a chatbot that your employees can use in the Azure AI Studio to search for information about tasks in the Azure DevOps. This will help your team see the whole picture of a specific epic or the relationship between different tasks and functionality.