
Introduction
The previous article, Azure Open AI Chatbot Integration with Azure DevOps, looked at building an assistant using Azure OpenAI Studio, which helps you find information in an extensive knowledge base using the RAG method. Despite the fact that this assistant is a complete application by itself, the development of which did not even require writing a code, it has one significant limitation: its users do not have the ability to add or edit documents in the Assistant’s Knowledge Base, only the Azure Portal system administrator can do this action.
This article will address this issue and demonstrate how you can customize an automatically generated assistant app from Azure AI Studio.
Assistant Project Preparation
To work with a wizard project, you need the following prerequisites:
- Python 3.11
- Node.js
- Visual Studio Code
To get started, you have to generate an assistant in Azure OpenAI Studio. The instructions for creating an assistant are described in Azure Open AI Chatbot Integration with Azure DevOps, so we will not drill down on this process in detail here, but just note that after completing all the steps specified in the article, you will have a new web application in the Azure Portal, which is responsible for the created assistant’s work.
If you open this application's properties in the External Repository Project parameter, you will find a link to a GitHub repository with a project template from which Azure OpenAI Studio generates new applications.
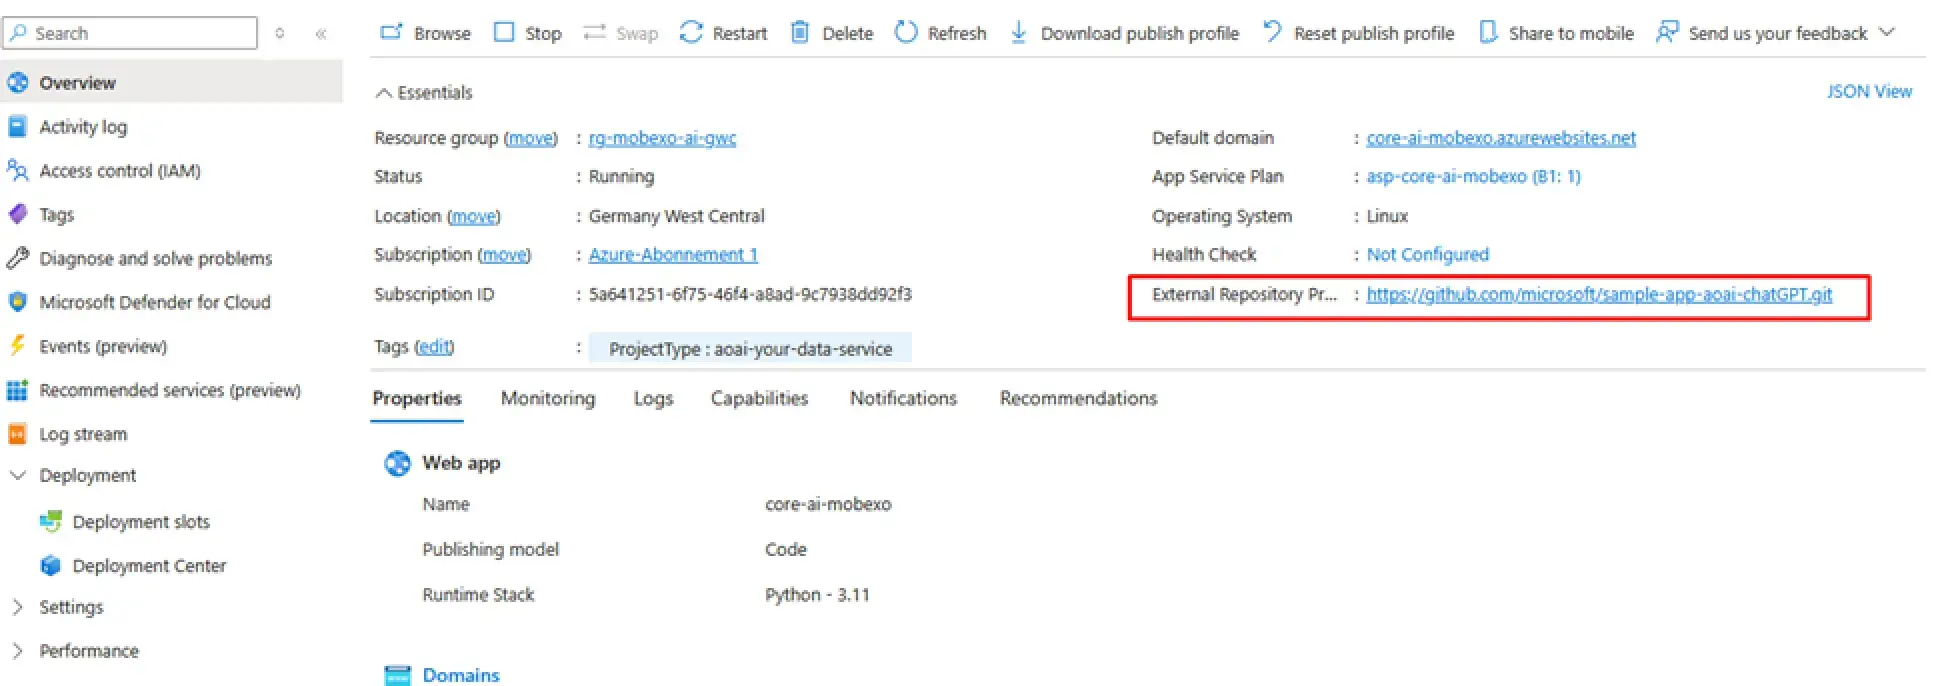
! Note. You need to clone this repository to your computer, and then we can start customizing it.
Initial Project Setup
In the project folder, you have to have a file called .env.sample. If you open it, you will see a list of the environment variables required to run the project. Copy it under the name.env, and go back to the portal -> to the application -> to the Settings/Environment Variables section:
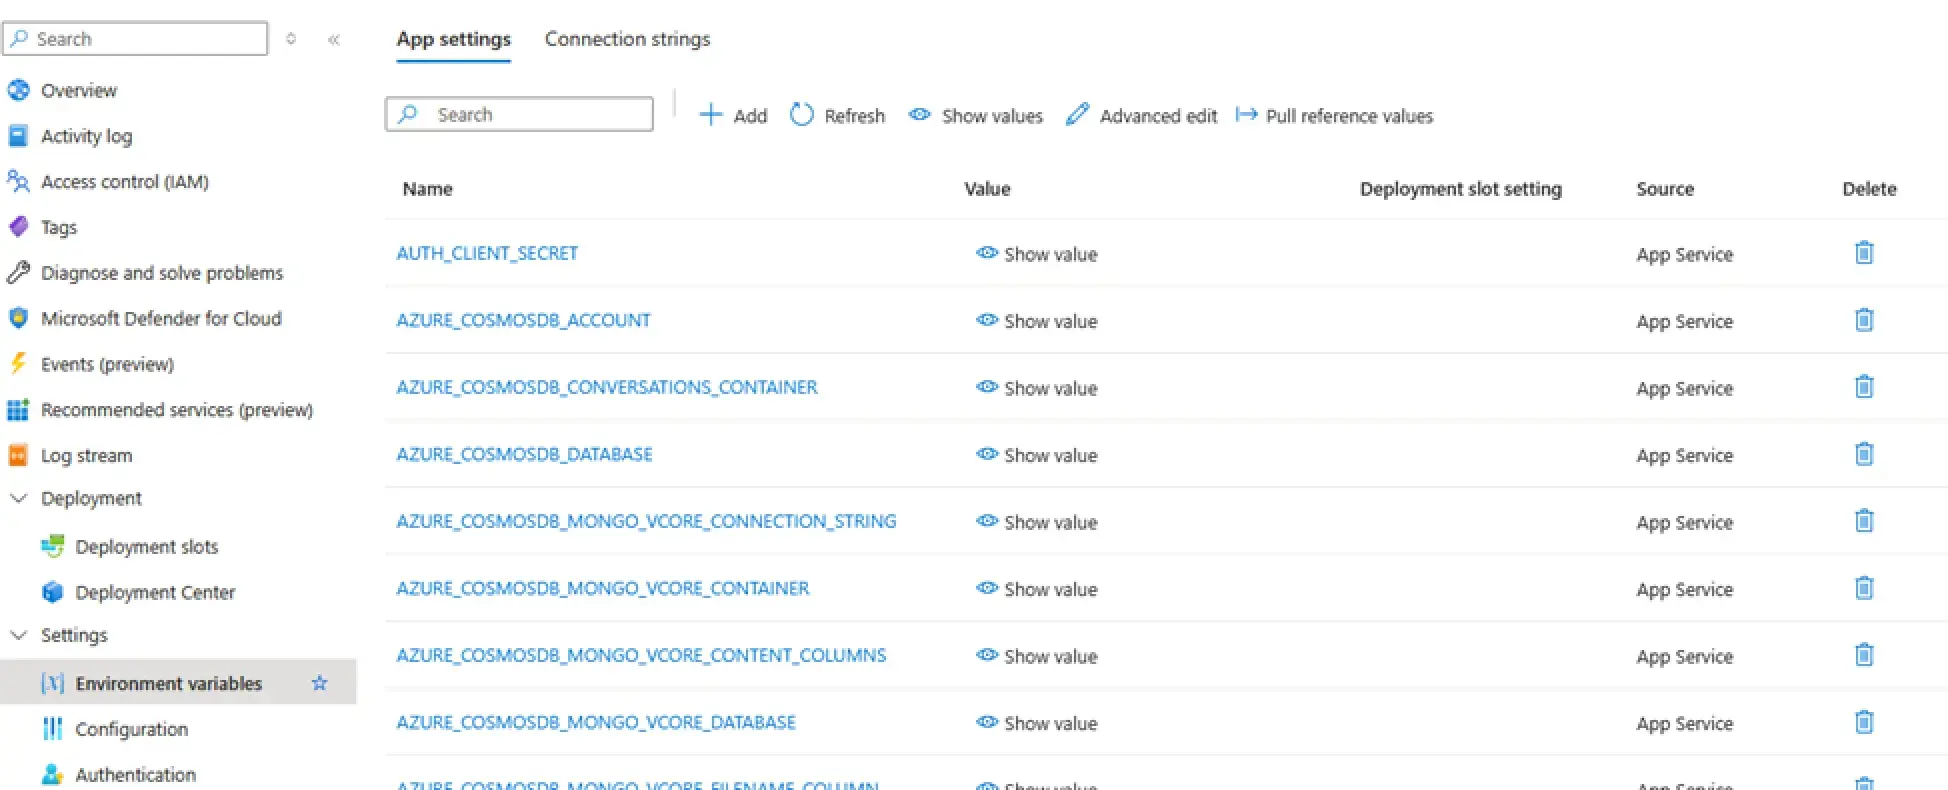
The variables listed here are the same as in the .env file, but some of them are initialized with the values necessary for the project to work. Accordingly, you need to copy these values into the .env file so that the local project on your machine works with the same resources as the application deployed in the cloud.
After that, run the start.bat file. This script first installs the Python packages required for the application's backend, then uses npm to install all the packages for the frontend, builds the frontend, and finally runs the application itself. Make sure that the assistant functions similarly to the version deployed in the cloud, and you can proceed directly to its improvements.
Connecting to Azure Blob Storage
Our assistant's knowledge base is stored in Azure Blob Storage as a document set. Accordingly, to work with it, we need an API that allows us to perform the following operations:
- Get a list of documents from a specified Azure Blob Storage container
- Add files to the container
- Delete the files from the container
In Python, Azure Blob Storage is handled by the azure.storage.blob library, which contains the storage client. Accordingly, we need to add a link to it in our application and import this client:
from azure.storage.blob import BlobServiceClient
! Note. Before using the client, it must be initialized, i.e., at least, you should specify a string for connecting to the storage. Since we will initialize each time any of our three possible storage operations are called, it makes sense to formalize it as a separate function:
def init_storage_client():

if (
        not app_settings.storage.connection_string and
        not app_settings.storage.container
    ):

        raise ValueError(
            "AZURE_STORAGE_CONNECTION_STRING or AZURE_STORAGE_CONTAINER is required"
        )

    blob_service_client  = BlobServiceClient.from_connection_string( app_settings.storage.connection_string)

    return blob_service_client
As you can see, our initialization uses two new environment variables, AZURE_STORAGE_CONNECTION_STRING and AZURE_STORAGE_CONTAINER, which are not in the .env file. Hence, we need to add them to the .env file, specifying the storage connection string and the container's name in which the knowledge base documents are stored. Next, we need to add the values of these variables to the application's global settings object.
! Note. Variables with fields of the settings object are mapped automatically, but you need to create the fields themselves. This process is done in the backend/settings.py file. Create a new class in it for the Azure Blob Storage configuration group:
class _AzureSearchSettings(_BaseAzureSearchSettings):
    model_config = SettingsConfigDict(
        env_prefix="AZURE_SEARCH_",
        env_file=DOTENV_PATH,
        extra="ignore",
        env_ignore_empty=True
    )
Then, add this group to the main settings object:
class _AppSettings(BaseModel):
    base_settings: _BaseSettings = _BaseSettings()
    azure_openai: _AzureOpenAISettings = _AzureOpenAISettings()
    search: _SearchCommonSettings = _SearchCommonSettings()
    storage: _StorageSettings = _StorageSettings()
    msgraph: _MSGraphSettings = _MSGraphSettings()
    ui: Optional[_UiSettings] = _UiSettings()
Now, you can move on to implementing the basic features of Azure Blob Storage. Here is the function to add the files to the storage:
@bp.route('/files', methods=['POST'])
async def upload_file():
    files = await request.files

    file = files['file']

    if file is None:
        return jsonify({"error": "No file part in the request"}), 400

    if file.filename == '':
        return jsonify({"error": "No file selected for uploading"}), 400

    filename = secure_filename(file.filename)
    success = await upload_file_to_blob(file, filename)

    if success:
        return jsonify({"message": "File successfully uploaded"}), 200
    else:
        return jsonify({"error": "Failed to upload file"}), 500

async def upload_file_to_blob(file, filename):
    blob_service_client = init_storage_client()
    blob_client = blob_service_client.get_blob_client( container=app_settings.storage.container, blob=filename)

    try:
        blob_client.upload_blob(file, overwrite=True)
        return True
    except Exception as e:
        print(f"Failed to upload to blob storage: {e}")

return False
Here is the function to delete the files from the storage:
 @bp.route('/files', methods=['DELETE'])
async def delete_file():
    try:
        # Get the blob name from the request
        blob_name = request.args.get('file_name')

        if not blob_name:
            return jsonify({"error": "File name is required"}), 400

        blob_service_client = init_storage_client()

        # Get the container client
        container_client = blob_service_client.get_container_client( app_settings.storage.container)

        blob_client = container_client.get_blob_client(blob_name)

        # Delete the blob
        blob_client.delete_blob()

        update_search_indexer()

        return jsonify({"message": f"File '{blob_name}' deleted successfully"}), 200

    except Exception as e:
        return jsonify({"error": str(e)}), 500
Finally, here is the function to get a list of the files:
@bp.route('/files', methods=['GET'])
async def list_files():
    try:
        blob_service_client = init_storage_client()
        container_client = blob_service_client.get_container_client(app_settings.storage.container)
        # List all blobs in the container
        blob_list = container_client.list_blobs()

        blobs = []

        for blob in blob_list:
            blob_details = {
                'name': blob.name,
                'size': blob.size,
                'last_modified': blob.last_modified.strftime('%Y-%m-%d %H:%M:%S') if blob.last_modified else None
            }
            blobs.append(blob_details)

        # Return the list of blobs as JSON response
        return jsonify({'files': blobs}), 200

    except Exception as e:
        return jsonify({'error': str(e)}), 500
User Interface
Now, we come to the final stage of what all the above was created for: a user interface for managing files.
The frontend of the assistant application has an API wrapper, which serves as an intermediate layer between the forms and the backend. Accordingly, we need to add wrappers to this wrapper for our created functions. It is located in the frontend/src/api/api.ts file:
export async function getDocumentList(): Promise<Document[]> {
  const response = await fetch('/files');
  if (!response.ok) {
    throw new Error('Failed to fetch document list');
  }

  const data = await response.json();
  return data.files as Document[];
}

export async function uploadFile(file: File): Promise<void> {
  const formData = new FormData();
  formData.append('file', file);

  const response = await fetch('/files', {
    method: 'POST',
    body: formData,
  });

  if (!response.ok) {
    const errorData = await response.json();
    throw new Error(errorData.error || 'Failed to upload file');
  }
}

export async function deleteFile(fileName: string): Promise<void> {
  const response = await fetch(`/files?file_name=${encodeURIComponent(fileName)}`, {
    method: 'DELETE',
  });

  if (!response.ok) {
    const errorData = await response.json();
    throw new Error(errorData.error || 'Failed to delete file');
  }
}
Now, add the model describing the knowledge base document to the frontend/src/api/models.ts file:
export type Document = {
  name: string;
  size: number;
  last_modified: string | null;
}
Now, as you have the API features ready-made, all you have to do is create a page to manage the list of the files in the knowledge base and link to it from the app's main page. Here is an example of the code of such a page:
import React, { useEffect, useState, useCallback } from 'react';
import { getDocumentList, uploadFile, deleteFile } from '../../api';
import { Document } from '../../api';
import './Documents.css';

const Documents: React.FC = () => {
  const [documents, setDocuments] = useState<Document[]>([]);
  const [loading, setLoading] = useState<boolean>(true);
  const [error, setError] = useState<string | null>(null);
  const [uploadError, setUploadError] = useState<string | null>(null);
  const [deleteError, setDeleteError] = useState<string | null>(null);

  useEffect(() => {
    const fetchDocuments = async () => {
      try {
        const docs = await getDocumentList();
        setDocuments(docs);
      } catch (err) {
        setError("Error fetching documents");
      } finally {
        setLoading(false);
      }
    };

    fetchDocuments();
  }, []);

  const handleFileUpload = async (file: File) => {
    try {
      await uploadFile(file);
      const docs = await getDocumentList();
      setDocuments(docs);
      setUploadError(null);
    } catch (err) {
      setUploadError("Error uploading file");
    }
  };

  const handleFileInputChange = (event: React.ChangeEvent<HTMLInputElement>) => {
    const files = event.target.files;
    if (files && files.length > 0) {
      handleFileUpload(files[0]);
    }
  };

  const handleDrop = useCallback((event: React.DragEvent<HTMLDivElement>) => {
    event.preventDefault();
    const files = event.dataTransfer.files;
    if (files && files.length > 0) {
      handleFileUpload(files[0]);
    }
  }, []);

  const handleDragOver = useCallback((event: React.DragEvent<HTMLDivElement>) => {
    event.preventDefault();
  }, []);

  const handleDelete = async (fileName: string) => {
    const confirmed = window.confirm(`Are you sure you want to delete the file "${fileName}"?`);
    if (!confirmed) return;

    try {
      await deleteFile(fileName);
      const docs = await getDocumentList();
      setDocuments(docs);
      setDeleteError(null);
    } catch (err) {
      setDeleteError("Error deleting file");
    }
  };

  if (loading) return (
    <div className="container">
        <div className="documentsContainer">
          <div className="spinner"></div>
        </div>
    </div>
  );
  if (error) return <div className="documentsError">Error: {error}</div>;

  return (
    <div className="container">
        <div className="documentsContainer">
        <h1 className="documentsHeader">Documents</h1>
        {uploadError && <div className="documentsError">{uploadError}</div>}
        {deleteError && <div className="documentsError">{deleteError}</div>}
        <input type="file" onChange={handleFileInputChange} name="file" className="fileInput" />
        <div
            onDrop={handleDrop}
            onDragOver={handleDragOver}
            className="dropZone"
        >
            Drag and drop files here
        </div>
        <ul className="documentsList">
            {documents.map(doc => (
            <li key={doc.name} className="documentsListItem">
                <div>
                <strong className="documentName">{doc.name}</strong>
                <span className="documentDetails">- {doc.size} bytes - Last modified: {doc.last_modified || 'N/A'}</span>
                </div>
                <button onClick={() => handleDelete(doc.name)} className="deleteButton">Delete</button>
            </li>
            ))}
        </ul>
        </div>
    </div>
  );
};

export default Documents;
Updating the Search Index
There is one more small step left that will complete our application. As mentioned in the previous article, our application is built on the RAG architecture, i.e., the data for the AI assistant is provided by a search engine that indexes the knowledge base. This means the search engine's indexer needs to know when we have made changes in the knowledge base and trigger a search index update after the new documents are added or deleted.
To do this, you first need to know the name of your indexer. You can see this in the Azure Search Service settings you have created when generating the assistant. Once you find an indexer in this list that matches your knowledge base index, specify it in the application settings in the variable AZURE_STORAGE_INDEXER.
Now, add a function to your application code that runs this indexer:
def update_search_indexer():
    endpoint = f"https://{app_settings.datasource.service}.search.windows.net"
    credential = AzureKeyCredential(app_settings.datasource.key)
    client = SearchIndexerClient(endpoint, credential)

    # Run the existing indexer
    client.run_indexer(app_settings.storage.indexer)

    # Check the indexer status
    status = client.get_indexer_status(app_settings.storage.indexer)
    print(f"Indexer status: {status.status}")
Finally, ensure that it is called after successfully adding or removing a file.
Conclusion
Your Python assistant generated in Azure AI Studio can now upload documents to its knowledge base stored in Azure Blob Storage. This functionality allows users to easily add new data and expand the assistant's capabilities, making it more informative and useful.